Resetting a cluster that has lost consensus
Resetting the cluster configuration allows you to recover a cluster that has lost consensus. If the cluster regains consensus after connectivity is restored, the primary will return to Read-Write mode and password and SSH key check and change will be reenabled. However, if it does not regain consensus, the Appliance Administrator must perform a cluster reset to force-remove nodes from the cluster.
If you are concerned about network issues, reset the cluster with only the new primary appliance. Once the cluster reset operation is complete, enroll appliances one by one to create a new cluster.
|

|
Caution: Resetting a cluster should be your last resort. It is recommended that you restore from a backup rather than reset a cluster. |
Cautions
To avoid issues, consider the following cautions.
- Only reset the cluster if you are certain that consensus has been lost; otherwise, you could introduce a split-brain scenario. (Split-brain scenario is where a cluster gets divided into smaller clusters. Each of these smaller clusters believes it is the only active cluster and may then access the same data which could lead to data corruption.)
- Ensure that no cluster member has Offline Workflow Mode enabled. For more information, see Offline Workflow (automatic).
To reset a cluster
- Go to Cluster:
 web client: Navigate to
  Cluster | Cluster Management.
 desktop client: Navigate to Administrative Tools | Settings and select Cluster.
-
Click the  Reset Cluster button.
The Reset Cluster dialog displays, listing the appliances (primary and replicas) in the cluster.
-
In the Reset Cluster dialog, select the nodes to be included in the reset operation and use the Set Primary button to designate the primary appliance in the cluster.
NOTE: Nodes must have an appliance state of Online or Online Read-only and be able to communicate to be included in the reset operation. If you select a node that is not online or not available, you will get an error and the reset operation will fail.
- Click Reset Cluster.
-
In the confirmation dialog, enter the words Reset Cluster and click OK.
When connected to the new primary appliance, the Configuring Safeguard for Privileged Passwords Appliance progress page displays, showing the steps being performed as part of the maintenance task to reset the cluster.
- Once the maintenance tasks have completed, click Restart.
- If an appliance is cluster reset as a standalone appliance, it will be placed in StandaloneReadonly mode (not online) and will require activation to avoid a split-brain scenario. For more information, see Activating a read-only appliance.
Once reset, the cluster only contains the appliances that were included in the reset operation.
Performing a factory reset
As an Appliance Administrator, you can use the Factory Reset feature to reset a Safeguard for Privileged Passwords Appliance to recover from major problems or to clear the data and configuration settings on the appliance. A factory reset of a physical appliance may be initiated from:
- The Settings | Appliance page in the desktop client or web client
- The Recovery Kiosk
- The virtual appliance Support Kiosk
- Using the API
A Safeguard for Privileged Passwords virtual appliance is reset by the recovery steps to redeploy and not a factory reset. For more information, see Virtual appliance backup and recovery.
|
|
Caution: Care should be taken when performing a factory reset against a physical appliance, because this operation removes all data and audit history, returning it to its original state when it first came from the factory. Performing a factory reset will NOT reset the BMC/IPMI interface or the IP address. However, the BMC/IPMI interface will need to be reenabled after the reset has completed (for more information, see Lights Out Management (BMC)).The appliance must go through configuration again as if it had just come from the factory. For more information, see Setting up Safeguard for Privileged Passwords for the first time.
In addition, performing a factory reset may change the default SSL certificate and default SSH host key.
The appliance resets to the current Long Term Support (LTS) version. For example, if you are using version 6.6 (feature release) or 6.0.6 LTS (maintenance Long Term Support release) and then factory reset, you appliance will reset down to 6.0 LTS and you will have to patch up to your current version. For more information, see Long Term Support (LTS) and Feature Releases. |
Factory reset on a clustered appliance
Performing a factory reset on a clustered hardware appliance will not automatically remove the appliance from a cluster. The recommended best practice is to unjoin an appliance from the cluster before performing a factory reset on the appliance. After the unjoin and factory reset, the appliance must be configured again. For more information, see Setting up Safeguard for Privileged Passwords for the first time.
To perform a factory reset
- Go to Factory Reset on hardware (not virtual machine):
- desktop client: Navigate to Administrative Tools | Settings | Appliance | Factory Reset.
- Click Factory Reset.
-
In the Factory Reset confirmation dialog, enter the words Factory Reset and click OK.
The appliance will go into Maintenance mode to revert the appliance. Once completed, you will be prompted to restart the desktop client. If the appliance was in a cluster, you may need to unjoin the factory reset appliance. The factory reset appliance must be configured again. For more information, see Setting up Safeguard for Privileged Passwords for the first time. In addition, when you log in to the appliance, you will be prompted to add your Safeguard for Privileged Passwords licenses.
To perform a factory reset from the Recovery Kiosk
|
|
CAUTION: As part of the factory reset process, you will be performing a challenge response operation. To avoid invalidating the challenge response, do NOT navigate away from the page or refresh.
If the challenge response operation is invalidated, try restarting the process to generate a new challenge response. If that fails, contact One Identity Support for assistance. |
- To perform a hardware factory reset, go to the Recovery Kiosk. For more information, see Recovery Kiosk (Serial Kiosk).
-
Select Factory Reset.
-
Press the right arrow.
-
At id, enter your email or name and press the Tab key (or down arrow).
-
At Get Challenge, press the Enter key. Safeguard for Privileged Passwords produces a challenge. (If the challenge is not shown, maximize Putty.)
-
Copy and paste the challenge into a text document and send it to One Identity Support. A challenge response is only good for 48 hours.
Do not navigate away from the page or refresh during a challenge response operation. Doing so will invalidate the challenge response and you will need to restart the process.
- When you get the response from One Identity Support, copy and paste the response into the kiosk screen and select Factory Reset. The response is only valid for 24 hours from when it was generated by One Identity.
-
Once the factory reset is completed the appliance will need to be reconfigured.
See the following Knowledge Base Article for details on using the MGMT network interface for factory reset: KB 232766: What are the steps to perform a factory reset from the recovery kiosk or MGMT network interface on physical devices?
To perform a factory reset from the Support Kiosk
|
|
CAUTION: As part of the factory reset process, you will be performing a challenge response operation. To avoid invalidating the challenge response, do NOT navigate away from the page or refresh.
If the challenge response operation is invalidated, try restarting the process to generate a new challenge response. If that fails, contact One Identity Support for assistance. |
- To perform a hardware factory reset, on the web management console, click
 Support Kiosk. For more information, see Support Kiosk.
- Select Factory Reset. (This option is not available if you are attached to the console of a virtual machine. The options is only available for hardware.)
-
Complete the challenge/response process:
- In Full Name or Email, enter your name or email to receive the challenge question.
- Click Get Challenge.
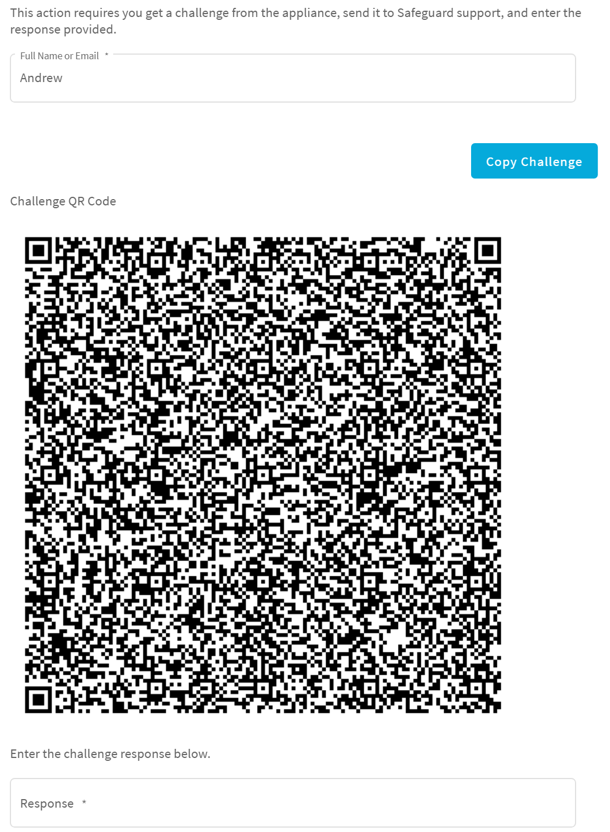
- To get the challenge response, perform one of the following (see the illustration that follows).
- Click Copy Challenge. The challenge is copied to the clipboard. Send that challenge to Safeguard support. Support will send back a challenge response that is good for 48 hours. Do not refresh your screen.
-
Screenshot the QR code and send it to Support. Support will send back a challenge response that is good for 48 hours.
Do not navigate away from the page or refresh during a challenge response operation. Doing so will invalidate the challenge response and you will need to restart the process.
- When you get the response from One Identity Support, copy and paste the response into the kiosk screen and select Factory Reset.
Unlocking a locked cluster
In order to maintain consistency and stability, only one cluster operation can run at a time. To ensure this, Safeguard for Privileged Passwords locks the cluster while a cluster operation is running, such as enroll, unjoin, failover, patch, reset, session module join, update IP, and audit log maintenance. While the cluster is locked, changes to the cluster configuration are not allowed until the operation completes.
The lock notification displays as follows:
- web client: The Appliance State will show a red lock icon (
 ).
).
- desktop client: In the Cluster view, the banner that appears at the top of the screen explains the operation in progress and a red lock icon () next to an appliance indicates that the appliance is locking the cluster.
You should never cancel the cluster lock for an SPP unjoin, failover, cluster reset, restore, patch, or IP address update. Other considerations:
- If a SPP join (enroll) is taking a long time, you may cancel it during the streaming audit data step.
- If a patch distribution is taking a long time, you may cancel it and upload the patch to the replicas directly.
- If an audit log synchronize operation is taking a long time, or you have reason to believe it will not complete due to a down appliance in the cluster, you may cancel it. Canceling this operation requires monitoring as detailed in Cancel Audit Log Maintenance from the Audit Log Maintenance page.
-
If an audit log archive or purge operation is taking a long time, or you have reason to believe it will not complete due to a down appliance in the cluster, you may cancel it. Canceling this operation requires monitoring as detailed in Cancel Audit Log Maintenance from the Audit Log Maintenance page.
To unlock a locked cluster
- Go to Cluster Management:
- web client: Navigate to Cluster | Cluster Management.
- desktop client: Navigate to Administrative Tools | Settings | Cluster | Cluster Management.
- Click the lock icon in the upper right corner of the warning banner.
-
In the Unlock Cluster confirmation dialog, enter Unlock Cluster and click OK.
This will release the cluster lock that was placed on all of the appliances in the cluster and close the operation.
IMPORTANT: Care should be taken when unlocking a locked cluster. It should only be used when you are sure that one or more appliances in the cluster are offline and will not finish the current operation. If you force the cluster unlock, you may cause instability on an appliance, requiring a factory reset and possibly the need to rebuild the cluster. If you are unsure about the operation in progress, do NOT unlock the cluster.
Troubleshooting tips
If there is a problem with a Safeguard for Privileged Passwords cluster, follow these guidelines:
- Ensure that the hardware is powered on and online.
- Check for networking problems. For more information, see Diagnosing a cluster member.
- Check the events in the Activity Center as all cluster operations are logged. Errors and warnings may resolve on their own. If an error persists for more than 15 minutes, it probably won't resolve itself. Try restarting the appliance to see if the error or warning clears.
- Contact One Identity Support: