
You can run an entitlement report.
To run an entitlement report
- From the Safeguard for Privileged Passwords desktop Home page, select
Reports.
- In the first drop-down, choose a type of report: User, Asset, or Account.
- In the second drop-down, you can select All or you can select Browse to select one or more objects for the report. If you select multiple objects, the selected objects display in the center of the page. Click a selected object to display the object's information at the bottom of the page.
-
The top of the report displays the following information.
User:
- Name: The name of the user.
- Username: The user name used for authentication.
- Domain name: The name of the domain of the user.
-
Accounts: Number of accounts each user is allowed to access.
If an access request policy allows password access to linked accounts, an account may display twice: once based on the policy scope and a second time because it is a linked account. In the bottom grid, see the From Linked Account column. For more information, see Access Config tab (create access request policy desktop client).
Asset:
- Name: The name of the asset.
- Accounts: Number of accounts on this asset that can be accessed.
- Requesters: Number of users allowed to request access to the asset's accounts.
- Partition: The name of the partition to which the asset belongs.
- Users: The name of the requesters allowed to request access.
Account:
- Name: Name of the account.
- Asset: Name of the asset associated with the account.
- Domain Name: If applicable, the domain of the account.
- Requesters: Number of requesters allowed to access an account.
- Select an item from the top pane to view additional detail in the lower pane.
For entitlements by assets, you can continue to drill down into the details of an item. For example, you can view both the Total Accounts tab and the People tab to see more details about the users that can request the accounts on an asset. Select an item from the results to drill down further into the details about the users and the accounts.
- To filter the results, use the filter control in the column heading. For more information, see Filtering report results.
To export the report
-
To export, select
Export and then select Export as CSV or Export as JSON. Save the file to the location desired. Different information may be returned based on whether you select CSV or JSON. For example, JSON includes details of accounts discovered and CSV includes only the count of accounts.
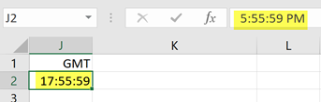
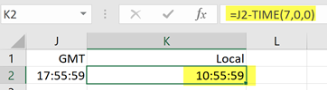
- The time is set according to the user time zone. You can convert timestamps another time, if necessary. Once the report is exported, you can convert time stamps to local time, if necessary. For more information, see Converting time stamps.
To run the report
Click the Run button to generate the report.
 Administrative Tools allow you to add all the objects you need to write access request policies, such as users, accounts, and assets. From this view, you can also configure all of the