Chat now with support
Chat with Support

Active Roles 8.0 LTS - Synchronization Service Administration Guide

Synchronization Service Overview Deploying Synchronization Service Getting started Connections to external data systems
External data systems supported with built-in connectors
Working with Active Directory Working with an AD LDS (ADAM) instance Working with Skype for Business Server Working with Oracle Working with Exchange Server Working with Active Roles Working with One Identity Manager Working with a delimited text file Working with Microsoft SQL Server Working with Micro Focus NetIQ Directory Working with Salesforce Working with ServiceNow Working with Oracle Unified Directory Working with an LDAP directory service Working with IBM DB2 Working with IBM AS/400 Working with an OpenLDAP directory service Working with IBM RACF connector Working with MySQL database Working with an OLE DB-compliant relational database Working with SharePoint Configuring data synchronization with the Office 365 Connector
Creating a Microsoft 365 connection Viewing or modifying a Microsoft 365 connection Microsoft 365 data supported for data synchronization
ClientPolicy object attributes supported for Microsoft 365 data synchronization ConferencingPolicy object attributes supported for Microsoft 365 data synchronization Contact object attributes supported for Microsoft 365 data synchronization DistributionGroup object attributes supported for Microsoft 365 data synchronization Domain object attributes supported for Microsoft 365 data synchronization DynamicDistributionGroup object attributes supported for Microsoft 365 data synchronization ExternalAccessPolicy object attributes supported for Microsoft 365 data synchronization HostedVoicemailPolicy object attributes supported for Microsoft 365 data synchronization LicensePlanService object attributes supported for Microsoft 365 data synchronization Mailbox object attributes supported for Microsoft 365 data synchronization MailUser object attributes supported for Microsoft 365 data synchronization PresencePolicy object attributes supported for Microsoft 365 data synchronization SecurityGroup object attributes supported for Microsoft 365 data synchronization SPOSite object attributes supported for Microsoft 365 data synchronization SPOSiteGroup object attributes supported for Microsoft 365 data synchronization SPOWebTemplate object attributes supported for Microsoft 365 data synchronization SPOTenant object attributes supported for Microsoft 365 data synchronization User object attributes supported for Microsoft 365 data synchronization VoicePolicy object attributes supported for Microsoft 365 data synchronization Microsoft 365 Group attributes supported for Microsoft 365 data synchronization Changing the display names of synchronized Microsoft 365 licenses and services
Objects and attributes specific to Microsoft 365 services How the Office 365 Connector works with data
Configuring data synchronization with the Microsoft Azure AD Connector Configuring data synchronization with the SCIM Connector Configuring data synchronization with the Generic SCIM Connector
Using connectors installed remotely Creating a connection Renaming a connection Deleting a connection Modifying synchronization scope for a connection Using connection handlers Specifying password synchronization settings for a connection
Synchronizing identity data Mapping objects Automated password synchronization Synchronization history Scenarios of use
About scenarios Scenario 1: Create users from a .csv file to an Active Directory domain Scenario 2: Use a .csv file to update user accounts in an Active Directory domain Scenario 3: Synchronizing data between One Identity Manager Custom Target Systems and an Active Directory domain Scenario 4: Deprovisioning between One Identity Manager Custom Target Systems and an Active Directory domain Scenario 5: Provisioning of Groups between One Identity Manager Custom Target Systems and an Active Directory domain Scenario 6: Enabling Delta Sync mode between One Identity Manager Custom Target Systems and an Active Directory domain Example of using the Generic SCIM Connector for data synchronization
Appendix A: Developing PowerShell scripts for attribute synchronization rules Appendix B: Using a PowerShell script to transform passwords

Managing outgoing mail profiles

To create, edit, or delete an outgoing mail profile, in the Synchronization Service Administration Console, click the Settings menu in the upper right corner, and then click the Mail Profiles. Then, follow the appropriate procedure below.

To create a profile

  1. Click the Add button below the list of profiles, and then specify the settings you want to use. For the descriptions of the settings you can specify, see Outgoing mail profile settings.
  2. When you are finished, click OK.

To edit a profile

  1. In the list, select the outgoing mail profile you want to edit.
  2. Click the Edit button below the list of profiles, and then specify the settings you want to use. For the description of the settings you can specify, see Outgoing mail profile settings.
  3. When you are finished, click OK.

To delete a profile

  1. In the list, select the outgoing mail profile you want to delete.
  2. Click the Delete button below the list of profiles.

Outgoing mail profile settings

In each outgoing mail profile, you can use the following settings:

  • Profile name. Type a descriptive name with which you want to identify the profile.
  • Outgoing SMTP server. Type the fully qualified domain name of the SMTP mail server you want to use for sending notification emails.
  • This server requires an encrypted connection (SSL). Select this check box if the specified mail server requires an encrypted connection.
  • This server requires authentication. Select this check box if the specified mail server requires authentication, and then type the user name and password with which you want to access the server.
  • Sender email address. Type the email address you want to use as the originating address in the notification emails.
  • Sender name. Type the sender name you want to display in the From field to the recipients of the notification emails.


Mapping objects

About mapping objects

Object mapping allows you to establish one-to-one relationships between objects in two connected data systems. By using object mapping, you can determine what objects will participate in data synchronization operations you run between these two data systems.

Synchronization Service maps objects automatically when running the creating steps of a sync workflow. In this case, one-to-one relationship is automatically established between source objects and their counterparts created in the target connected system during the creation operation. In some cases, however, you may need to manually map objects. For example, you should configure object mapping before running a sync workflow that includes updating or deprovisioning steps. By doing so, you provide Synchronization Service with the information on which objects need to be updated or deprovisioned in the target data system.

To map objects, you can use mapping pairs and mapping rules. A mapping pair allows you to establish a relationship between a certain object type in one connected system and its counterpart in the other connected system. A mapping rule allows you to define the scope of conditions where the objects belonging to the object types specified in a particular mapping pair will be mapped. For a mapping pair you can create multiple mapping rules, each defining a specific mapping condition. In order your mapping rules take effect, you need to run them. After you run a mapping rule, Synchronization Service reads data in the connected data systems for which the rule is configured, and then maps the objects that meet the conditions specified in the mapping rule.

The following example shows how a mapping rule works:

Figure 14: Object mapping

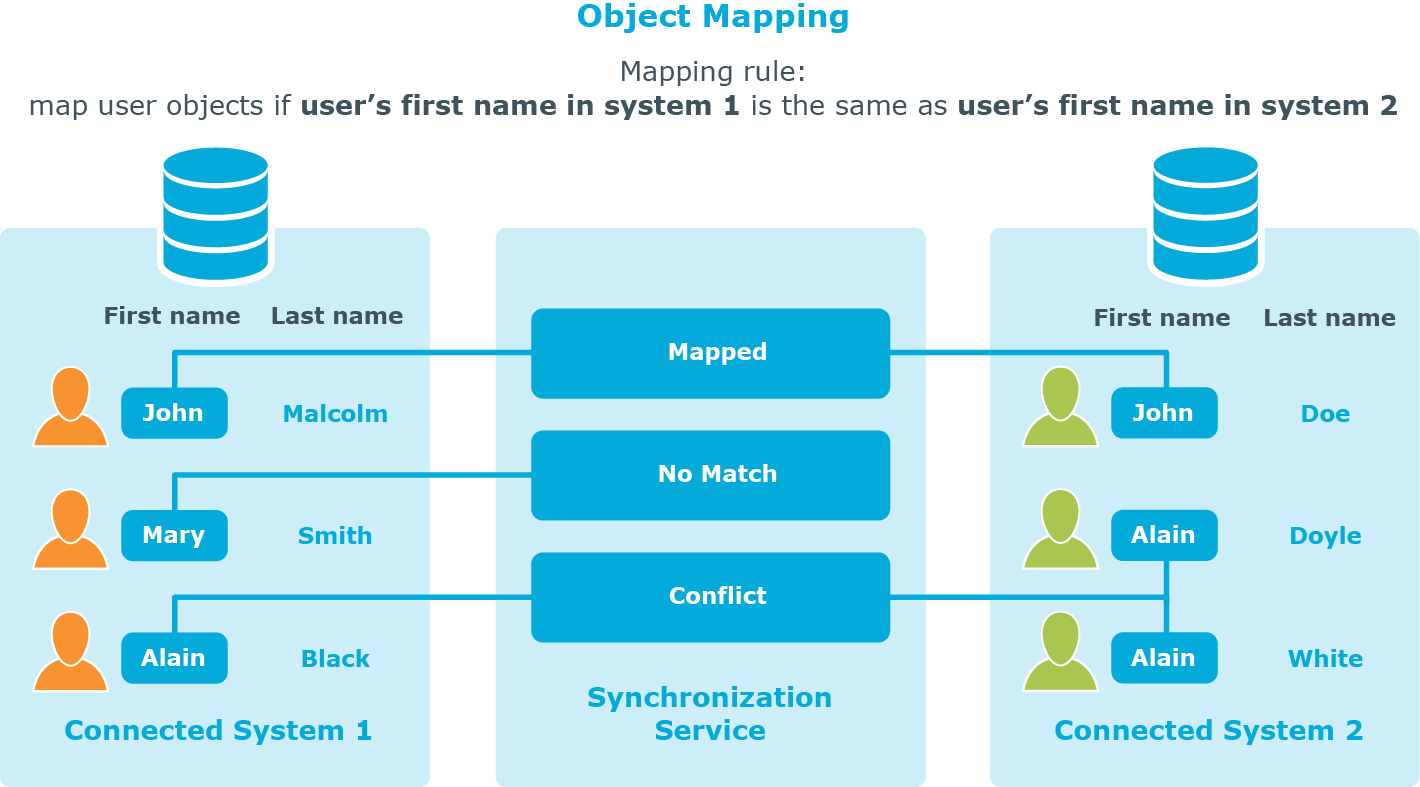
In this example, one-to-one relationship is established between the user object John Malcolm in Connected System 1 and the user object John Doe in Connected System 2: the first names of these user objects match, and thus the condition specified in the mapping rule is met. Now, if you configure a sync workflow for these systems and populate it with synchronization steps, identity information will be synchronized between these two user objects, since they are mapped. The direction of synchronization depends on which of these two connected data systems acts as the synchronization source and which is the target.

The next sections cover the following:

Related Documents

The document was helpful.

Select Rating

I easily found the information I needed.

Select Rating