The Active Roles Console allows you to find group Managed Service Accounts that meet your search conditions.
To search for gMSA in the directory
-
Right-click the OU, domain or container in which you want to search for gMSA and click Find.
-
In the Find window that opens, configure and start your search:
-
In the Find list, click Custom Search.
-
Click Field, and select the msDS-GroupManagedServiceAccount object type and the object property to search for.
-
Configure and add the desired search condition for the object property you have selected.
-
If needed, add more search conditions by repeating Steps b and c.
-
Click Find Now.
In the list of search results, right-click a gMSA and use the shortcut menu to perform management tasks. For example, you can right-click a gMSA and then click Properties to view or change the properties of the gMSA.
The Active Roles Console allows you to disable a gMSA so that the gMSA cannot be used for login. For a disabled gMSA, you can use the Console to re-enable that gMSA.
To disable or re-enable a gMSA
-
Right-click the gMSA you want to administer and click Properties.
-
In the Properties dialog, click the Account tab, and examine the Account is disabled check box:
-
If the check box is not selected, then the gMSA is enabled for logon. You can disable the gMSA by selecting the Account is disabled check box.
-
If the check box is selected, then the gMSA is disabled. You can re-enable the gMSA by clearing the Account is disabled check box.
Alternatively, you can use the Disable Account or Enable Account command on the gMSA object to disable or re-enable the gMSA.
Groups are Active Directory objects used to collect users, contacts, computers, and other groups into manageable units. There are three kinds of groups:
-
Security groups: Used to manage user and computer access to shared network resources. When assigning permissions to access resources, administrators assign permissions to security groups rather than to individual users.
-
Distribution groups: Used as email distribution lists. Distribution groups have no security function.
-
Query-Based Distribution groups: Used also as email distribution lists but the difference is that members of such a group are not specified statically. Membership of these groups is built in dynamic manner using LDAP queries.
In this document, security and distribution groups are collectively referred to as groups. As for Query-based distribution groups, these are considered a separate category of groups.
Each group has a scope: universal, global, or domain local.
-
Universal: These groups can include groups and accounts from any domain in the domain tree or forest, and can be granted permissions in any domain in the domain tree or forest.
-
Global: These groups can only include groups and accounts from the domain in which the group is defined. Global groups can be granted permissions in any domain in the forest.
-
Domain local: These groups can include groups and accounts from other domains. These groups can only be granted permissions within the domain in which the group is defined.
A group can be a member of another group. This is referred to as group nesting. Group nesting increases the number of affected member accounts and thus consolidates group management. Accounts that reside in a group nested within another group are indirect members of the nesting group.
Active Roles provides the facility to perform administrative tasks such as create copy, rename, modify, and delete groups. It can also be used to add and remove members from groups and perform Exchange tasks on groups.
The following section describes how to use the Active Roles Console to manage groups. You can also use the Active Roles Web Interface to perform the group management tasks.
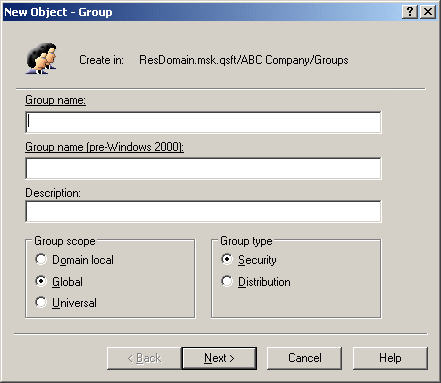
To create a group, in the Console tree, right-click the container where you want to add the group, select New > Group, then follow the instructions in the wizard.
In the wizard, some property labels may be displayed as hyperlinks. The hyperlink indicates that Active Roles enforces certain policy restrictions on the property. To examine policy details, click the hyperlink: the policy information is displayed. For more information, see Getting policy-related information.
Figure 10: Creating a group
The policy information is also displayed whenever you supply a property value that violates a policy restriction. The wizard cannot proceed until you enter an acceptable value.
