
Using credential stores for server-side authentication
Credential Stores offer a way to store user credentials (for example, passwords, private keys, certificates) and use them to log in to the target server, without the user having access to the credentials. That way, the users only have to perform gateway authentication on One Identity Safeguard for Privileged Sessions (SPS) with their usual password (or to an LDAP database), and if the user is allowed to access the target server, SPS automatically logs in using the Credential Store. For details on gateway authentication, see Configuring gateway authentication.
|
|
NOTE:
Keyboard-interactive authentication is not supported when using credential stores. |

Figure 256: Authenticating using Credential Stores
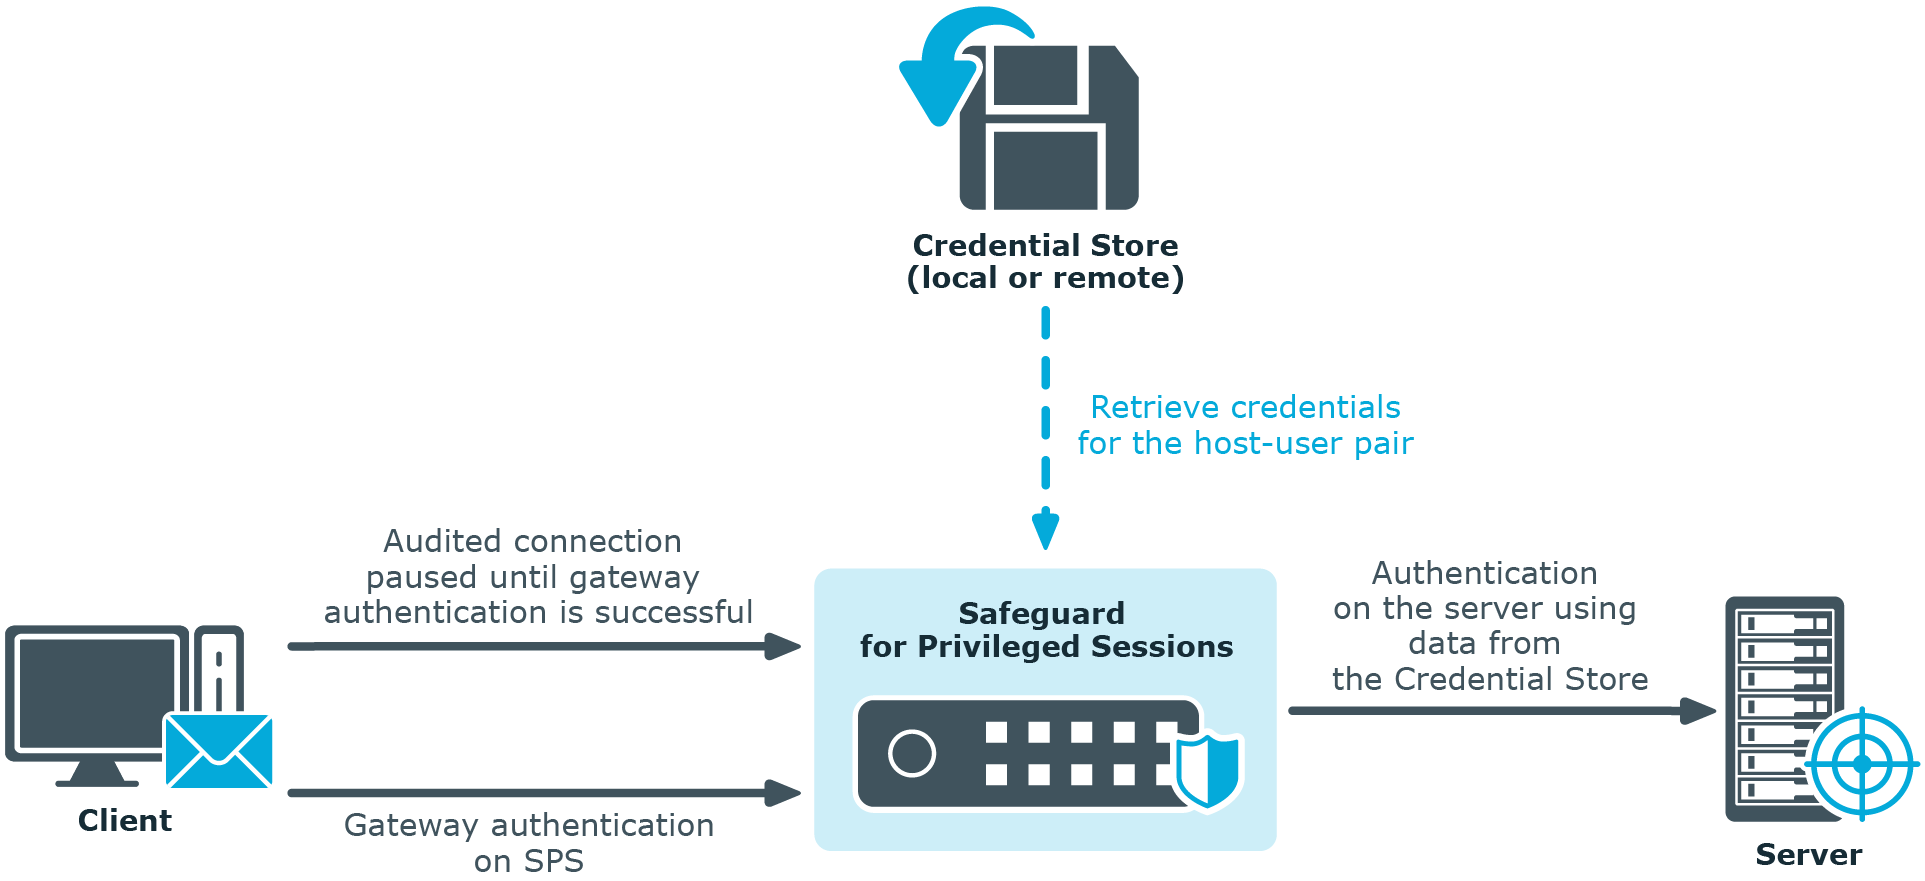
Credential Stores can be stored locally on SPS, or on a remote device. For remote Credential Stores, SPS integrates with external authentication and authorization systems using plugins.
-
To configure a local Credential Store, see Configuring local Credential Stores.
-
To configure a local, password-protected Credential Store, see Configuring password-protected Credential Stores.
-
To unlock a local, password-protected Credential Store, see Unlocking Credential Stores.
-
To configure a custom Credential Store plugin, see Using a custom Credential Store plugin to authenticate on the target hosts.
|
|
NOTE:
After performing a successful gateway authentication, if the credential store does not contain a password for the user, the user is prompted for the server-side password as a fallback. In case of authenticating to RDP servers using Network Level Authentication (NLA), the server-side password is prompted at the start of the connection. If there is no password in the credential store for the user and the server-side password is incorrect, the connection is terminated. |
Configuring local Credential Stores
The following describes how to configure a local Credential Store that stores the credentials used to login to the target host.
Prerequisites
|
|
NOTE:
Users accessing connections that use Credential Stores to authenticate on the target server must authenticate on One Identity Safeguard for Privileged Sessions (SPS) using gateway authentication or an AA plugin. Therefore gateway authentication or an AA plugin must be configured for these connections. For details, see "Configuring gateway authentication" in the Administration Guide and "Integrating external authentication and authorization systems" in the Administration Guide. |
To configure a local Credential Store that stores the credentials used to login to the target host
-
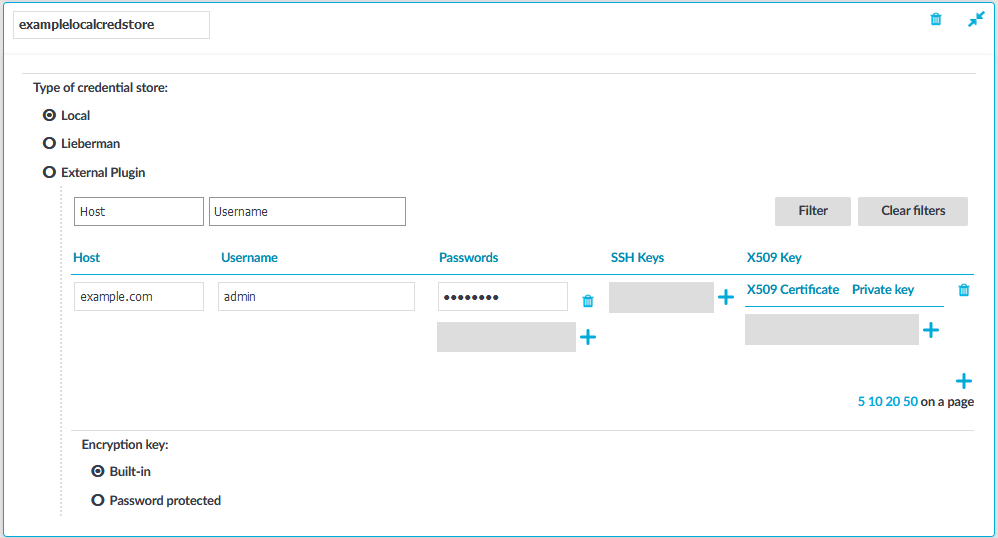
Navigate to Policies > Credential Stores.
-
Click
and enter a name for the Credential Store.
-
Select Local.
-
Select Encryption key > Built-in. That way the credentials will be encrypted with a built-in password, and the Credential Store is automatically accessible when SPS boots up. To use custom passwords to encrypt the Credential Store, see Configuring password-protected Credential Stores.
Figure 257: Policies > Credential Stores > Local — Configuring local Credential Stores
-
Add credentials to the Credential Store.
-
Click and enter the destination host and the username. For the destination host, you can use hostname, IP address, or subnet as well. To use the same credentials for every destination host, enter the 0.0.0.0/0 subnet. To use the credentials only on the hosts of a specific domain, enter *.domain. Note that:
-
Usernames are case sensitive.
-
To authenticate users of a Windows domain, enter the name of the domain into the Host field.
Use an IPv4 address.
-
-
Set the credentials. SPS will use these credentials to login to the destination host if the credential store is selected in a Connection policy. If more than one credential is specified to a host-username pair, SPS will attempt to use the credentials as the destination host requests it.
-
To add a password, click Passwords > , then enter the password corresponding to the username.
-
To upload a private key, click SSH Keys > > , then paste or upload a private key.
NOTE: If the private key is protected by a passphrase, enter the passphrase. The passphrase is needed only once during the upload, it is not required for the later operation of the Credential Store.
-
To generate a keypair on SPS click SSH Keys > > , set the length and type of the key, then click Generate. After that, click the fingerprint of the key to download the public part of the keypair. There is no way to download the private key from the SPS web interface.
NOTE: One Identity recommends using 2048-bit RSA keys (or stronger).
-
To upload a certificate and the corresponding private key, click X509 Keys > > , then paste or upload a certificate and the private key.
NOTE: If the private key is protected by a passphrase, enter the passphrase. The passphrase is needed only once during the upload, it is not required for the later operation of the Credential Store.
NOTE: One Identity Safeguard for Privileged Sessions (SPS) accepts passwords that are not longer than 150 characters. The following special characters can be used: !"#$%&'()*+,-./:;<=>?@[\]^-`{|}
-
-
Repeat the previous step to add further credentials to the username as necessary.
-
-
Repeat the previous step to add further hosts or usernames as necessary.
NOTE: Credential Stores can be used together with usermapping policies to simplify the administration of users on the target hosts. For details, see Configuring usermapping policies.
-
Click
.
-
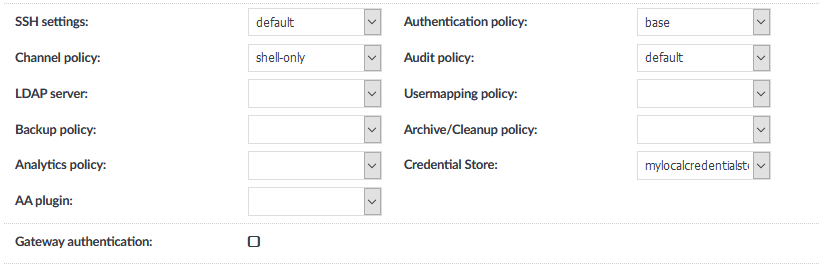
Navigate to the Connection policy where you want to use the Credential Store (for example, to SSH Control > Connections), select the Credential Store to use in the Credential Store field, then click
NOTE: The Connection Policy will ignore the settings for server-side authentication (set under Relayed authentication methods) if a Credential Store is used in the Connection Policy.
Figure 258: <Protocol name> Control > Connections — Select a Credential Store to use
Performing gateway authentication to RDP servers using local Credential Store and NLA
The following describes how to perform a gateway authentication to RDP servers using local Credential Store and Network Level Authentication (NLA).
To perform a gateway authentication to RDP servers using local Credential Store and NLA
-
Initiate the RDP connection.
-
Enter your gateway credentials during the gateway authentication. This can be web gateway authentication, or inband gateway authentication using RD Gateway.
-
Enter the following:
-
In the Username field, enter the domain name, the -AUTO suffix, and your username. For example, EXAMPLEDOMAIN-AUTO\Administrator.
NOTE: The -AUTO suffix is the default value of the RDP Control > Settings > Autologon domain suffix option of One Identity Safeguard for Privileged Sessions (SPS). If your SPS administrator has changed this option, use the appropriate suffix instead of -AUTO.
-
Enter your username (only the username, without the domain, for example, Administrator) into the Password field.
-
-
If the authentication is successful, the desktop of the remote server is displayed.
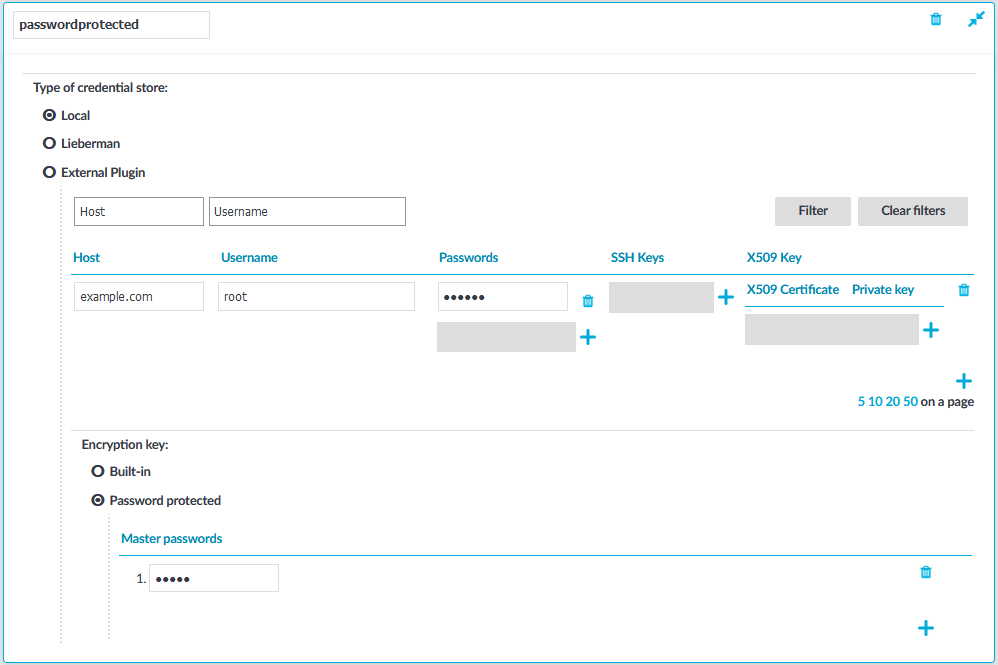
Configuring password-protected Credential Stores
The following describes how to configure a local Credential Store that stores the credentials used to login to the target host. The Credential Store will be protected by custom passwords. This password must be entered every time One Identity Safeguard for Privileged Sessions (SPS) is rebooted to make the Credential Store available.
Prerequisites
|
|
NOTE:
Users accessing connections that use Credential Stores to authenticate on the target server must authenticate on One Identity Safeguard for Privileged Sessions (SPS) using gateway authentication or an AA plugin. Therefore gateway authentication or an AA plugin must be configured for these connections. For details, see "Configuring gateway authentication" in the Administration Guide and "Integrating external authentication and authorization systems" in the Administration Guide. |
To configure a local Credential Store that stores the credentials used to login to the target host
-
Navigate to Policies > Credential Stores.
-
Click
-
Select Local.
-
Select Encryption key > Password protected.
NOTE: The contents of the Credential Store, as well as the passwords are included in the configuration backups of SPS. Make sure to encrypt the configuration backups.
-
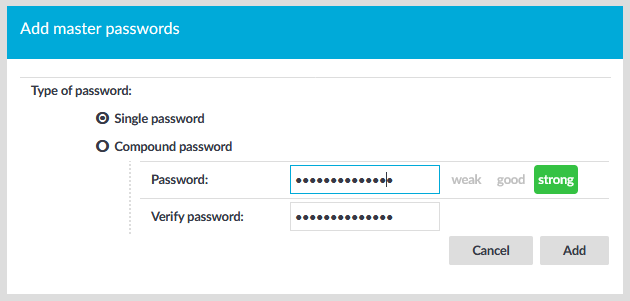
Select Master passwords and click
Figure 259: Policies > Credential Stores > Local > Password protected — Set Master Password
-
To protect the Credential Store with a single password, select Single password and enter the password into the Password and Verify password fields. Anyone who knows this password and has the Unlock Credential Store privilege will be able to open the Credential Store. Password-protected Credential Stores must be unlocked on the SPS web interface or console after every SPS reboot.
-
To protect the Credential Store with multiple passwords, select Compound password, click
SPS encrypts the master passwords using an aes-256-cbc cipher, and stores them in a local database.
NOTE: One Identity Safeguard for Privileged Sessions (SPS) accepts passwords that are not longer than 150 characters. The following special characters can be used: !"#$%&'()*+,-./:;<=>?@[\]^-`{|}
Figure 260: Policies > Credential Stores > Local > Password protected — Configure Credential Store
-
-
Repeat the previous step to add another single or compound password. That way, different password sets can be defined for the Credential Store. For example, if a single and a compound password is configured, the chief administrator can unlock the Credential Store with a single password, and two of his subordinates can open the Credential Store together if they know one element each of the compound password.
TIP: To change the password, just click
to delete the old password. Then add new passwords as needed.
-
Add credentials to the Credential Store.
-
Click and enter the destination host and the username. For the destination host, you can use hostname, IP address, or subnet as well. To use the same credentials for every destination host, enter the 0.0.0.0/0 subnet. To use the credentials only on the hosts of a specific domain, enter *.domain. Note that:
-
Usernames are case sensitive.
-
To authenticate users of a Windows domain, enter the name of the domain into the Host field.
Use an IPv4 address.
-
-
Set the credentials. SPS will use these credentials to login to the destination host if the credential store is selected in a Connection policy. If more than one credential is specified to a host-username pair, SPS will attempt to use the credentials as the destination host requests it.
-
To add a password, click Passwords > , then enter the password corresponding to the username.
-
To upload a private key, click SSH Keys > > , then paste or upload a private key.
NOTE: If the private key is protected by a passphrase, enter the passphrase. The passphrase is needed only once during the upload, it is not required for the later operation of the Credential Store.
-
To generate a keypair on SPS click SSH Keys > > , set the length and type of the key, then click Generate. After that, click the fingerprint of the key to download the public part of the keypair. There is no way to download the private key from the SPS web interface.
NOTE: One Identity recommends using 2048-bit RSA keys (or stronger).
-
To upload a certificate and the corresponding private key, click X509 Keys > > , then paste or upload a certificate and the private key.
NOTE: If the private key is protected by a passphrase, enter the passphrase. The passphrase is needed only once during the upload, it is not required for the later operation of the Credential Store.
NOTE: One Identity Safeguard for Privileged Sessions (SPS) accepts passwords that are not longer than 150 characters. The following special characters can be used: !"#$%&'()*+,-./:;<=>?@[\]^-`{|}
-
-
Repeat the previous step to add further credentials to the username as necessary.
-
-
Repeat the previous step to add further hosts or usernames as necessary.
NOTE: Credential Stores can be used together with usermapping policies to simplify the administration of users on the target hosts. For details, see Configuring usermapping policies.
-
Click
-
Navigate to the Connection policy where you want to use the Credential Store (for example, to SSH Control > Connections), select the Credential Store to use in the Credential Store field, then click
Figure 261: Control > Connections — Select a Credential Store to use
-
Navigate to Basic Settings > Alerting & Monitoring > Traffic related traps and enable the Decryption of a credential failed (scbCredStoreDecrpytError) and The requested credential store is closed (scbCredStoreClosed) events. That way SPS sends automatic alerts if a Credential Store needs to be unlocked.
Caution: Password-protected Credential Stores must be unlocked every time after SPS is rebooted. Connections using a password-protected Credential Store will automatically fail until the Credential Store is locked.
To unlock a Credential Store, users must have the Unlock Credential Store privilege, or editing (read and write) privileges to the particular Credential Store.
