
Querying SPS status information using agents
External SNMP agents can query the basic status information of SPS.
To configure which clients can query status information
-
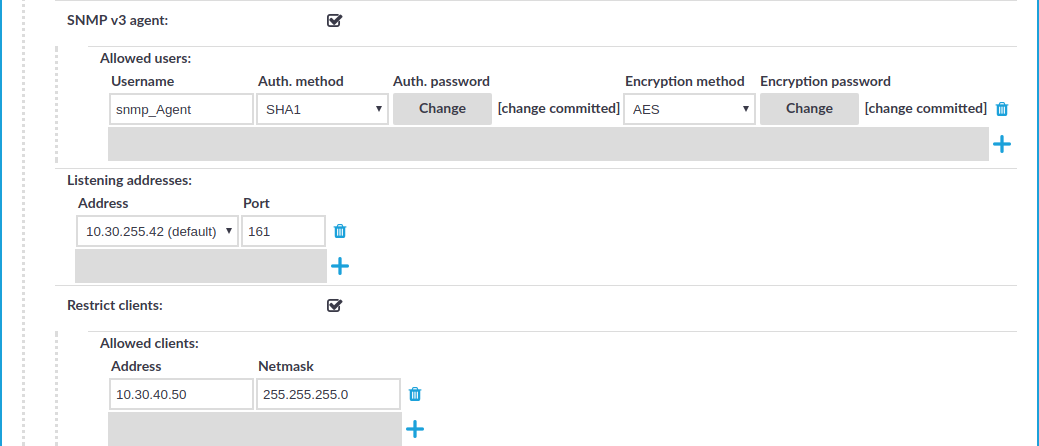
Navigate to Basic Settings > Local Services > SNMP server settings.
Figure 56: Basic Settings > Local Services > SNMP server settings — Configuring SNMP agent access
-
Enable the SNMP server.
-
Optionally, you can enter the details of the SNMP server into the System location, System contact, and System description fields.
-
To use the SNMP v2c protocol for SNMP queries, enable SNMP v2c agent, and enter the community to use into the Community field.
-
To use the SNMP v3 protocol, select SNMP v3 agent and complete the following steps:
-
Click
-
Enter the username used by the SNMP agent into the Username field.
-
Select the authentication method (MD5 or SHA1) to use from the options under the Auth. method field.
-
Enter the password used by the SNMP agent into the Auth. password field.
-
Select the encryption method (Disabled, DES or AES) to use from the options under the Encryption method field.
-
Enter the encryption password to use into the Encryption password field.
-
To add other agents, click
.
NOTE: One Identity Safeguard for Privileged Sessions (SPS) accepts passwords that are not longer than 150 characters. Letters A-Z, a-z, numbers 0-9, the space character, as well as the following special characters can be used: !"#$%&'()*+,-./:;<>=?@[]\^-`{}_|
-
-
In the Listening addresses field, choose
The available addresses correspond to the interface addresses configured in Basic Settings > Network > Interfaces. Only IPv4 addresses can be selected.
Repeat this step to add multiple addresses.
-
(Optional) To permit access to the SNMP server only from selected subnets or IP addresses, select Restrict clients, click
Use an IPv4 address.
Repeat this step to add multiple addresses.
-
Click
.

Customize system logging in One Identity Safeguard for Privileged Sessions (SPS)
One Identity Safeguard for Privileged Sessions (SPS) uses the syslog-ng Open Source Edition application (version 3.16) for system logging. Starting with SPS 5 LTS, you can customize its configuration to better integrate SPS into your logging infrastructure. If you are not familiar with syslog-ng Open Source Edition, read how syslog-ng OSE works. Customizing the configuration of syslog-ng Open Source Edition allows you to better integrate the log messages of SPS into your environment, for example, to:
-
change the message format or rename message fields,
-
send the messages to multiple logservers or SIEMs, or to
-
select (filter) which messages to send to your logserver.
Limitations
Note that not every feature described in the syslog-ng Open Source Edition documentation is available on SPS. Typically, features that are only rarely used on logging clients are not available (for example, Java-based destinations like HDFS and Elasticsearch). For a detailed list of available modules, execute the syslog-ng --module-registry command.
Customize the syslog-ng configuration
Do not change the syslog configuration of SPS unless you know exactly what you are doing. Incorrect changes can decrease the performance of SPS, deactivate system logging, or cause message loss.
While customizing the syslog-ng configuration, note the following points in particular:
-
Create a SPS configuration snippet in a file. Make sure that the filename ends with .conf. Note that syslog-ng OSE uses the configuration objects defined in these files only if they are used in a log path as well, so make sure to include a log path.
Do not loop messages. That is, make sure that the destination does not send a message back to the original source of the message (doing so would cause an infinite loop).
-
Copy it to the /etc/syslog-ng/conf.d/ directory of the core firmware. (If you are using a high-availability SPS cluster, SPS automatically copies the file to the secondary node as well.)
Files located in this directory do not taint the SPS configuration and SPS automatically includes them in the configuration of syslog-ng Open Source Edition.
Do not modify the original configuration files (for example, /etc/syslog-ng/syslog-ng.conf or /etc/syslog-ng/conf.d/message-queue-client.conf).
-
Verify that the resulting syslog-ng OSE configuration file is syntactically valid. The configuration is valid if executing the following command does not show any syntax errors: syslog-ng --syntax-only --no-caps
-
Your changes will take effect only after you reload the configuration of syslog-ng Open Source Edition using the following command: syslog-ng-ctl reload
If there are any errors in the configuration, SPS keeps on using the earlier configuration. In this case, correct the configuration, because if SPS reboots while the syslog-ng OSE configuration is invalid, SPS will not be able to log messages.
Available sources
You can use the following sources in your custom configuration. These sources are defined in the stock configuration file of syslog-ng OSE, and are in regular syslog message format (except for s_message_queue_client).
-
s_core_journal: Logs of the SPS host, including log messages about the audited sessions.
-
s_message_queue_client: Logs about the audited sessions in JSON format.
-
s_slave_boot: Logs from the boot firmware of the secondary node in a high-availability SPS cluster.
-
src: Logs messages of local SPS services.
-
src-internal: The internal logs of syslog-ng OSE running on SPS.
Certificates and encrypted connections
If you are using a custom destination that requires a certificate (either to authenticate SPS, or to verify the identity of the logserver). In this case, copy the certificates to SPS into the /etc/syslog-ng/conf.d/ directory. In the custom syslog configuration you cannot use the certificates uploaded to SPS using the web interface.
SIEM integration
Customizing the syslog configuration of SPS allows you to send log messages directly to your SIEM (for example, Splunk) in a format that your SIEM can understand.
One Identity can provide you the configuration files needed to send the log messages of SPS to Splunk in the Splunk Common Information Model (CIM) format. If you are interested, contact our Support Team.
If you need assistance to use another SIEM format, contact professionalservices@balabit.com.
Examples
The following configuration snippet reads the messages from the built-in s_message_queue_client source, parses the JSON message, and sends the messages to a remote destination using the RFC5424 message format (the body of the message remains in JSON).
parser json {
    json-parser(
        prefix(".scb.")
        template("$MSG")
    );
};

destination d_custom_remote {
    syslog(
        "192.168.1.1"
        transport(tcp)
        port(6514)
        template("$(format-json --key .scb.*)\n")
    );
};

log {
    source(s_message_queue_client);
    parser(json);
    destination(d_custom_remote);
};
A sample log message using the above configuration is the following (line-breaks added for clarity):
{"_scb":
  {
    "username":"frobert",
        "timestamp":"1499673286.380022",
        "session_id":"svc/hm4soFrNYeAmkyzLVkzi1o/ssh_demo:4",
        "server_port":"22",
        "server_ip":"10.30.255.70",
        "protocol":"ssh",
        "event_type":"server_authentication_success",
        "connection_name":"ssh_demo",
        "client_port":"50830",
        "client_ip":"10.30.255.70"
    }
}
To use this configuration snippet on your SPS, copy it to a file (make sure that the filename ends with .conf), change the IP address and port number to match your environment, copy it to the core firmware of your SPS into the /etc/syslog-ng/conf.d directory, then reload the syslog-ng configuration using syslog-ng-ctl reload.
Configuring system monitoring on SPS
SPS supports the SNMPv2c and SNMPv3 protocols. The SNMP server set on the Management tab can query status information from SPS.
NOTE: In order to have your central monitoring system to recognize the SNMP alerts sent by SPS, import the SPS-specific Management Information Base (MIB) into your monitoring system. Download all MIBs by navigating to Basic Settings > Alerting & Monitoring and clicking Download MIBs and import them into your monitoring system. For details, see the documentation of your monitoring system.
Topics:
Configuring monitoring
The following describes how to configure monitoring.
To configure monitoring
-
Navigate to Basic Settings > Alerting & Monitoring.
-
The default threshold values of the parameters are suitable for most situations. Adjust the threshold values only if needed.
-
Click
-
Navigate to Basic Settings > Management and verify that the SNMP settings and Mail settings of SPS are correct. SPS sends alerts only to the alert e-mail address and to the SNMP server.
Caution: Sending alerts fails if these settings are incorrect.

The following sections describe the parameters you can receive alerts on.
-
For details on health-monitoring alerts, see Health monitoring.
-
For details on system-monitoring alerts, see System related traps.
-
For details on traffic-monitoring alerts, see Traffic related traps.