Deleting a local user from One Identity Safeguard for Privileged Sessions (SPS)
The following describes how to delete a local user from One Identity Safeguard for Privileged Sessions (SPS).
To delete a local user from SPS
-
Navigate to Users & Access Control > Local Users.
-
Find the user you wish to delete.
-
Click
next to the user, at the right edge of the screen.
-
Click
.
Setting password policies for local users
One Identity Safeguard for Privileged Sessions (SPS) can use password policies to enforce the use of password history, minimal password strength, password length, and password expiry.
Limitations
Password policies apply only to locally managed users, and have no effect if you manage your users from an LDAP database, or if you authenticate your users to a RADIUS server.
NOTE: One Identity Safeguard for Privileged Sessions (SPS) accepts passwords that are not longer than 150 characters. Letters A-Z, a-z, numbers 0-9, the space character, as well as the following special characters can be used: !"#$%&'()*+,-./:;<>=?@[]\^-`{}_|
To create a password policy
-
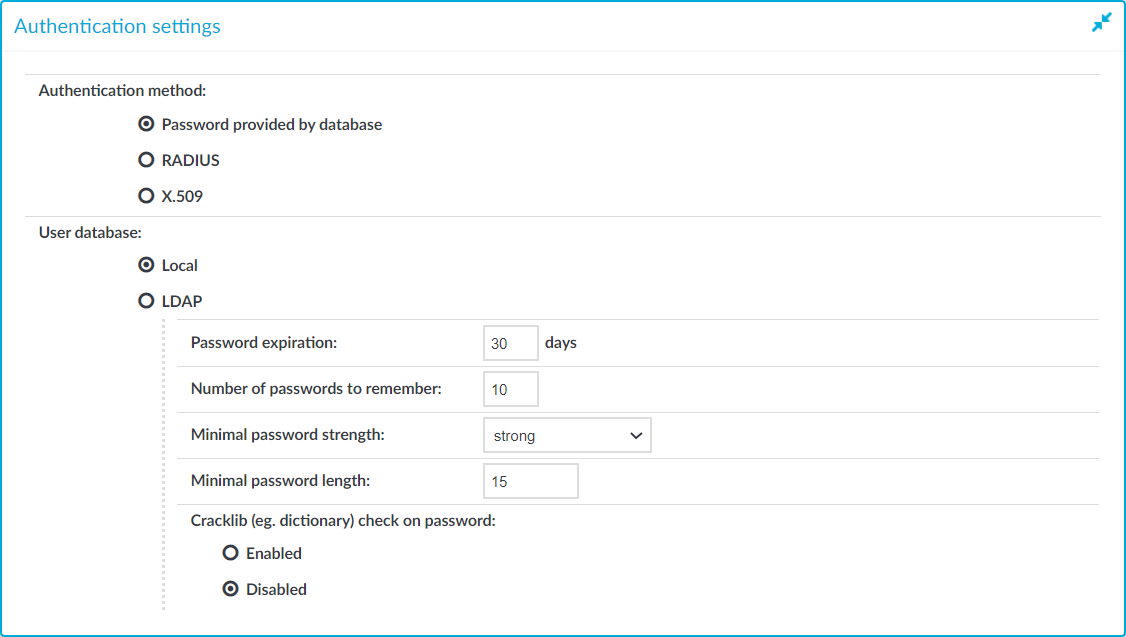
Navigate to Users & Access Control > Settings.
Figure 76: Users & Access Control > Settings — Configuring password policies
-
Set the Authentication method to Password provided by database and the User database to Local.
NOTE: If the setting of these fields is different (for example LDAP or RADIUS), then SPS is not configured to manage passwords locally.
-
Set how long the passwords are valid in the Password expiration field. After the configured period, SPS users have to change their password. To disable this option, set the value to 0. The acceptable values are 0-365.
-
Number of passwords to remember: use this option to prevent using the same password again for the configured number of password changes. For example, if the value is set to 10, the users have to use 10 different passwords consecutively until the first password can be used again. The acceptable values are 0-32. To disable this option, set the value to 0.
-
Set the required password complexity level in Minimal password strength. The possible values are disabled, good, and strong.
NOTE: The strength of the password is determined by its entropy: the variety of numbers, letters, capital letters, and special characters used, not only by its length.
To execute some simple dictionary-based attacks to find weak passwords, set Cracklib (eg. dictionary) check on password to Enabled.
- In Minimal password length, set the minimum number of characters for the passwords. The acceptable values are 1-99.
-
Click
NOTE: Changes to the password policy do not affect existing passwords. However, setting password expiry will require every user to change their passwords after the expiry date, and the new passwords must comply with the strength requirements set in the password policy.
Managing local user groups
You can use local groups to control the privileges of One Identity Safeguard for Privileged Sessions (SPS) local users — who can view and configure what.
For the description of built-in groups, see Built-in usergroups of One Identity Safeguard for Privileged Sessions (SPS).
Use the Users & Access Control > Local User Groups page to:
-
Create a new user group.
-
Display which users belong to a particular local user group.
-
Edit group memberships.
To create a new group,
-
Navigate to Users & Access Control > Local User Groups and click
.
Figure 77: Users & Access Control > Local User Groups — Group management
-
Enter a name for the group.
-
Enter the names of the users belonging to the group. Click
-
Click
Once you have added your user groups, the next step is to start assigning privileges to them. For details on how to do that, see Assigning privileges to user groups for the One Identity Safeguard for Privileged Sessions (SPS) web interface.
Managing One Identity Safeguard for Privileged Sessions (SPS) users from an LDAP database
The One Identity Safeguard for Privileged Sessions (SPS) web interface can authenticate users to an external LDAP database to simplify the integration of SPS to your existing infrastructure. You can also specify multiple LDAP servers: if the first server is unavailable, SPS will try to connect to the second server.
NOTE: Consider the following:
-
The admin user is available by default and has all privileges. It is not possible to delete this user.
-
Enabling LDAP authentication automatically disables the access of every local user except for admin. The admin user can login to SPS even if LDAP authentication is used.
-
SPS accepts both pre-win2000-style and Win2003-style account names (User Principal Names). User Principal Names (UPNs) consist of a username, the at (@) character, and a domain name, for example administrator@example.com.
-
For the username of SSH users, only valid UTF-8 strings are allowed.
-
The following characters cannot be used in:
- usernames: /\[]:;|=+*?<>"
-
group names: /\[]:;|=+*?<>"@,
-
When using RADIUS authentication together with LDAP users, the users are authenticated to the RADIUS server, only their group memberships must be managed in LDAP. For details, see "Authenticating users to a RADIUS server" in the Administration Guide.
- SPS treats user and group names in a case insensitive manner if the matching rule for the attribute in question is case insensitive in the LDAP database.
Prerequisites
Make sure that the response timeout of the LDAP/Active Directory server is at least 120 seconds.
To enable LDAP authentication
-
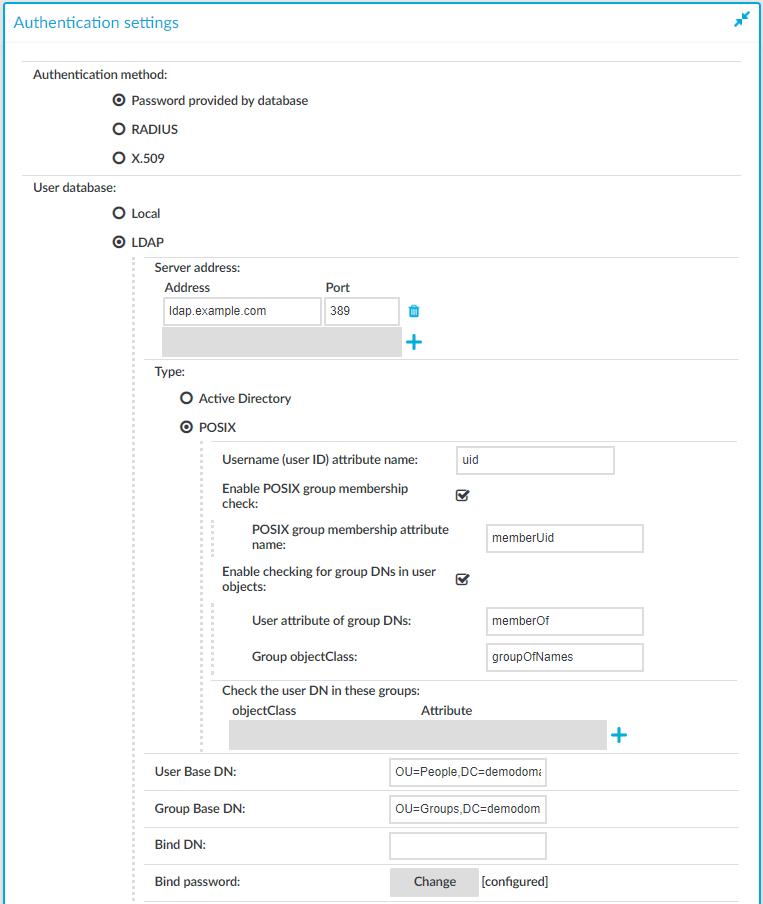
Navigate to Users & Access Control > Settings > Authentication settings.
-
Select the LDAP option and enter the parameters of your LDAP server.
Figure 78: Users & Access Control > Settings > Authentication settings — Configuring LDAP authentication
-
Enter the IP address or hostname and port of the LDAP server into the Server Address field. If you want to encrypt the communication between SPS and the LDAP server, in case of TLS, enter 636 as the port number, or in case of STARTTLS, enter 389 as the port number.
Use an IPv4 address.
To add multiple servers, click
Caution: If you will use a TLS-encrypted with certificate verification to connect to the LDAP server, use the full domain name (for example ldap.example.com) in the Server Address field, otherwise the certificate verification might fail. The name of the LDAP server must appear in the Common Name of the certificate.
When you configure the location of the LDAP server, that is, the IP address or hostname and the port number, you can use a Service record (SRV record), which is a type of information record in the DNS that maps the name of a service to the DNS name of the server. For example, enter _ldap._tcp.SITE_NAME._sites.dc._msdcs.DOMAIN.NAME in the Address field where you change the SITE_NAME and DOMAIN.NAME to your own site and domain name, then add the port number as required.
In SPS, the lookup of the SRV record happens at LDAP service startup, reload, or restart.
For more information on SRV records, see the relevant Microsoft documentation.
-
Select the type of your LDAP server in the Type field. Select:
-
Active Directory to connect to Microsoft Active Directory servers.
You can enable nested groups. Select Enable AD group membership check, then Enable nested groups.
Caution: Nested groups can slow down the query and cause the connection to timeout if the LDAP tree is very large. In this case, disable the Enable nested groups option.
To also check group membership based on group DNs in a user attribute, select Enable checking for group DNs in user objects and enter the name of the user attribute, for example, memberOf in the User attribute of group DNs field.
Caution: Using this option significantly slows down log on to the SPS web interface if you have too many groups.
Only use this option if you have an LDAP schema where the user groups can only be determined from a user attribute that contains the group DNs.
To check for group membership based on user DNs in group attributes, use the Check the user DN in these groups options.
For more information, see Active Directory LDAP backend.
-
POSIX to connect to servers that use the POSIX LDAP scheme.
If your LDAP server uses a custom POSIX LDAP scheme, you might need to set which LDAP attributes store the username, or the attributes that set group memberships. For example, if your LDAP scheme does not use the uid attribute to store the usernames, set the Username (user ID) attribute name option.
In addition to the primary group membership checking, you can allow checking for supplementary group memberships by selecting the Enable POSIX group membership check and specifying the POSIX group membership attribute name field.
To also check group membership based on group DNs in a user attribute, select Enable checking for group DNs in user objects and enter the name of the user attribute, for example, memberOf in the User attribute of group DNs field and objectClass, for example, groupOfNames in the Group objectClass field.
Caution: Using this option significantly slows down log on to the SPS web interface if you have too many groups.
Only use this option if you have an LDAP schema where the user groups can only be determined from a user attribute that contains the group DNs.
To check for group membership based on user DNs in group attributes, use the Check the user DN in these groups options.
For more information, see POSIX LDAP backend.
For an overview about LDAP user and group resolution in SPS, see Overview.
-
-
In the User Base DN field, enter the name of the DN to be used as the base of queries regarding users (for example: OU=People,DC=demodomain,DC=exampleinc).
NOTE: You must fill in this field. It is OK to use the same value for User Base DN and Group Base DN.
However, note that specifying a sufficiently narrow base for the LDAP subtrees where users and groups are stored can speed up LDAP operations.
-
In the Group Base DN field, enter the name of the DN to be used as the base of queries regarding groups (for example: OU=Groups,DC=demodomain,DC=exampleinc).
NOTE: You must fill in this field. It is OK to use the same value for User Base DN and Group Base DN.
However, note that specifying a sufficiently narrow base for the LDAP subtrees where users and groups are stored can speed up LDAP operations.
-
In the Bind DN field, enter the Distinguished Name that SPS should use to bind to the LDAP directory (for example: CN=Administrator,DC=demodomain,DC=exampleinc).
NOTE: SPS accepts both pre-win2000-style and Win2003-style account names (User Principal Names), for example administrator@example.com is also accepted.
-
To configure or change the password to use when binding to the LDAP server, click Change and enter the password. Click Update. Click
NOTE: One Identity Safeguard for Privileged Sessions (SPS) accepts passwords that are not longer than 150 characters. Letters A-Z, a-z, numbers 0-9, the space character, as well as the following special characters can be used: !"#$%&'()*+,-./:;<>=?@[]\^-`{}_|
-
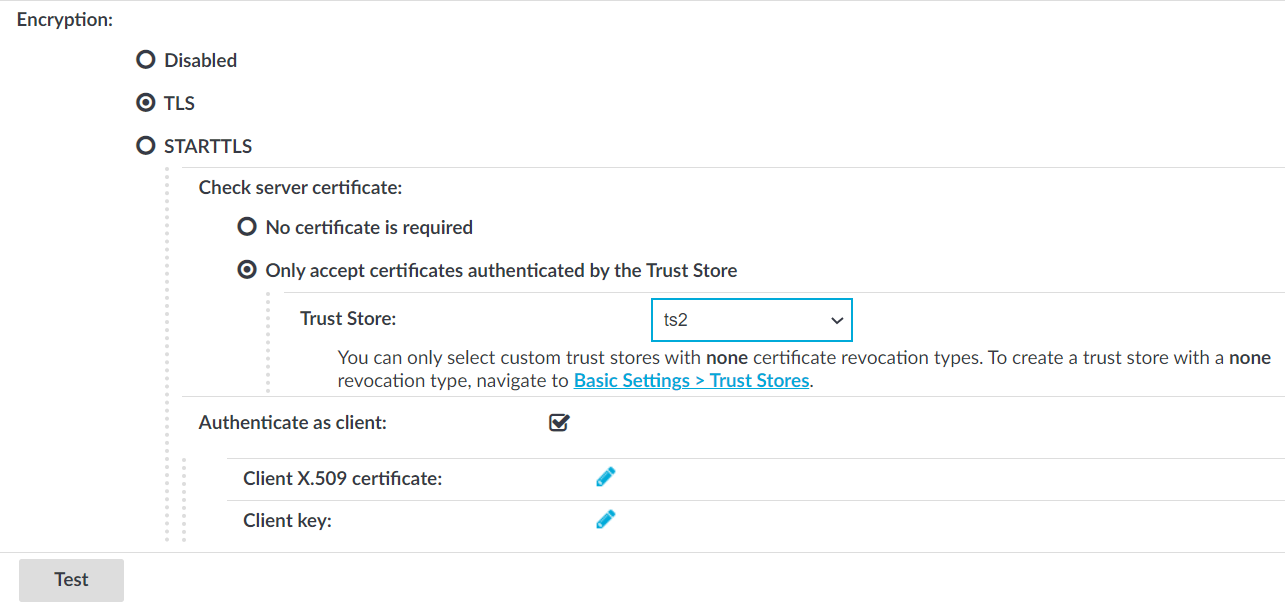
If you want to encrypt the communication between SPS and the LDAP server, in Encryption, select the TLS or the STARTTLS option and complete the following steps:
Figure 79: Policies > LDAP Servers — Configuring encryption
NOTE:TLS-encrypted connection to Microsoft Active Directory is supported only on Windows 2003 Server and newer platforms. Windows 2000 Server is not supported.
-
If you want SPS to verify the certificate of the server, select Only accept certificates authenticated by the Trust Store and select a trust store in the Trust Store field.
SPS will use the selected trust store to verify the certificate of the server, and reject the connections if the verification fails.
Caution: According to recent cryptographic research, SHA-1 algorithm cannot be trusted as secure anymore, because signatures can be forged with reasonable costs. As a result, SHA-1 algorithm is not supported in SPS for X.509 certificate chains. Starting from SPS versions 6.0.4 and 6.5.0, certificates with SHA1-based signatures are no longer trusted for Active Directory or LDAP authentication, and future versions might refuse to validate SHA-1 signatures altogether.
Note that Root CA certificates may still contain SHA-1 signatures, because the signature is not validated for self-signed certificates. It is expected that other software such as clients and servers connected to SPS might reject SHA-1 signatures in a similar fashion.
Signing CAs in SPS generate certificates with SHA-256 since versions 4.3.4 and 5.0.0.
SPS checks if the certificate revocation list (CRL) has expired and that the CRL has been signed by the same certificate authority (CA).
Caution: If you will use a TLS-encrypted with certificate verification to connect to the LDAP server, use the full domain name (for example ldap.example.com) in the Server Address field, otherwise the certificate verification might fail. The name of the LDAP server must appear in the Common Name of the certificate.
Authenticate as client
-
If the LDAP server requires mutual authentication, that is, it expects a certificate from SPS, enable Authenticate as client. Generate and sign a certificate for SPS, then click
in the Client X.509 certificate field to upload the certificate. After that, click
Verify the certificate of the server
One Identity recommends using 2048-bit RSA keys (or stronger).
-
-
Click
NOTE: You also have to configure the usergroups in SPS and possibly in your LDAP database. For details on using usergroups, see Using usergroups.
-
Click Test to test the connection.