One Identity Manager offers simplified user account administration for Unix. One Identity Manager concentrates on setting up and editing user accounts and providing the required permissions. To equip users with the required permissions, groups are mapped in One Identity Manager. This makes it possible to use Identity and Access Governance processes such as attesting, Identity Audit, user account management and system entitlements, IT Shop, or report subscriptions for Unix based target systems.
One Identity Manager provides company employees with the user accounts required to allow you to use different mechanisms for connecting employees to their user accounts. You can also manage user accounts independently of employees and therefore set up administrator user accounts.
Additional information about the Unix core directory is loaded into the One Identity Manager database by data synchronization. There are only limited options for customizing this information in One Identity Manager due to the complex dependencies and far-reaching effects of any changes.
One Identity Manager supports most Unix and Linux derivatives. For more information, see the specifications for One Identity Authentication Services.
In One Identity Manager, the following servers play a role in managing Unix:
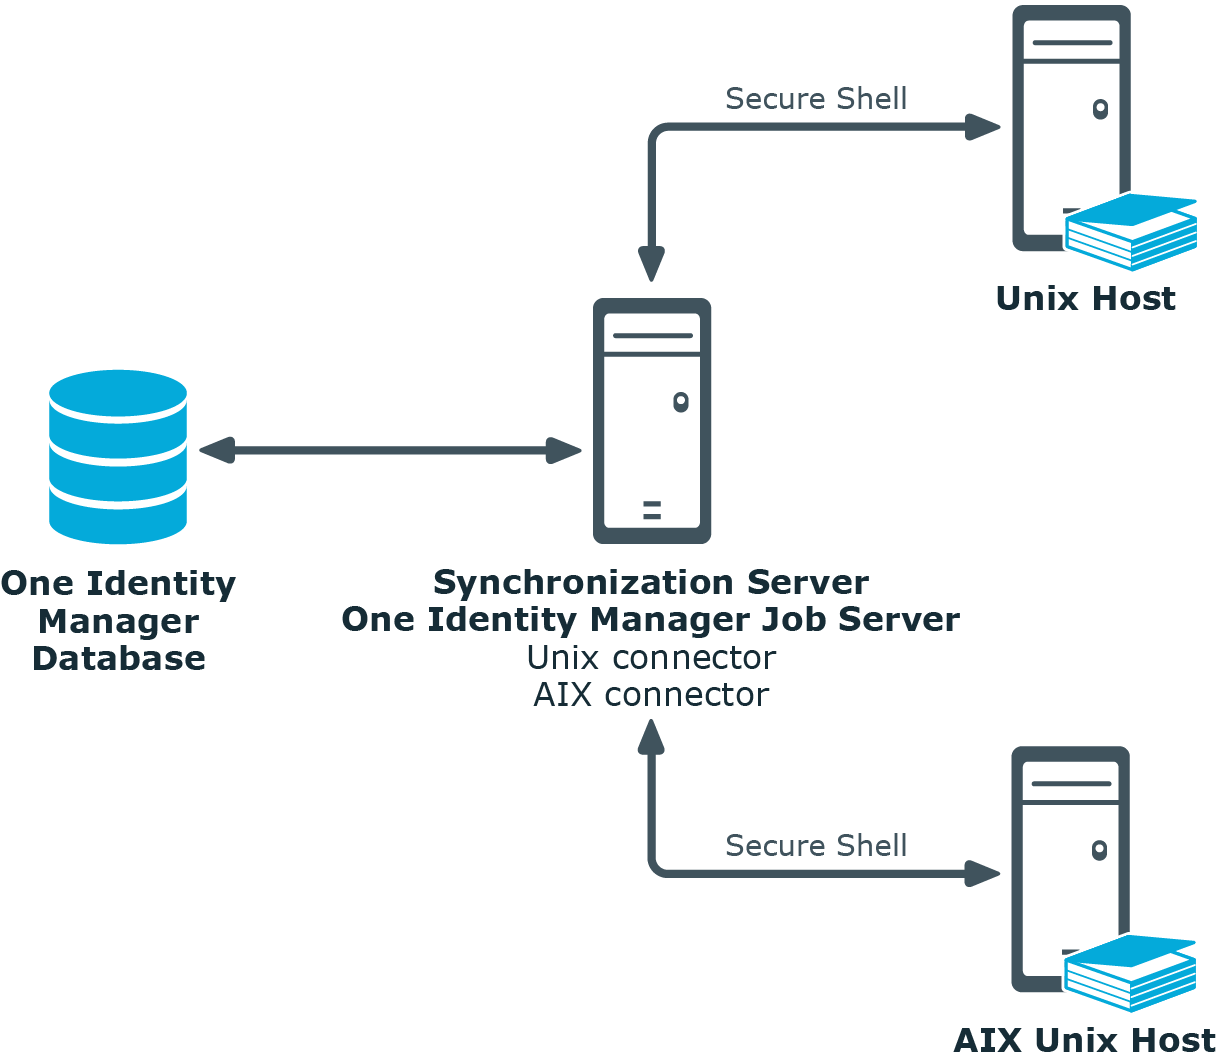
- Unix host
Unix host, which holds the directory. This host is a selected live host with a good network connection to the synchronization server. The synchronization server connects to this host in order to access the Unix objects.
- Synchronization server
The synchronization server for synchronizing the One Identity Manager database with the Unix system. The One Identity Manager Service with "Unix" is installed on this server. "Unix" contains the Unix connector and the AIX connector. The Unix connector is used for synchronization and provisioning Unix-based objects. The AIX connector is implemented for synchronizing and provisioning IBM AIX systems objects. The connectors communicate directly with the Unix host.
Figure 1: Architecture for synchronization
The following users are used for setting up and managing Unix-based target systems.
Table 1: Users
| Target system administrators |
Target system administrators must be assigned to the Target systems | Administrators application role.
Users with this application role:
-
Administer application roles for individual target system types.
-
Specify the target system manager.
-
Set up other application roles for target system managers if required.
-
Specify which application roles for target system managers are mutually exclusive.
-
Authorize other employees to be target system administrators.
-
Do not assume any administrative tasks within the target system. |
| Target system managers |
Target system managers must be assigned to the Target systems | Unix application role or a child application role.
Users with this application role:
-
Assume administrative tasks for the target system.
-
Create, change, or delete target system objects like user accounts or groups.
-
Edit password policies for the target system.
-
Prepare groups to add to the IT Shop.
-
Can add employees who have an other identity than the Primary identity.
-
Configure synchronization in the Synchronization Editor and define the mapping for comparing target systems and One Identity Manager.
-
Edit the synchronization's target system types and outstanding objects.
-
Authorize other employees within their area of responsibility as target system managers and create child application roles if required. |
| One Identity Manager administrators |
-
Create customized permissions groups for application roles for role-based login to administration tools in the Designer as required.
-
Create system users and permissions groups for non role-based login to administration tools in the Designer as required.
-
Enable or disable additional configuration parameters in the Designer as required.
-
Create custom processes in the Designer as required.
-
Create and configure schedules as required.
-
Create and configure password policies as required. |
| Administrators for the IT Shop |
Administrators must be assigned to the Request & Fulfillment | IT Shop | Administrators application role.
Users with this application role:
|
| Administrators for organizations |
Administrators must be assigned to the Identity Management | Organizations | Administrators application role.
Users with this application role:
|
| Business roles administrators |
Administrators must be assigned to the Identity Management | Business roles | Administrators application role.
Users with this application role:
|
One Identity Manager supports most Unix and Linux derivatives. For more information, see the specifications for One Identity Authentication Services.
To load Unix-based objects into the One Identity Manager database for the first time
- Prepare a user account with sufficient permissions for synchronizing in the Unix-based target system.
-
One Identity Manager components for managing Unix-based target systems are available if the "TargetSystem | Unix" configuration parameter is set.
- Install and configure a synchronization server and declare the server as a Job server in One Identity Manager.
- Create a synchronization project with the Synchronization Editor.
Related topics
