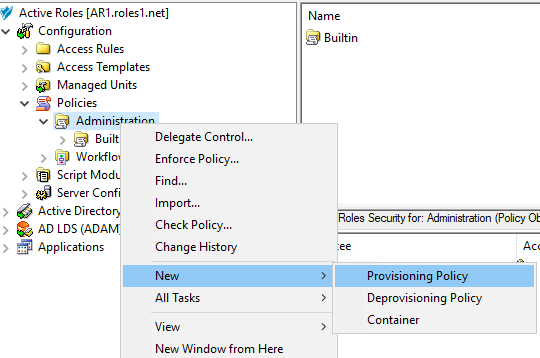
To configure a Group Membership AutoProvisioning policy via the Active Roles MMC console, perform the following procedure.
To configure a Group Membership AutoProvisioning policy
-
To open the New Provisioning Policy Object Wizard dialog, right-click in the middle pane to open the context menu, and then select New > Provisioning Policy.
-
On the Name and Description page, provide a unique Name for the new policy object. Optionally, also provide a Description. To continue, click Next.
-
On the Policy to Configure page, select Group Membership AutoProvisioning, and then click Next.
-
On the Object Type Selection page, to specify the type of object you want the policy to add or remove from groups, click Select, then click OK.
-
On the Policy Conditions page, set up conditions that specify how the policy adds or removes the selected object types to or from groups. To create a new condition with the Set Up Condition dialog, click Add.
-
To select the object property on which you want to set up the condition, click Property to open the Object property page.
-
Select the property you want the condition to check, then click OK.
TIP: If you do not see the object type you need, expand the list by selecting Show all possible object types.
-
In Operation, click the operation type you want to assign to the condition.
-
To specify additional configuration for the condition, enter a variable into the Value field, then click OK to close the Add Value dialog.
Alternatively, click Configure Value, then click Add, and configure an entry manually in the Add Entry dialog. For more information on manual configuration, see Steps for configuring entries. To close the Add Value dialog, click OK.
-
(Optional) To modify or remove an existing condition, click View/Edit or Remove on the Policy Conditions page, respectively.
-
Click Next on the Policy Conditions page to continue onto the Policy Action page.
-
On the Policy Action page, specify whether you want the policy to add or remove objects if the configured conditions are met.
-
Select Add object to groups if object satisfies policy conditions if you want Active Roles to add the object to the specified group(s) if the configured conditions are met.
-
Select Remove object from groups if object satisfies policy conditions if you want Active Roles to remove the object from the specified group(s) if the configured conditions are met.
Click Next to continue.
-
-
On the Group Selection page, specify the group(s) you want the policy to add the objects to (or remove from, depending on your choice on the Policy Action page). Click Add to open the Select Objects dialog, and then use either the Look in: drop-down or click Browse to specify the group(s). Once you are ready, click Next to continue.
NOTE: Consider the following limitations when configuring a Group Membership Autoprovisioning policy for cloud-only Azure objects:
-
When provisioning cloud-only Azure users or Azure guest users, you must specify an O365 Group (or O365 Groups) in this step. To do so, click Browse to open the Browse for Container dialog, and then navigate to the following node for the list of O365 Groups in the organization:
-
The Group Membership AutoProvisioning policy can only add or remove cloud-only Azure users and guest users to or from O365 Groups that are located in the same Azure tenant as the Azure users and guest users. Selecting O365 Groups located in another Azure tenant causes the configured Policy Object to not work properly.
-
-
On the Enforce Policy page, specify the objects to which the configured Policy Object will be applied. Click Add, and then use the Select Objects dialog to locate and select the objects.
TIP: When provisioning cloud-only Azure users or guest users, you can either select the respective object category (such as the Azure user or Azure guest user node) in this step, or the Azure tenant that contains the Azure objects.
- Click Next, and then click Finish to create the new policy.


