Communication over HTTP consists of client requests and server responses (also called exchanges). Unlike in other protocols, for example SSH, these request-response pairs do not form a well-defined, continuous connection. Therefore, One Identity Safeguard for Privileged Sessions (SPS) assumes that an HTTP request-response pair belongs to a specific session if the following points are true:
-
The IP address of the client is the same
-
The hostname of the target server (not the IP address) is the same
-
The username is the same (if the user has performed inband authentication)
-
The time elapsed since the last request-response pair between the same client and server is less then the session timeout value (15 minutes by default).
-
The first session cookie SPS finds within the request is the same. Note that the cookie must be listed in the Session Cookie Settings option. For details, see Creating and editing protocol-level HTTP settings.
SPS creates a separate audit trail and records the accessed URLs for every session. These are displayed on the Sessions page. If any of the columns is not visible, click Customize columns....
For technical reasons, in authenticated sessions the login page where the user provides the credentials is not part of the session associated with the username. This means that even if the login page is the first that the user visits, SPS will record two sessions: the first does not include a username, the second one does. These two sessions are visible on the Pending Connections > Active Connections page (until the unauthenticated session times out).
This section describes the HTTP settings that determine the parameters of the connection on the protocol level, including timeout value, session cookies, and TLS settings.
|

|
Caution:
Modifying timeout settings is recommended only for advanced users. Do not modify these settings unless you exactly know what you are doing. |
To create a new HTTP setting profile or edit an existing one
-
Navigate to the Settings tab of the Traffic Controls > HTTP menu item.
-
Click  to display the parameters of a profile.
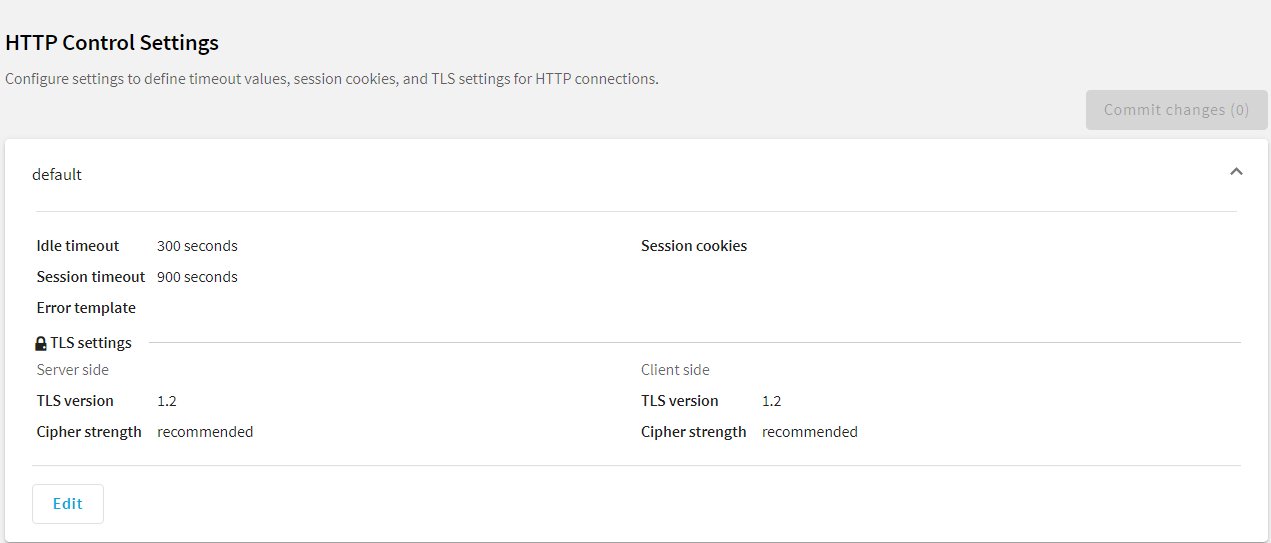
Figure 200: Traffic Controls > HTTP > Settings — Creating and editing protocol-level HTTP settings
-
To create a new HTTP setting, click Create new.
-
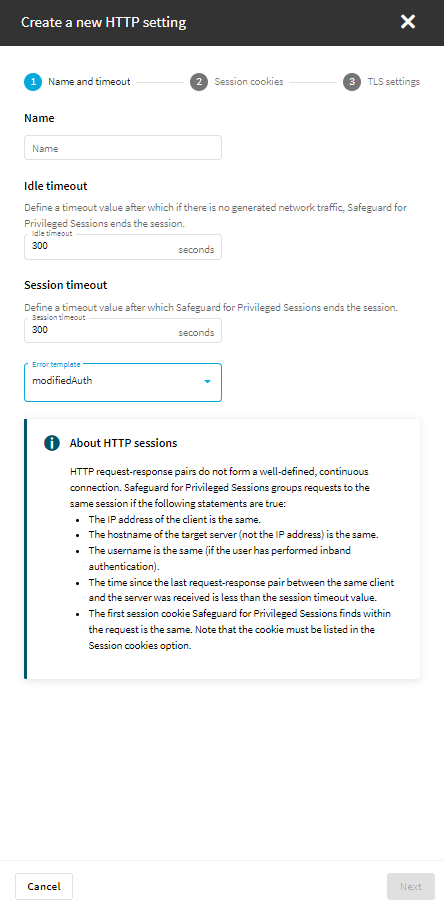
On Name and timeout, enter a name for the new profile and configure the timeout values. The following parameters are available:
-
Name: This is a required field. The name must be unique, and the accepted characters are the letters of the English alphabet (A-Z, and a-z) and the underscore (_) character.
-
Idle timeout: This is a required field. Timeout value for the session in seconds. The accepted values are positive integers. To avoid early timeout, set it to a larger value, for example a week (604800 seconds).
|
|
Caution:
Determining if a connection is idle is based on the network traffic generated by the connection, not the activity of the user. For example, if an application or the taskbar of a graphical desktop displays the time which is updated every minute, it generates network traffic every minute, negating the effects of timeout values greater than one minute and preventing One Identity Safeguard for Privileged Sessions (SPS) from closing the connection. |
-
Session timeout: This is a required field. Timeout value for the session in seconds. The accepted values are positive integers.
-
Error template: Use the error templates to send customized HTTP error messages to the users. The error templates, created on Traffic Controls > HTTP > Error templates, contain the following data:
For more information, see Customizing HTTP error templates.
Figure 201: Traffic Controls > HTTP > Settings > Create a new HTTP setting - Name and timeout
-
Proceed to Session cookies.
To distinguish the audited HTTP requests and responses based on the session cookies of web applications, click Add cookie, and enter the name of the session cookie, for example, PHPSESSID, JSESSIONID, or ASP.NET_SessionId. Note that the names of session cookies are case sensitive.
Repeat this step to add multiple cookie names. Note that if you list multiple cookie names, SPS will use the first one it finds to assign the requests to a session.
Figure 202: Traffic Controls > HTTP > Settings > Create a new HTTP setting - Session cookies

-
To configure TLS security settings on both the Client side and the Server side, proceed to TLS security settings.
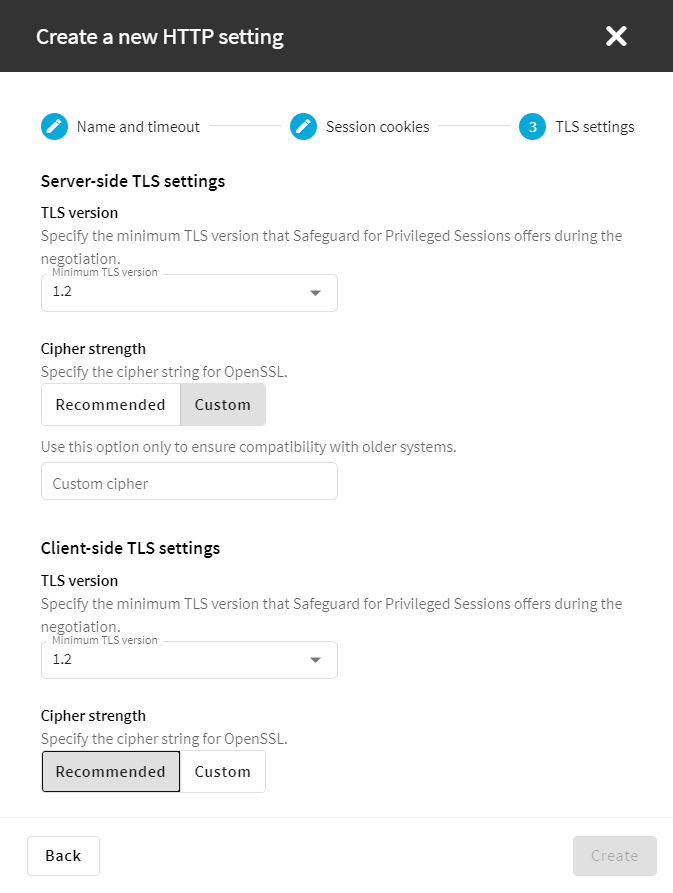
Figure 203: Traffic Controls > HTTP > Settings > Create a new HTTP setting - TLS settings
NOTE: Note that SPS only permits TLS-encrypted connections. SSLv3 is not supported.
-
Minimum TLS version specifies the minimum TLS version SPS offers during the negotiation. The following options are available:
-
TLS 1.2: this setting only offers TLS version 1.2 during the negotiation. This is the recommended setting.
-
TLS 1.1: this setting offers TLS version 1.1 and later versions during the negotiation.
-
TLS 1.0: this setting offers TLS version 1.0 and later versions during the negotiation.
-
Cipher strength specifies the cipher string for OpenSSL. The following options are available:
-
Recommended: this setting only uses ciphers with adequate security level.
-
Custom: this setting allows you to specify the list of ciphers you want to permit SPS to use in the connection. This setting is only recommended to ensure compatibility with older systems. For more details on customizing this list, check the 'openssl-ciphers' manual page on your SPS appliance.
For example: ALL:!aNULL:@STRENGTH
-
To create the new setting and to save it, click Create and after that, click Commit changes.
-
Select this profile in the HTTP settings field of your connections.
This section describes how to create and customize HTTP error templates that you can use to send customized HTTP error messages to the users.
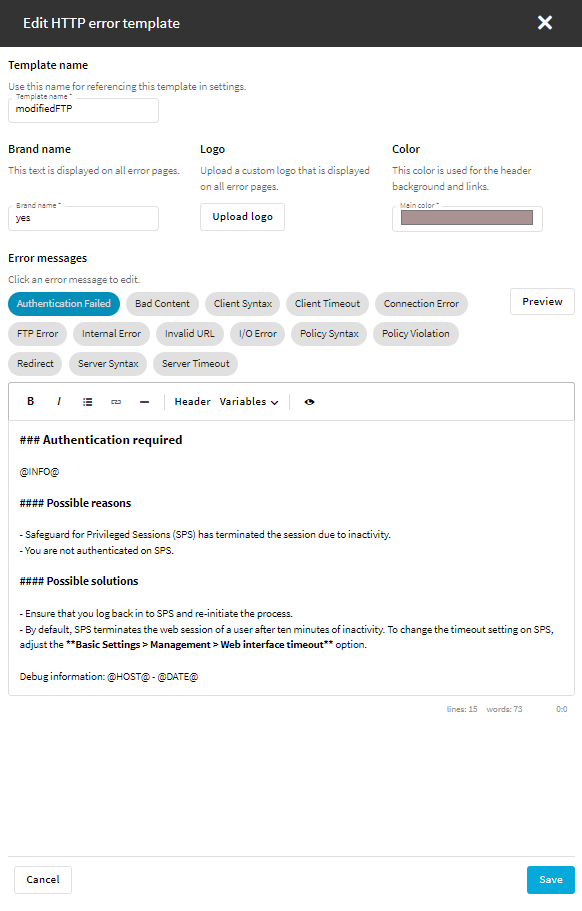
Figure 204: Traffic Controls > HTTP — Error templates
To customize HTTP error templates
-
To create or edit an HTTP error template, navigate to Traffic Controls > HTTP > Error templates.
-
To create a new error template, select Create new template and name your template.
The new template contains all the error message templates listed on the Error templates page.
-
To modify an error template, select the template and click Edit.
The following error message templates are available:
-
Authentication Failed
-
Bad Content
-
Client Syntax
-
Client Timeout
-
Connection Error
-
FTP Error
-
Internal Error
-
Invalid URL
-
I/O Error
-
Policy Syntax
-
Policy Violation
-
Redirect
-
Server Syntax
-
Server Timeout
-
Select or modify the brand name, the color, and optionally the logo that is displayed on the customized HTTP error pages.
-
(Optional) Using Markdown language, customize the default content of the error message templates.
-
To check the layout and the content of an error message template, click Preview.
-
Save the error template.
-
In Traffic Controls > HTTP > Settings, select a setting, and in the Error template option, select the error template that you created or customized in this procedure.
For more information, see Creating and editing protocol-level HTTP settings.
The following sections describe configuration settings available only for the ICA protocol. Use the following policies to control who, when, and how can access the ICA connection.
NOTE: As an experimental feature, IPv6 addresses can be configured for ICA connections.
