Chat now with support
Chat with Support

One Identity Safeguard for Privileged Sessions 7.5 - Administration Guide

Preface Introduction The concepts of One Identity Safeguard for Privileged Sessions (SPS)
The philosophy of One Identity Safeguard for Privileged Sessions (SPS) Policies Credential Stores Plugin framework Indexing Supported protocols and client applications Modes of operation Connecting to a server through One Identity Safeguard for Privileged Sessions (SPS) Archive and backup concepts Maximizing the scope of auditing IPv6 in One Identity Safeguard for Privileged Sessions (SPS) SSH host keys Authenticating clients using public-key authentication in SSH The gateway authentication process Four-eyes authorization Network interfaces High Availability support in One Identity Safeguard for Privileged Sessions (SPS) Versions and releases of One Identity Safeguard for Privileged Sessions (SPS) Accessing and configuring One Identity Safeguard for Privileged Sessions (SPS)
Cloud deployment considerations The Welcome Wizard and the first login Basic settings
Supported web browsers The structure of the web interface Network settings Configuring date and time System logging, SNMP and e-mail alerts Configuring system monitoring on SPS Data and configuration backups Archiving Cleaning up audit data Using plugins Forwarding data to third-party systems Starling integration
User management and access control
Login settings Managing One Identity Safeguard for Privileged Sessions (SPS) users locally Setting password policies for local users Managing local user groups Managing One Identity Safeguard for Privileged Sessions (SPS) users from an LDAP database Authenticating users to a RADIUS server Authenticating users with X.509 certificates Authenticating users with SAML2 Managing user rights and usergroups Creating rules for restricting access to search audit data Displaying the privileges of users and user groups Listing and searching configuration changes
Managing One Identity Safeguard for Privileged Sessions (SPS)
Controlling One Identity Safeguard for Privileged Sessions (SPS): reboot, shutdown Managing One Identity Safeguard for Privileged Sessions (SPS) clusters Managing a High Availability One Identity Safeguard for Privileged Sessions (SPS) cluster Upgrading One Identity Safeguard for Privileged Sessions (SPS) Managing the One Identity Safeguard for Privileged Sessions (SPS) license Accessing the One Identity Safeguard for Privileged Sessions (SPS) console Sealed mode Out-of-band management of One Identity Safeguard for Privileged Sessions (SPS) Managing the certificates used on One Identity Safeguard for Privileged Sessions (SPS)
General connection settings HTTP-specific settings ICA-specific settings MSSQL-specific settings RDP-specific settings SSH-specific settings Using Sudo with SPS Telnet-specific settings VMware Horizon View connections VNC-specific settings Indexing audit trails Using the Search interface Advanced authentication and authorization techniques Reports The One Identity Safeguard for Privileged Sessions (SPS) REST API One Identity Safeguard for Privileged Sessions (SPS) scenarios Troubleshooting One Identity Safeguard for Privileged Sessions (SPS)
Network troubleshooting Gathering data about system problems Viewing logs on One Identity Safeguard for Privileged Sessions (SPS) Changing log verbosity level of One Identity Safeguard for Privileged Sessions (SPS) Collecting logs and system information for error reporting Collecting logs and system information of the boot process for error reporting Support hotfixes Status history and statistics Troubleshooting a One Identity Safeguard for Privileged Sessions (SPS) cluster Understanding One Identity Safeguard for Privileged Sessions (SPS) RAID status Restoring One Identity Safeguard for Privileged Sessions (SPS) configuration and data VNC is not working with TLS Configuring the IPMI from the BIOS after losing IPMI password Incomplete TSA response received Using UPN usernames in audited SSH connections
Using SPS with SPP Configuring external devices Using SCP with agent-forwarding Security checklist for configuring One Identity Safeguard for Privileged Sessions (SPS) Jumplists for in-product help Configuring SPS to use an LDAP backend Glossary

Replaying audit trails in your browser

The following section describes how to replay an audit trail in your browser.

NOTE: You can replay audit trails in your browser, or using the Safeguard Desktop Player application. Note that there are differences between these solutions.

For details on the Safeguard Desktop Player application, see Safeguard Desktop Player User Guide.

The following table details the differences between the solutions provided by the browser and the Safeguard Desktop Player application when replaying audit trails.

Browser Safeguard Desktop Player
Works without installation -
Works on any operating system Windows, Linux, Mac
Replays audit trails recorded with SPS 5 F4 and newer
Replays TN5250 sessions
Extracts files from SCP, SFTP, HTTP and RDP sessions -
Replays HTTP sessions - Only exports raw files from the command line
Replays X11 sessions
Starts replay while rendering is in progress
Follows 4-eyes connections -
Replays live streams in follow mode
Exports to PCAP -
Displays user input
Displays subtitles for video
Exports audit trail as video -
Exports screen content text -
Searches in the contents of the audit trails -

Caution:

From version 6.13.0, SPS does not support Internet Explorer 11 (IE11) anymore. SPS version 6.12.0 and previous versions continue to support IE11.

From SPS version 6.10, the Google WebM Video for Microsoft Internet Explorer plugin is not required for replaying audit trails in your browser. The supported browsers are:

  • Google Chrome

  • Firefox

  • Safari

  • Internet Explorer 11 (IE11) - supported until SPS version 6.12.0

For SPS version 6.9 and earlier versions, even though the One Identity Safeguard for Privileged Sessions (SPS) web interface supports Internet Explorer and Microsoft Edge in general, to replay audit trails, you need to use Internet Explorer 11, and install the Google WebM Video for Microsoft Internet Explorer plugin.

If you cannot install Internet Explorer 11 or another supported browser on your computer, use the the Safeguard Desktop Player application. For details, see Replaying audit trails in your browser in the Administration Guide and Safeguard Desktop Player User Guide.

NOTE: From SPS version 6.10 and onwards, you can play video files of audit trails both in central and in cluster environments. Previously, you could play the video files only on the Search Master node in a cluster environment. From SPS version 6.10 and onwards, you can play video files on Search Minion nodes as well.

To replay an audit trail in your browser

  1. On the Sessions page, select the audit trail you want to replay.

  2. To display the details of a connection, click . This page is called the details view.

  3. To play the video file, click .

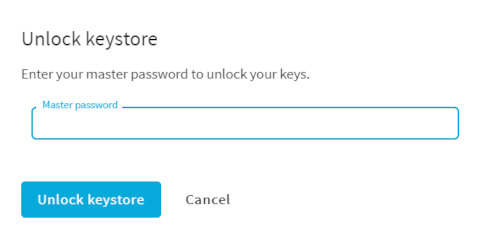
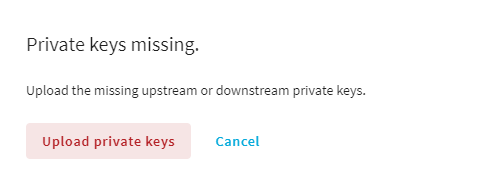
  4. (Optional) For encrypted audit trails, upload any missing private keys and certificates. For more information on these procedures, see section Replaying encrypted audit trails in your browser.

    After uploading the private keys and the corresponding certificates, the encrypted upstream traffic elements are decrypted. The trail is decrypted and decompressed on the client-side. As a result, the encrypted elements will be displayed distributed in the video (see List of keyboard events, Show / hide events, and both versions of the Progress bar further in this section, in Replaying audit trails in your browser).

  5. (Optional) After uploading any missing private keys or certificates, to play the video, click .

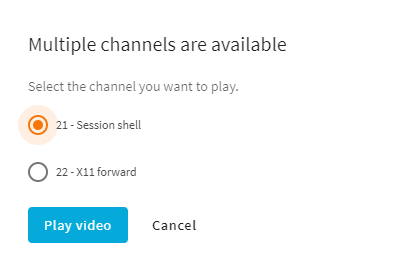
    1. (Optional) If there are more channels that can be played, select the channel that you want to play in the Multiple channels are available dialog and click Play video.

      Figure 310: Multiple channels are available dialog

      The Player window opens.

For more information on how to use the browser to play video files, see Using the browser to play video files.

Using the browser to play video files

This section provides information on how to use the browser to play video files of recorded audit trails, or how to follow active sessions.

Figure 311: Replaying audit trails or following active sessions in your browser

Following active sessions

If you are following an active session, a green Following label is displayed in the top-right corner of the screen, and there is a green, pulsing dot on the menu bar. If you stop following the session, for example, by jumping back in the video, a green Follow button is displayed on the menu bar, which allows you to continue to follow the active session. If a session is not active anymore, the Following label and the green dot are not displayed.

Player window controls

TIP: You can quickly zoom in or out by clicking anywhere in the Player window.

NOTE: From the video, you can copy the content of text-based protocols to the clipboard:

  1. Select the required content.

  2. Right click on the selected content.

  3. From the list of available options, select Copy.

The Player window has the following controls:

  • , : Play, Pause.

  • ,: Jump to previous event, Jump to next event.

    If you use the button, the video playing is stopped so that you can jump back to preceding events.

  • : Adjust replay speed. The possible increments are: 0,25, 0,5, 1, 1,5, 2, 3, and 5.

  • Time-related information and options of audit trails:

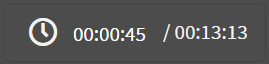
    • : Time since the audit trail started / Length of the audit trail.

    • To jump to a timestamp in the video, click on the time.

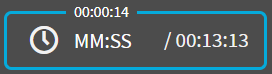
      : Time since the audit trail started (top) / Jump to a timestamp (left) / Length of the audit trail (right).

    • : Time since the audit trail started when following an active session.

  • : List of keyboard events. Special characters like SHIFT, ENTER, F1, and so on, and mouse usage are displayed as buttons. If the upstream traffic is encrypted, upload your permanent or temporary keys to User menu > Audit keystore to display the keyboard events. This will not be displayed if your upstream traffic is encrypted but not unlocked.

  • : Share. You can copy the link of a session, or optionally, obtain the link of a session starting from a specific timestamp.

  • : Encoding settings. This option enables you to set the encoding for terminal-based and graphical protocols.

    For terminal-based protocols, you can set the following:

    • Terminal encoding layout

    • Telnet codec

    • Telnet alternate codec

    For graphical protocols, you can set the keyboard layout.

    You can save your video encoding settings, which are stored locally, in your browser.

  • : Create a screenshot.

  • : Show / hide events. Select the types of events to display. The available options are Keystroke, Mouse activity, and On-screen changes. Depending on the protocol used and how the audit trail was processed, SPS can display keyboard events, commands, mouse events, and window titles. Commands and window titles are displayed as subtitles at the bottom of the screen. This will not be displayed if your upstream traffic is encrypted but not unlocked.

  • , : Switching fullscreen mode on and off

  • : Progress bar and distribution of events. Light blue - screen change, blue - keyboard or mouse event, dark blue - command or title event. This will not be displayed if your upstream traffic is encrypted but not unlocked.

  • : Close the player, and return to the Connection details page.

Streamable session recording playback with Safeguard Desktop Player started from the SPS UI

From SPS version 7.2, you can play back your session recordings with the Safeguard Desktop Player application started from the SPS UI. With this method, you do not have to start the Safeguard Desktop Player application outside SPS to start replaying your session recording. This method starts a streamable, on-demand playback. As a result, you do not have to wait for a potentially large file to completely download before you start replaying the recording.

NOTE: You can replay session recordings in your browser, or using the Safeguard Desktop Player application. Note that there are differences between these solutions.

For details on the Safeguard Desktop Player application, see Safeguard Desktop Player User Guide.

The following table details the differences between the solutions provided by the browser and the Safeguard Desktop Player application when replaying session recordings.

Browser Safeguard Desktop Player
Works without installation -
Works on any operating system Windows, Linux, Mac
Replays session recordings recorded with SPS 5 F4 and newer
Replays TN5250 sessions
Extracts files from SCP, SFTP, HTTP and RDP sessions -
Replays HTTP sessions - Only exports raw files from the command line
Replays X11 sessions
Starts replay while rendering is in progress
Follows 4-eyes connections -
Replays live streams in follow mode
Exports to PCAP -
Exports audit trail as video -
Exports screen content text -
Searches in the contents of the session recordings -

Caution:

From version 6.13.0, SPS does not support Internet Explorer 11 (IE11) anymore. SPS version 6.12.0 and previous versions continue to support IE11.

From SPS version 6.10, the Google WebM Video for Microsoft Internet Explorer plugin is not required for replaying audit trails in your browser. The supported browsers are:

  • Google Chrome

  • Firefox

  • Safari

  • Internet Explorer 11 (IE11) - supported until SPS version 6.12.0

For SPS version 6.9 and earlier versions, even though the One Identity Safeguard for Privileged Sessions (SPS) web interface supports Internet Explorer and Microsoft Edge in general, to replay audit trails, you need to use Internet Explorer 11, and install the Google WebM Video for Microsoft Internet Explorer plugin.

If you cannot install Internet Explorer 11 or another supported browser on your computer, use the the Safeguard Desktop Player application. For details, see Replaying audit trails in your browser in the Administration Guide and Safeguard Desktop Player User Guide.

NOTE: From SPS version 6.10 and onwards, you can play video files of audit trails both in central and in cluster environments. Previously, you could play the video files only on the Search Master node in a cluster environment. From SPS version 6.10 and onwards, you can play video files on Search Minion nodes as well.

Prerequisites
  • The Safeguard Desktop Player application is installed and properly configured.

    NOTE: Trying to open your session recording in Safeguard Desktop Player while the application is not installed or not properly configured opens a snackbar notification, taking you directly to the Installing Safeguard Desktop Player section in the One Identity Safeguard for Privileged SessionsSafeguard Desktop Player User Guide.

  • At least one recorded session is available on the Sessions page.

Replaying session recordings with Safeguard Desktop Player started from the SPS UI

With Safeguard Desktop Player installed, and at least one session recorded, you can start replaying started from the SPS UI.

To replay your session recordings with Safeguard Desktop Player started from the SPS UI

  1. On the Sessions page, select the session recording you want to replay.

  2. To display the details of a connection, click . This page is called the details view.

  3. Next to , click the playback options ( ) and choose .

    Depending on your browser, a confirmation window may appear. Verify that you want to open the Safeguard Desktop Player application.

    TIP: You can set your browser to always allow your localhost:<port-number> to open session recordings in Safeguard Desktop Player.

  4. (Optional) For encrypted sessions, upload any missing private keys or certificates, then click .

    Safeguard Desktop Player opens in a separate window.

    NOTE: SPS saves your most recently selected replay method for recorded sessions. Depending on which method you used before logging out previously, the SPS UI will display or when you next log in to SPS and navigate to the details view of your sessions. You can use replay options () to switch between replay methods.

  5. Authenticate with your SPS username and password.

    The recorded session starts replaying.

    For more information about using the Safeguard Desktop Player, see the One Identity Safeguard for Privileged SessionsSafeguard Desktop Player User Guide.

Viewing encrypted screenshots

This section provides information on how to view encrypted screenshots and on the private keys that are necessary to view them.

Prerequisites

To view encrypted screenshots in the Search interface, you have to upload the necessary private encryption keys to your audit keystore. Only RSA keys (in PEM-encoded X.509 certificates) can be uploaded to the audit keystore.

TIP: One Identity recommends using 2048-bit RSA keys (or stronger).

The private keys are stored locally, in your browser.

NOTE: If you clear your browser’s data, your audit keystore could be deleted. If your audit keystore is deleted, upload your private keys again.

To view encrypted screenshots

  1. On the Sessions page, select an encrypted audit trail.

  2. To display the details of a connection, click . This page is called the details view.

  3. To access the list of encrypted screenshots of the selected audit trail, click Events in the details view.

  4. Click the screenshot that you want to view.

  5. (Optional) Unlock your keystore.

    If you have private keys stored in your audit keystore, the Unlock keystore dialog is displayed.

    Figure 312: Unlock keystore — Enter your master password

    Enter your master password and click Unlock keystore.

    The keystore is unlocked and you can use your keys or you can add new keys.

  6. (Optional) If there is a missing private key, the Private keys missing dialog opens.

    Figure 313: Private keys missing dialog

    Click Upload private keys, which takes you to User menu > Audit keystore, where you can add the keys.

  7. (Optional) If necessary, add any missing certificates on Basic settings > Local services > Indexer service.

    Previously, the audit keystore was used to store certificates as well as private keys. From SPS version 6.10 and onwards, you must upload the certificates to Basic settings > Local services > Indexer service.

    For more information on how to add certificates, see Configuring the internal indexer.

Result

Once you add the necessary private keys to your audit keystore, you can view the encrypted screenshots in the Sessions interface.

Related Documents

The document was helpful.

Select Rating

I easily found the information I needed.

Select Rating