The following list applies to all configurations:
-
You have created a configuration backup of One Identity Safeguard for Privileged Sessions (SPS).
For detailed instructions, refer to Exporting the configuration of One Identity Safeguard for Privileged Sessions (SPS).
-
You have a valid support portal account.
To download the required firmware file and license, you need a valid support portal account. Consider that registration is not automatic, and might require up to two working days to process.
-
You have downloaded the latest SPS firmware from the Downloads page.
-
You have read the Release Notes of the firmware before updating. The Release Notes might include additional instructions specific to the firmware version.
The Release Notes are available on the Downloads page.
-
You have verified that SPS is in good condition (no issues are displayed on the System Monitor).
-
Optional: You have exported core dump files, if necessary for debugging, from Basic Settings > Troubleshooting > Core files. These files are removed during upgrade.
If you have a High Availability cluster:
-
You have IPMI access to the secondary node. You can find detailed information on using the IPMI in the following documents:
For Safeguard Sessions Appliance 3000 and 3500, see the X9 SMT IPMI User's Guide.
For Safeguard Sessions Appliance 4000, see the X12 H12 BMC User's Manual.
-
You have verified on the Basic Settings > High Availability page that the HA status is not degraded.
If you are upgrading SPS in a virtual environment:
During the upgrade, SPS displays information about the progress of the upgrade and any possible problems in the following places:
-
On the web interface of SPS, at any of the Listening addresses configured at Basic settings > Local Services > Web login (admin and user). (After booting, you are directed to the login screen of SPS.)
NOTE: If you are upgrading to version 7.5 from version 5.0.x, this feature is enabled after the first boot to version 7.5. So during the upgrade to version 7.5, you will not be able to see any upgrade logs on the web interface.
-
On the console, which you can monitor with IPMI (ILOM) or console access.
The information displayed in the browser and on the console is the same.
One Identity strongly recommends that you test the upgrade process in a non-production (virtual, and so on) environment first.
Upgrading SPS requires a reboot. One Identity strongly recommends that you perform the upgrade on the production appliance during maintenance hours only, to avoid any potential data loss.
The following describes how to upgrade One Identity Safeguard for Privileged Sessions (SPS) to a newer firmware version. To upgrade SPS without using the web interface, see Firmware update using SSH. One Identity recommends that you always use the latest maintenance release available.
|

|
Caution:
When upgrading to a new major release (that is, to a new Feature Release or a new Long-Term Supported release), always follow the instructions of the How to upgrade to One Identity Safeguard for Privileged Sessions guide for that release, as it contains more detailed instructions (available at the Safeguard for Privileged Sessions Documentation page). |
To upgrade SPS to a newer firmware version
-
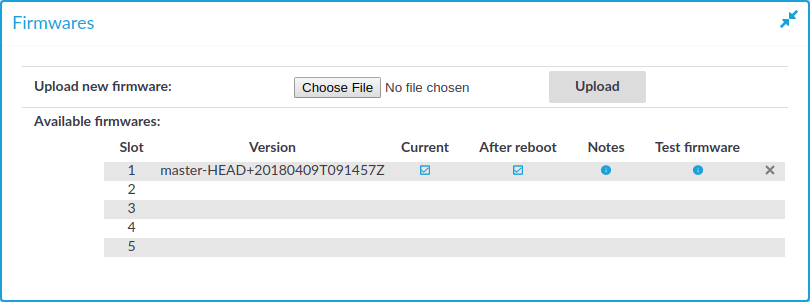
Navigate to Basic Settings > System > Firmwares.
Figure 137: Basic Settings > System > Firmwares — Managing the firmwares
-
Upload the new firmware: Browse for the firmware .iso file and then click Upload.
To read the Upgrade Notes of the uploaded firmware, click on the  icon. The Upgrade Notes are displayed in a pop-up window.
-
Click Test for the new firmware to check if your configuration can be upgraded to version 7.5. If the test returns any errors, correct them before continuing the upgrade process. If you encounter any problems, contact our Support Team.
|
|
Caution:
Proceed only if the upgrade test is successful. |
-
For the new firmware, select After reboot. This will activate the new firmware after reboot.
-
Navigate to Basic Settings > System > System control > This node, and choose Reboot.
SPS attempts to boot with the new firmware. Wait for the process to complete.
-
Login to the SPS web interface to verify that the upgrade was successful.
Navigate to Basic Settings > System > Version details, or check the system log for the version numbers SPS reports on boot. In case you encounter problems, you can find common troubleshooting steps in Troubleshooting.
The following describes how to upgrade a High Availability One Identity Safeguard for Privileged Sessions (SPS) cluster to a newer firmware version. One Identity recommends that you always use the latest maintenance release available.
|
|
Caution:
When upgrading to a new major release (that is, to a new Feature Release or a new Long-Term Supported release), always follow the instructions of the How to upgrade to One Identity Safeguard for Privileged Sessions guide for that release, as it contains more detailed instructions (available at the Safeguard for Privileged Sessions Documentation page). |
To upgrade a High Availability SPS cluster to a newer firmware version
-
Navigate to Basic Settings > System > Firmwares.
-
Upload the new firmware: Browse for the firmware .iso file and then click Upload.
To read the Upgrade Notes of the uploaded firmware, click on the icon. The Upgrade Notes are displayed in a pop-up window.
-
Click Test for the new firmware to check if your configuration can be upgraded to version 7.5. If the test returns any errors, correct them before continuing the upgrade process. If you encounter any problems, contact our Support Team.
|
|
Caution:
Proceed only if the upgrade test is successful. |
-
For the new firmware, select After reboot. This will activate the new firmware after reboot.
-
Navigate to Basic Settings > High Availability, and verify that the new firmware is active on the secondary node. This might take a few minutes.
-
In Basic Settings > High Availability > Other node, click Shutdown.
-
Restart the primary node: click This node > Reboot.
SPS attempts to boot with the new firmware. Wait for the process to complete.
-
Login to the SPS web interface to verify that the primary node upgrade was successful.
Navigate to Basic Settings > System > Version details, or check the system log for the version numbers SPS reports on boot. In case you encounter problems, you can find common troubleshooting steps in Troubleshooting.
-
Use the IPMI to power on the secondary node.
The secondary node attempts to boot with the new firmware, and reconnects to the primary node to sync data. During the sync process, certain services (including Heartbeat) are not available. Wait for the process to finish, and the secondary node to boot fully.
-
Navigate to Basic Settings > High Availability and verify that the secondary node is connected, and has the same firmware versions as the primary node.
-
Click Activate Slave to finish the upgrade process and verify HA functionality.
|
|
Caution:
If you have nodes with the Search Minion role configured, the Search Minion nodes must be upgraded first during High Availability cluster upgrade. If you upgrade the Search Master node first, it is possible that a Search Minion node will create a legacy search database index before the init script on the Search Master creates a new one. In this case, the search database index will contain invalid schema mapping data, therefore as the High Availability cluster’s schema changes, the Search Minion nodes cannot push their documents into the search database, resulting in a critical error. |
To avoid the critical error mentioned above, follow the method below to upgrade a High Availability SPS cluster with Search Minion nodes to a newer firmware version
- Set the Search Master node for upgrade so that it uses the newer firmware version for reboot. To do this, complete steps 1-11 of To upgrade a High Availability SPS cluster to a newer firmware version.
- Click Shutdown.
- Upgrade your Search Minion nodes one after the other, using the method in steps 1-2 above.
- Reboot the Search Master node, which will now boot with the newer firmware version.
With this method you detach the Search Minion nodes from the Search Master node and upgrade them separately before any other nodes. As a result, the whole High Availability cluster will use the newer firmware version after reboot.
If you have accidentally upgraded the Search Master node first and encounter this critical error, contact our Support Team.
If you experience any strange behavior of the web interface, first try to reload the page by holding the SHIFT key while clicking the Reload button of your browser to remove any cached version of the page.
In the unlikely case that One Identity Safeguard for Privileged Sessions (SPS) encounters a problem during the upgrade process and cannot revert to its original state, SPS performs the following actions:
-
Initializes the network interfaces using the already configured IP addresses.
-
Enables SSH-access to SPS, unless SPS is running in sealed mode. That way it is possible to access the logs of the upgrade process that helps the One Identity Support Team to diagnose and solve the problem. Note that SSH access will be enabled on every active interface, even if management access has not been enabled for the interface.
In case the web interface is not available within 30 minutes of rebooting SPS, check the information displayed on the local console and contact our Support Team.
