Exchange Mailbox AutoProvisioning policies automate the selection of a mailbox store or database when designating a user as mailbox-enabled, or creating a mailbox on Microsoft Exchange Server.
When configuring the policy, you can:
For example, you can configure a policy to automatically choose a store that holds the least number of mailboxes.
For a detailed description of this policy, see Concept: Exchange Mailbox AutoProvisioning in the Active Roles Feature Guide.
To configure a new Exchange Mailbox AutoProvisioning policy via the Active Roles Console (also known as the MMC interface), perform the following procedure.
To configure an Exchange Mailbox AutoProvisioning Policy
-
In the Console tree, navigate to Configuration > Policies > Administration.
-
To open the New Provisioning Policy Object Wizard dialog, right-click Administration, then select New > Provisioning Policy.
-
On the Name and Description page, provide a unique Name for the new Policy Object. Optionally, also provide a Description. To continue, click Next.
-
Select the Exchange Mailbox AutoProvisioning policy type for configuration. Click Next.
For more information, see Configuring an Exchange Mailbox AutoProvisioning policy.
-
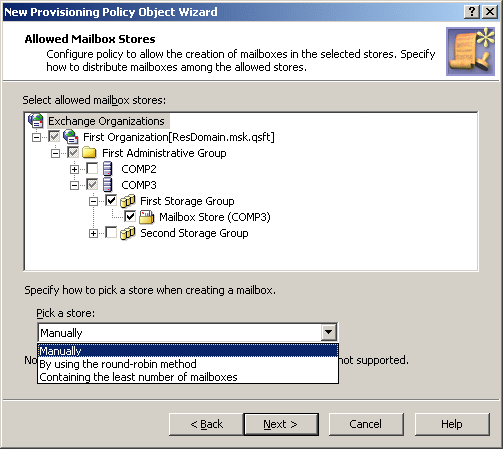
On the Allowed mailbox stores page, select the stores where you want to allow mailbox creation.
In case of multiple stores, from the Pick a store list, select one of following options:
-
Manually: Allows the operator to select a store from the list defined by the policy.
-
By using the round-robin method: Redirects mailbox creation requests sequentially across the stores, selecting the first store for the first request, the second store for the second request and so on. After the last store is reached, the next request is passed to the first store in the sequence.
-
Containing the least number of mailboxes: Forwards mailbox creation requests to the store that holds the least amount of mailboxes.
Figure 26: Allowed mailbox stores
For information about the methods of picking a store in case of multiple stores, see Exchange Mailbox AutoProvisioning in the Active Roles Feature Guide.
-
Click Next, then follow the instructions in the wizard to create (and optionally, immediately apply) the Policy Object.
-
To apply the Policy Object:
-
Use the Enforce Policy page in the New Policy Object Wizard.
-
Alternatively, complete the New Policy Object Wizard, then use the Enforce Policy command on the domain, OU, or Managed Unit where you want to apply the policy.
For more information on how to apply a Policy Object, see Linking Policy Objects to directory objects.
The policy described in this example allows Active Roles to use multiple stores for mailbox creation, and forces Active Roles to automatically select the store that holds the least amount of mailboxes.
To implement this example scenario
-
Create and configure a Policy Object that defines the appropriate policy.
-
Apply the Policy Object to a domain, OU, or Managed Unit.
As a result, when creating a mailbox for a user account that resides in the container that you selected, Active Roles selects the least loaded store from those where mailbox creation is allowed.
For the steps of creating this policy, see Creating and configuring the Exchange Mailbox AutoProvisioning Policy Object.
You can create and configure the Policy Object policy that is described in Example: Load balancing a mailbox store with the New Provisioning Policy Object Wizard.
To create a Policy Object that load balances mailbox creation
-
In the Console tree, navigate to Configuration > Policies > Administration.
-
To open the New Provisioning Policy Object Wizard dialog, right-click Administration, then select New > Provisioning Policy.
-
On the Name and Description page, provide a unique Name for the new Policy Object. Optionally, also provide a Description. To continue, click Next.
-
Select the Exchange Mailbox AutoProvisioning policy type for configuration. Click Next.
For more information, see Configuring an Exchange Mailbox AutoProvisioning policy.
-
On the Allowed mailbox stores page, select the stores where you want to allow mailbox creation.
-
From the Pick a store list, select Containing the least number of mailboxes.
Figure 27: Allowed mailbox stores

-
Click Next, then follow the instructions in the wizard to create (and optionally, immediately apply) the Policy Object.
-
To apply the Policy Object:
-
Use the Enforce Policy page in the New Policy Object Wizard.
-
Alternatively, complete the New Policy Object Wizard, then use the Enforce Policy command on the domain, OU, or Managed Unit where you want to apply the policy.
For more information on how to apply a Policy Object, see Linking Policy Objects to directory objects.
