Property Generation and Validation policies automate the configuration of directory object properties. You can configure these policies to:
-
Populate new directory objects with default property values (for example, when creating new user accounts or groups).
-
Validate the compliance of directory property values against corporate rules.
For example, you can configure a policy to enforce a certain type of telephone number formatting in the contact information properties for your directory.
TIP: Consider the following when planning to configure a Property Generation and Validation policy:
-
To help you get started with configuring policy-based administration in your organization, Active Roles includes a set of built-in Policy Objects that offer provisioning and deprovisioning rules to the most typical administrative use cases. To find the built-in Policy Objects, navigate to the following node of the Active Roles Console:
Configuration > Policies > Administration > Builtin
-
If the directory of your organization contains cloud-only Azure objects (Azure users, guest users or contacts), then use the built-in Azure CloudOnly Policy - Default Rules to Generate Properties Policy Object to provision their default properties and accepted values.
NOTE: Policy Object settings that are specific to Azure cloud-only objects (such as cloud-only Azure users, guest users, or contacts) are available only if your Active Roles deployment is licensed for managing cloud-only Azure objects. Contact One Identity support for more information.
Also, Policy Objects that are specific to Azure cloud-only objects will work correctly only if an Azure tenant is already configured in the AD of the organization, and Active Roles is already set as a consented Azure application for that Azure tenant. For more information on these settings, see Configuring a new Azure tenant and consenting Active Roles as an Azure application.
For a detailed description of this policy, see Concept: Property Generation and Validation in the Active Roles Feature Guide.
To configure a Property Generation and Validation policy via the Active Roles Console (also known as the MMC interface), perform the following procedure.
To configure a Property Generation and Validation policy
-
In the Console tree, navigate to Configuration > Policies > Administration.
-
To open the New Provisioning Policy Object Wizard dialog, right-click Administration, then select New > Provisioning Policy.
-
On the Name and Description page, provide a unique Name for the new Policy Object. Optionally, also provide a Description. To continue, click Next.
-
On the Policy to Configure page, select Property Generation and Validation, and then click Next.
-
On the Controlled Property page, click Select to open the Select Object Type and Property dialog.
-
To select the object type and its object property that you want the policy to control, use the settings of the Select Object Type and Property dialog:
-
To select the object type that you want to configure, use the Object type drop-down menu.
TIP: If you do not see the Object type that you need, to expand the Object type list, select Show all possible object types.
-
To search for the object property, either enter it in the Look for Property search field, or browse for it in the Object Property list.
NOTE: Policy Object settings that are specific to Azure cloud-only objects (such as cloud-only Azure users, guest users, or contacts) are available only if your Active Roles deployment is licensed for managing cloud-only Azure objects. Contact One Identity support for more information.
Also, Policy Objects that are specific to Azure cloud-only objects will work correctly only if an Azure tenant is already configured in the AD of the organization, and Active Roles is already set as a consented Azure application for that Azure tenant. For more information on these settings, see Configuring a new Azure tenant and consenting Active Roles as an Azure application.
TIP: If you do not see the Object property that you need, to expand the Object property list, select Show all possible properties.
-
After you selected the Object type and Object property, to continue, click OK.
-
After you validated on the Controlled Property page that you selected the correct Object type and Object property, click Next.
-
On the Configure Policy Rule page, to specify the condition(s) that you want to configure for the policy, select them in the Select conditions to configure policy rule list. The selected conditions then appear in the Edit policy rule text box.
-
(Optional) If the selected condition supports editing, to open the Add Value dialog and edit its settings, click the underlined item.
To specify additional configuration for the condition, enter a variable into the Value field, then click OK to close the Add Value dialog.
Alternatively, click Configure, then click Add, and configure an entry manually in the Add Entry dialog. For more information on manual configuration, see Configuring entry types. To close the Add Value dialog, click OK.
-
(Optional) To specify a default value if you have selected a condition with (generates default value) in its name:
-
Set the value of Upon object creation, this policy generates default value to Yes.
-
If you have added more than one value, click the value that you want to configure as the default value, and select Default value, then click OK. The string (default value) appears next to the value.
-
(Optional) If you have selected multiple conditions, switch between the AND and OR logic of the condition relations by clicking and or or. The displayed logic is the condition relation that is in effect.
-
After selecting and configuring the condition(s), click Next.
-
(Optional) To modify the default description of the policy generated by the wizard, on the Policy Description page, select Modify this policy description. Modify the description, then click Next.
-
Click Next, then follow the instructions in the wizard to create (and optionally, immediately apply) the Policy Object.
-
To apply the Policy Object:
-
Use the Enforce Policy page in the New Policy Object Wizard.
-
Alternatively, complete the New Policy Object Wizard, then use the Enforce Policy command on the domain, OU, or Managed Unit where you want to apply the policy.
For more information on how to apply a Policy Object, see Linking Policy Objects to directory objects.
TIP: When provisioning cloud-only Azure users or guest users, you can either select the respective object category (such as the Azure user or Azure guest user node) in this step, or the Azure tenant that contains the Azure objects.
This example describes how to configure a policy that forces the user telephone number to conform to the following format: (123) 456-78-90.
To implement this example scenario
-
Create and configure a Policy Object that defines the appropriate policy.
-
Apply the Policy Object to a domain, OU, or Managed Unit.
As a result, when creating or modifying a user object in the container that you selected, Active Roles validates the telephone number against the defined format. If it does not conform to the defined format, the policy does not allow creating or editing the user object.
For the steps of creating this policy, see Creating and configuring a Property Generation and Validation Policy Object with a Mask entry type.
You can create the Property Generation and Validation policy that is described in Example: Using a Mask entry type to control phone number format with the New Provisioning Policy Object Wizard.
To control the phone number format with the Property Generation and Validation Policy Object using a Mask entry type
-
In the Console tree, navigate to Configuration > Policies > Administration.
-
To open the New Provisioning Policy Object Wizard dialog, right-click Administration, then select New > Provisioning Policy.
-
On the Name and Description page, provide a unique Name for the new Policy Object. Optionally, also provide a Description. To continue, click Next.
-
Select the Property Generation and Validation policy type for configuration. Click Next.
For more information, see Configuring a Property Generation and Validation policy.
-
On the Controlled Property page, click Select.
-
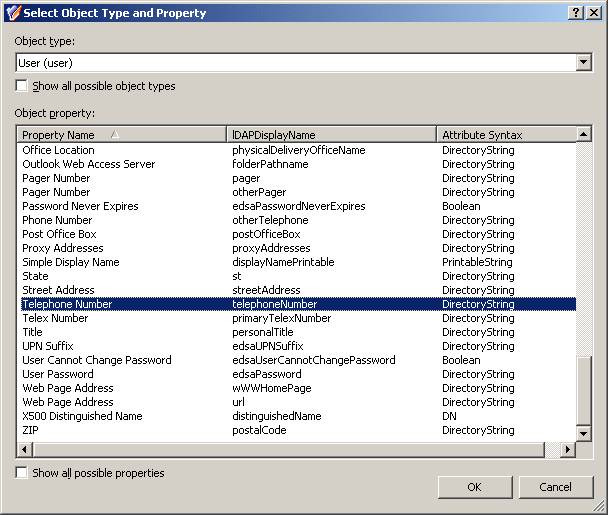
In the Select Object Type and Property dialog, from the Object type list, select User.
-
In the Object property list, select Telephone number.
Figure 32: Select Object Type and Property
-
After you selected the Object type and Object property, to continue, click OK.
-
After you validated on the Controlled Property page that you selected the correct Object type and Object property, click Next.
-
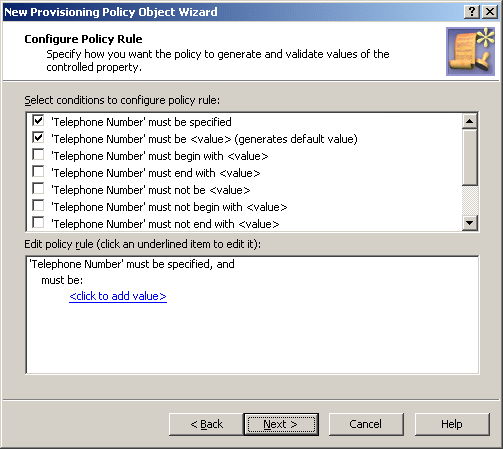
On the Configure Policy Rule page, select the following:
-
‘Telephone Number’ must be specified: This condition requires a phone number for every user account.
-
‘Telephone Number’ must be <value>: This condition requires a certain value as the telephone number. In this example, this is a mask.
Figure 33: Configure Policy Rule: Telephone Number must be specified and must be <value>
-
Click the <click to add value> link.
-
In the Add Value dialog, click Configure.
-
To open the Add Entry window, click Add.
-
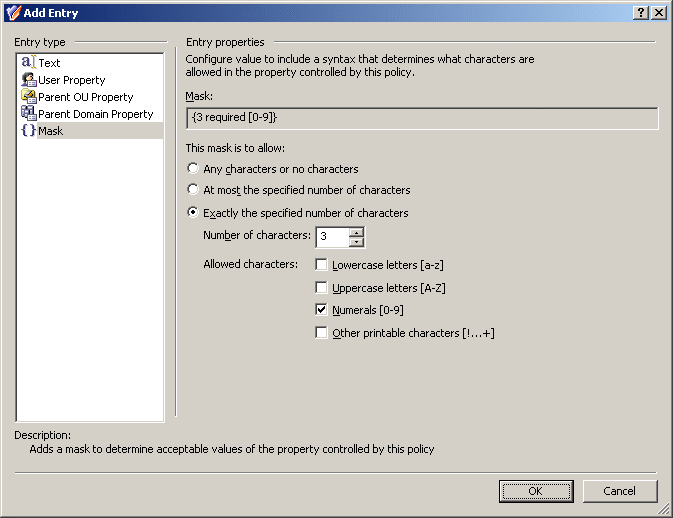
In the Add Entry window, under Entry type, select Mask.
-
The telephone number format consists of four groups of numerals divided by certain characters: spaces, hyphens, and brackets. First, configure a mask that requires the first three characters to be numerals:
-
Select Exactly the specified number of characters.
-
In the Number of characters field, enter 3.
-
Under Allowed characters, select the Numerals check box.
Figure 34: Entry properties
-
To apply the value setting for the entry, click OK.
-
To close the Configure Value dialog, click OK.
Figure 35: Add value dialog

-
Taking into consideration the mask that you have configured, the mask for the telephone number format that you need is as follows:
({3 required [0-9]}) {3 required [0-9]}-{2 required [0-9]}-{2 required [0-9]}
Type this mask in the Add Value dialog, in the ‘Telephone Number’ must be field. Pay attention to the round brackets enclosing the first three characters, a space character following the group in the round brackets, and two hyphen characters that separate the groups of characters.
-
To apply the value setting for the entry, click OK.
-
Click Next, then follow the instructions in the wizard to create (and optionally, immediately apply) the Policy Object.
-
To apply the Policy Object:
-
Use the Enforce Policy page in the New Policy Object Wizard.
-
Alternatively, complete the New Policy Object Wizard, then use the Enforce Policy command on the domain, OU, or Managed Unit where you want to apply the policy.
For more information on how to apply a Policy Object, see Linking Policy Objects to directory objects.
TIP: When provisioning cloud-only Azure users or guest users, you can either select the respective object category (such as the Azure user or Azure guest user node) in this step, or the Azure tenant that contains the Azure objects.
