Chat now with support
Chat with Support

Identity Manager 8.2.1 - Operational Guide

About this guide Simulating data changes in the Manager Scheduling operations activation times Re-applying templates Exporting data with the Manager Analyzing data and data changes Analyzing process monitoring in the Manager Schedules in One Identity Manager Mail templates in One Identity Manager Password policies in One Identity Manager Working with change labels Checking data consistency Compiling a One Identity Manager database Transporting custom changes Importing data with the Data Import Importing and exporting individual files for the software update Creating a One Identity Manager database for test or development from a database backup Initializing DBQueue Processor the after extending the server hardware Command line programs

Creating mail previews

You can edit certain mail templates in the Manager. For detailed information about editing mail templates in the Manager, refer to the administration guides for the modules.

To display a mail template preview in the Designer

  1. In the Designer, select the Mail templates category.

  2. Select the mail template and start Mail Template Editor using the Edit mail template task.

  3. Select the Mail templates > Mail preview menu item.

  4. Select the base object and click OK.

General properties of mail templates

Table 18: Mail template properties

Property

Meaning

Mail template

Name of the mail template. This name will be used to display the mail templates in the administration tools and in the Web Portal. Translate the given text using the button.

Base object

Mail template base object. A base object only needs to be entered if the mail definition properties of the base object are referenced.

Report (parameter set)

Report, made available through the mail template.

Description

Mail template description. Translate the given text using the button.

Target format

Format in which to generate email notification. Permitted values are:

  • HTML: The email notification is formatted in HTML. Text formats, for example, different fonts, colored fonts, or other text formatting, can be included in HTML format.

  • TXT: The email notification is formatted as text. Text format does not support bold, italics, or colored font, or other text formatting. Images displayed directly in the message are not supported.

Design type

Design in which to generate the email notification. Permitted values are:

  • Mail template: The generated email notification contains the mail body in accordance with the mail definition.

  • Report: The generated email notification contains the report specified under Report (parameter set) as its mail body.

  • Mail template, report in attachment: The generated email notification contains the mail body in accordance with the mail definition. The report specified under Report (parameter set) is attached to the notification as a PDF file.

Importance

Importance for the email notification. Permitted values are Low, Normal, and High.

Confidentiality

Confidentiality for the email notification. Permitted values are Normal, Personal, Private, and Confidential.

Can unsubscribe

Specifies whether the recipient can unsubscribe email notification. If this option is set, the emails can be unsubscribed through the Web Portal.

Deactivated

Specifies whether this mail template is disabled.

Mail definition

Selects the mail definition in a specific language.

NOTE: If the Common | MailNotification | DefaultCulture configuration parameter is set, the mail definition is loaded in the default language for email notifications when the template is opened.

Language

Language that applies to the mail template. The recipient's language preferences are taken into account when an email notification is generated.

Subject

Subject of the email message.

Mail body

Content of the email message.

Related topics

Creating and editing mail definitions

Mail texts can be defined in these different languages in a mail template. This ensures that the language of the recipient is taken into account when the email is generated.

To create a new mail definition

  1. In the Designer, select the Mail templates category.

  2. Select the mail template and start Mail Template Editor using the Edit mail template task.

  1. In the result list, select the language for the mail definition in the Language menu.

    All active languages are shown. To use another language, in the Designer, enable the corresponding countries. For more information, see the One Identity Manager Configuration Guide.

  2. Enter the subject in Subject.

  3. Edit the mail text in the Mail definition view with the help of the Mail Text Editor.

  4. Save the changes.

To edit an existing mail definition

  1. In the Designer, select the Mail templates category.

  2. Select the mail template and start Mail Template Editor using the Edit mail template task.

  1. In the Mail definition menu, select the language for the mail definition.

    NOTE: If the Common | MailNotification | DefaultCulture configuration parameter is set, the mail definition is loaded in the default language for email notifications when the template is opened.

  2. Edit the mail subject line and the body text.

  3. Save the changes.
Related topics

Using base object properties in mail templates

In the subject line and body text of a mail definition, you can use all properties of the object entered under Base object. You can also use the object properties that are referenced by foreign key relation.

To access properties use dollar notation. For more information, see the One Identity Manager Configuration Guide.

Example:

An IT Shop requester should receive email notification about the status of the request.

Table 19: Email notification properties

Property

Value

Base object

PersonWantsOrg

Subject

"$DisplayOrg[D]$" status change

Mail body

Dear $FK(UID_PersonOrdered).Salutation[D]$ $FK(UID_PersonOrdered).FirstName$ $FK(UID_PersonOrdered).LastName$,

The status was changed on the following request on $DateHead:Date$.

Requested by: $DisplayPersonInserted$

Requested by: $DisplayPersonInserted$

Reason: $OrderReason$

Current status of your request:

Approval: granted

Approver: $DisplayPersonHead[D]$

Reason: $ReasonHead[D]$

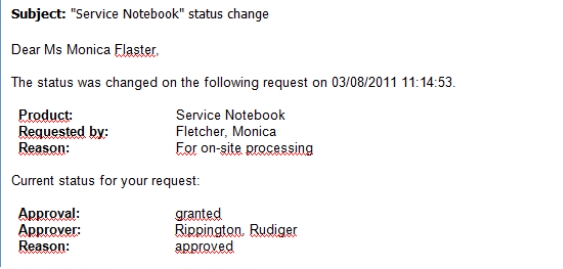
The generated email notification could look like the following, for example, once it has been formatted.

Related topics
Related Documents

The document was helpful.

Select Rating

I easily found the information I needed.

Select Rating