Chat now with support
Chat with Support

One Identity Safeguard for Privileged Sessions 6.9.3 - Administration Guide

Preface Introduction The concepts of One Identity Safeguard for Privileged Sessions (SPS)
The philosophy of One Identity Safeguard for Privileged Sessions (SPS) Policies Credential Stores Plugin framework Indexing Supported protocols and client applications Modes of operation Connecting to a server through One Identity Safeguard for Privileged Sessions (SPS) Archive and backup concepts Maximizing the scope of auditing IPv6 in One Identity Safeguard for Privileged Sessions (SPS) SSH host keys Authenticating clients using public-key authentication in SSH The gateway authentication process Four-eyes authorization Network interfaces High Availability support in One Identity Safeguard for Privileged Sessions (SPS) Versions and releases of One Identity Safeguard for Privileged Sessions (SPS) Accessing and configuring One Identity Safeguard for Privileged Sessions (SPS)
The Welcome Wizard and the first login Basic settings
Supported web browsers and operating systems The structure of the web interface Network settings Configuring date and time System logging, SNMP and e-mail alerts Configuring system monitoring on SPS Data and configuration backups Archiving and cleanup Using plugins Forwarding data to third-party systems Starling integration
User management and access control Managing One Identity Safeguard for Privileged Sessions (SPS)
Controlling One Identity Safeguard for Privileged Sessions (SPS): reboot, shutdown Managing Safeguard for Privileged Sessions (SPS) clusters Managing a High Availability One Identity Safeguard for Privileged Sessions (SPS) cluster Upgrading One Identity Safeguard for Privileged Sessions (SPS) Managing the One Identity Safeguard for Privileged Sessions (SPS) license Accessing the One Identity Safeguard for Privileged Sessions (SPS) console Sealed mode Out-of-band management of One Identity Safeguard for Privileged Sessions (SPS) Managing the certificates used on One Identity Safeguard for Privileged Sessions (SPS)
General connection settings HTTP-specific settings ICA-specific settings MSSQL-specific settings RDP-specific settings SSH-specific settings Telnet-specific settings VMware Horizon View connections VNC-specific settings Indexing audit trails Using the Search interface Advanced authentication and authorization techniques Reports The One Identity Safeguard for Privileged Sessions (SPS) RPC API The One Identity Safeguard for Privileged Sessions (SPS) REST API One Identity Safeguard for Privileged Sessions (SPS) scenarios Troubleshooting One Identity Safeguard for Privileged Sessions (SPS) Using SPS with SPP Configuring external devices Using SCP with agent-forwarding Security checklist for configuring One Identity Safeguard for Privileged Sessions (SPS) Jumplists for in-product help Configuring SPS to use an LDAP backend Glossary

Creating a Local User Database

Local User Databases are available for HTTP, RDP, SSH and Telnet protocols, and can be used to authenticate the clients to credentials that are locally available on One Identity Safeguard for Privileged Sessions (SPS). Such credentials include passwords and public keys. Local User Databases are most commonly used in inband gateway authentication scenarios.

NOTE: To store credentials on SPS and use them to authenticate on the server, use a local Credential Store. For details, see Using credential stores for server-side authentication.

To create a Local User Database

  1. Navigate to Policies > Local User Databases and click .

  2. Enter the name of the Local User Database.

  3. Click to add entries.

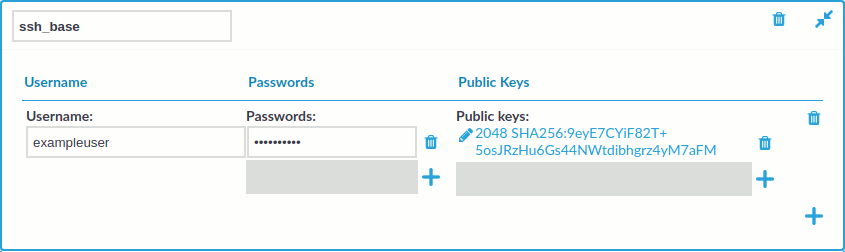
    Figure 186: Policies > Local User Databases — Mapping keys

  4. Enter the name of the user into the Username field.

    NOTE: If you also use Usermapping policies, enter the username that the client will use on the server side. If you also use gateway authentication, the gateway username can be used as well.

  5. If you use public-key based authentication on the client side, click the icon in the Public Keys field, and upload the public key of the client.

    SPS will verify that a client trying to use the username set in Step 3 is authenticating itself with the private key that corresponds to the uploaded public key or certificate.

    One Identity recommends using 2048-bit RSA keys (or stronger).

  6. Repeat the above steps to add other users as required.

  7. Click .

  8. Navigate to the Authentication Policies tab of the respective protocol and select the Local User Database there.

Related Documents

The document was helpful.

Select Rating

I easily found the information I needed.

Select Rating