Initial configuration of Active Roles On Demand
Initial configuration of Active Roles On Demand
When One Identity personnel confirmed to you that the offline join procedure of the Active Roles server has finished, perform the initial configuration of One Identity Active Roles On Demand.
Prerequisites
Make sure that the following conditions are met before performing initial configuration:
-
One Identity confirmed that the Active Roles On Demand tenant is ready for configuration.
-
The Active Roles server deployed by One Identity personnel is joined to the Active Directory of your organization.
-
The Active Roles installation package is downloaded from the One Identity Support Portal.
-
The user account that you use for configuring the Active Roles components is a Local Workstation Administrator, and has all required Active Directory permissions. For more information, see Required Permissions and Access in the Active Roles How-To Guide.
-
The workstation where you perform the procedure meets the minimum system requirements (described in Active Roles On Demand system requirements) and is joined to the same domain as the Active Roles server.
-
The Active Roles Service Account has the proper permissions. For more information, see Required Permissions and Access in the Active Roles How-To Guide.
NOTE: For each added domain, additional service accounts may be required.
-
An Active Directory group containing the administrators of Active Roles (and the account used to perform the following procedure) has been created.
-
All required communication ports are open for any firewalls. For more information, see Appendix C: Communication ports of the Active Roles Administration Guide.
Installing the One Identity Certificate
To ensure that the Active Roles Configuration Center installed on-premises can communicate with the Active Roles server deployed by One Identity, you must install the One Identity certificate on the workstation(s) where the Active Roles Configuration Center will be used.
NOTE: Perform this procedure only on the workstation(s) of the Active Roles administrator(s) who will run the Active Roles Configuration Center. You do not need to perform this procedure for any other Active Roles users, interfaces or management tools.
The Active Roles Configuration Center can only connect to the Active Roles server deployed by One Identity if this procedure is performed.
To install the One Identity Certificate
-
On an Active Roles administration workstation, navigate to the following UNC path:
\\<active-roles-server-name>\C$\Program Files\One Identity\Active Roles\7.5.3\Shell
-
To open the list of Active Roles-specific signatures, right-click the ActiveRolesServiceConfiguration.psm1 file and click Properties > Digital Signatures.
-
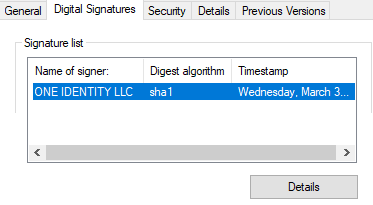
To open the details of the certificate, on the Digital Signatures tab, select ONE IDENTITY LLC from the Signature list and click Details.
-
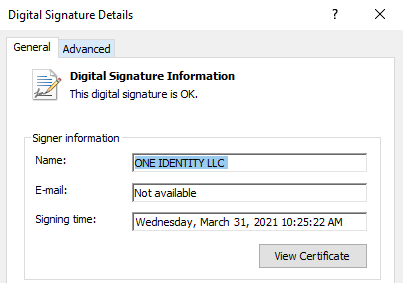
On the Digital Signature Details > General tab, click View Certificate.
-
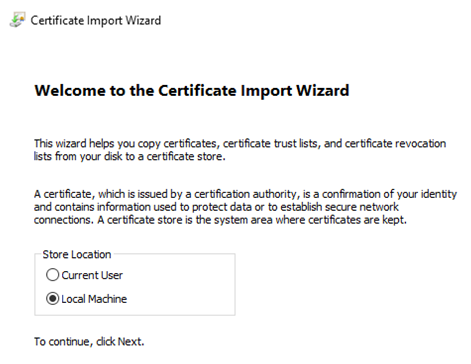
To launch the Certificate Import Wizard, on the Certificate > General tab, click Install Certificate.

-
Under Store Location, select Local Machine and click Next.
-
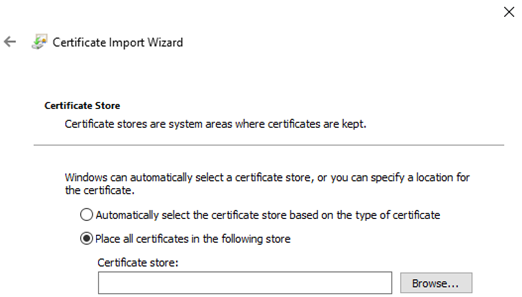
In the Certificate Store step, select Place all certificates in the following store and click Browse.
-
In the browse window that appears, select the Trusted Publishers directory and click OK.
-
To apply your changes, close all remaining steps of the Certificate Import Wizard by clicking Next, Finish and OK, respectively.
First-time configuration of Active Roles On Demand
When the One Identity Certificate is installed on the workstation(s) that will run the Active Roles Configuration Center, perform the first-time configuration of One Identity Active Roles On Demand.
To perform the first-time configuration of Active Roles On Demand
-
Copy the downloaded Active Roles .zip or .iso file to the local workstation of an Active Roles administrator. Depending on the file format of the installer, extract the .zip or mount the .iso.
-
To start the installation of the Active Roles Configuration Center, double-click the Configuration Center installation package in the local extracted location or the mounted ISO drive:
Components\ActiveRoles Configuration Center\ConfigCenter.msi
NOTE: The installation will progress without interaction, and will complete without a completion prompt.
After the installation is complete, the Active Roles Configuration Center will appear in the Windows Start Menu.
-
Open the Active Roles Configuration Center in the Windows Start menu.
-
In the Select Server window, select Another server, enter the name of the Active Roles server in the Server field, and the connection credentials to the User name and Password fields.
To proceed, click Connect. The Active Roles Configuration Center window will then appear.
-
To open the server settings of Active Roles, click Configure under Dashboard > Administration Service.
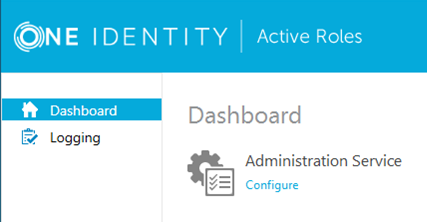
The Configure Administration Service window then opens.
-
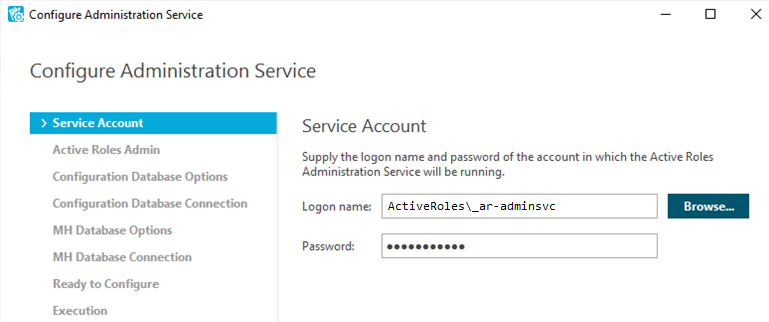
In the Service Account tab, enter the Active Roles service account credentials in the Logon name and Password fields.
-
In the Active Roles Admin tab, enter the domain group of the Active Roles administrators.
-
In the Configuration Database Options tab, select the New Active Roles database > Use a pre-created blank database option.
-
In the Configuration Database Connection tab, configure the following options:
-
In the Management History Database Options tab, select New Active Roles database > Use a pre-created blank database.
-
In the Connection to Management History Database tab, configure the following settings:
-
(Optional) On the Encryption Key Backup tab, set up a password-protected backup of the configuration. To specify the location of the backup file, click Browse. To configure password-protection for the backup, select Protect the backup file with a password and enter the password for the backup.
NOTE: Keep a copy of this file and password in a secure location for future use.
-
On the Ready to Configure tab, review your settings. When you are ready to apply the changes, click Configure.
The Configure Administration Service window will display the configuration progress in the Execution (Progress) tab.
-
When the configuration finished:
-
To close the Configure Administration Service window, click Finish.
-
To open the configuration log, click the View log link.
TIP: Use the provided support links of this tab to access the video tutorials, knowledge base articles and other support resources of Active Roles.
-
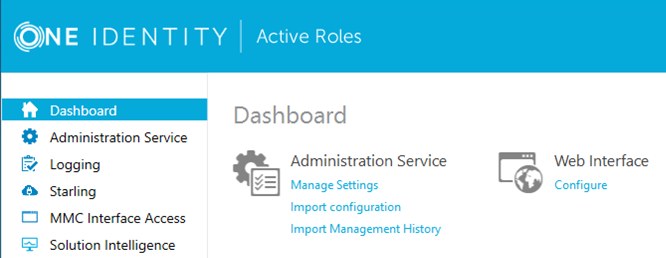
On the Active Roles Configuration Center, click Manage Settings under Dashboard > Administration Service.

-
Wait for the Administration Service to change from Getting ready to Ready for use status. When this happens, open the Configure Web Interface window by navigating to Dashboard > Web Interface > Configure.
-
In the Administration Service tab, select Administration Service on the computer running the Web Interface and click Configure.

The Configure Web Interface window will show the configuration progress in the Execution (Progress) tab.
With the SSL certificates also installed, the first-time configuration of Active Roles On Demand is finished, and it is ready to add and manage any Active Directory domains. Close the Active Roles Configuration Center.
Installing the Active Roles Console
The Active Roles Console (also known as the MMC Interface) is a comprehensive administrative tool for managing Active Directory and Microsoft Exchange objects. Using the Console, Active Roles administrators can specify administrative roles and delegate control, define administrative policies and automation scripts, easily find directory objects, and perform various administrative tasks.
NOTE: The Active Roles Console can be installed and used by any Active Roles On Demand user.
To install the Active Roles Console
-
Launch the installer package of the Console from the Active Roles source files. The files are available at the following locations of the extracted Active Roles installer (when using the .zip file) or the mounted .iso image:
-
If you use a 32-bit operating system, run \Components\ActiveRoles Console\x86\Console_x86.msi
-
If you use a 64-bit operating system, run \Components\ActiveRoles Console\x64\Console_x64.msi
NOTE: The installation will progress without interaction, and will complete without a completion prompt.
Upon completion, the Active Roles Console will be visible in the Windows Start Menu as Active Roles 7.5.3 Console.
-
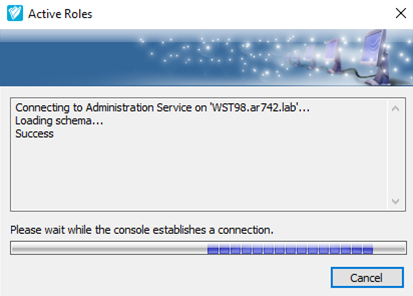
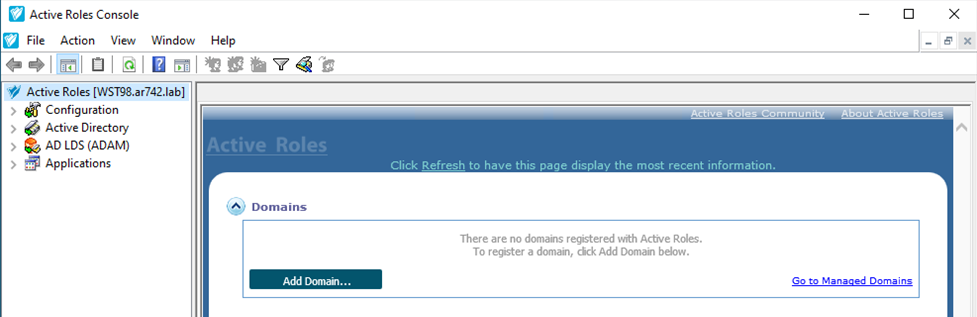
Start the Active Roles Console by clicking Active Roles 7.5.3 Console in the Windows Start Menu, and wait until the Active Roles Console establishes a connection to the Active Roles server and opens.
-
When Active Roles Console first opens, its Domains section will be blank. To configure the first domain, see Adding the first domain to the Active Roles Console.
After adding the first domain, it will appear for all other users when they open the Active Roles Console on any workstation or server.
