You need to allocate an approval workflow to the approval policies in order to find the approvers. In an approval workflow, you specify the approval procedures, the number of approvers and a condition for selecting the approvers.
Use the workflow editor to create and edit approval workflows.
To edit an approval workflow
-
In the Manager, select the IT Shop > Basic configuration data > Approval workflows category.
-
Select the approval workflow in the result list and run the Change main data task.
- OR -
Click  in the result list.
This opens the Workflow Editor.
-
Edit the approval workflow main data.
- Save the changes.
Use the workflow editor to create and edit approval workflows. The workflow editor allows approval levels to be linked together. Multi-step approval processes are clearly displayed in a graphical form.
Figure 4: Workflow editor
Approval levels and approval steps belonging to the approval workflow are edited in the workflow editor using special control elements. The workflow editor contains a toolbox. The toolbox items are activated or deactivated depending on how they apply to the control. You can move the layout position of the control elements in the workflow editor with the mouse or these can be moved automatically.
Table 24: Entries in the toolbox
|
Workflow |
Edit |
Edit the properties of the approval workflow. |
|
Layout automatically |
The workflow elements are aligned automatically. The workflow layout is recalculated. |
|
Approval levels |
Add |
A new approval level is added to the workflow. |
|
Edit |
Edit the properties of the approval workflow. |
|
Delete |
Deletes the approval level. |
|
Approval steps |
Add |
Add a new approval step to the approval level. |
|
Edit |
Edit the properties of the approval step. |
|
Delete |
Deletes the approval step. |
|
Assignments |
Remove positive |
The Approved connector for the selected approval level is deleted. |
|
Remove negative |
The Deny connector for the selected approval level is deleted. |
|
Remove reroute |
The Reroute connector for the selected approval level is deleted. |
|
Remove escalation |
The Escalate connector for the selected approval level is deleted. |
Each of the controls has a properties window for editing the data of the approval workflow, level, or step. To open the properties window, select the Toolbox > < Control> > Edit item.
To delete a control, select the element and then the Toolbox > <Control> > Delete item.
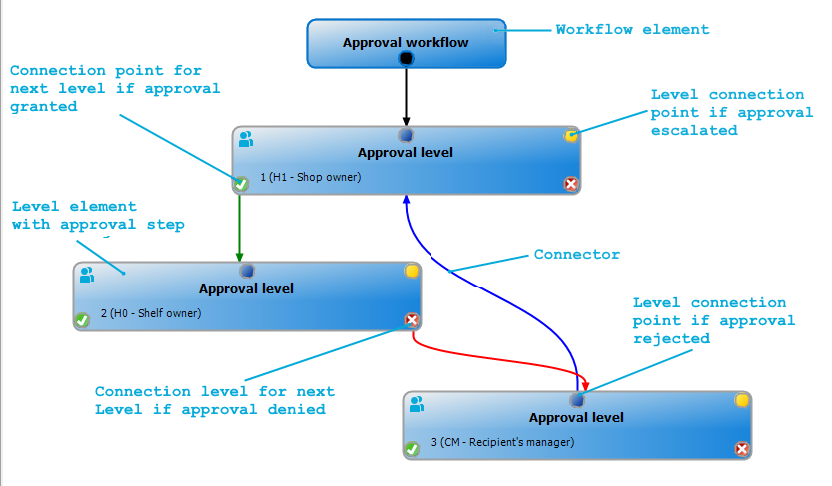
Individual elements are linked to each other with a connector. Activate the connection points with the mouse. The cursor changes into an arrow icon for this. Hold down the left mouse button and pull a connector from one connection point to the next.
Figure 5: Approval workflow connectors
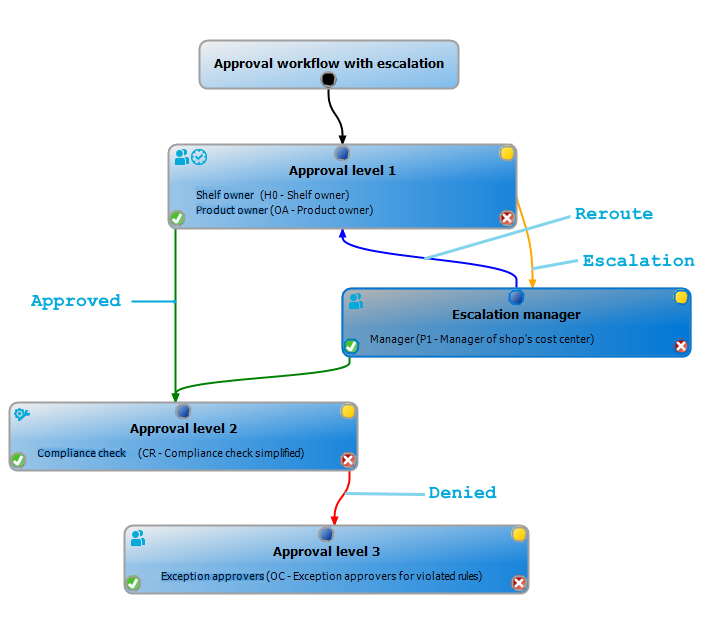
Table 25: Approval workflow connectors
|
Approve |
Link to next approval level if the current approval level was granted approval. |
|
Deny |
Link to next approval level if the current approval level was not granted approval. |
|
Reroute |
Link to other approval levels to bypass the current approval. |
|
Escalation |
Connection to another approval level when the current approval level is escalated after timing out. |
By default, a connection between workflow elements and level elements is created immediately when a new element is added. If you want to change the level hierarchy, drag a new connector to another level element.
Alternatively, you can release connectors between level elements using the Toolbox > Assignments items. To do this, mark the level element where the connector starts. Then add a new connector.
Different icons are displayed on the level elements depending on the configuration of the approval steps.
Table 26: Icons on the level elements
|

|
The approval decision is made by the system. |
|

|
The approval decision is made manually. |
|

|
The approval step contains a reminder function. |
|

|
The approval step contains a timeout. |
Changes to individual elements in the workflow do not take place until the entire approval workflow is saved. The layout position in the workflow editor is saved in addition to the approval policies.
An approval workflow consists of one or more approval levels. An approval level can contain one approval step or several parallel approval steps. Within the approval process, all of the approval steps for one approval level must be run before the next approval level is called. Use connectors to set up the sequence of approval levels in the approval workflow.
When you add a new approval workflow, the first thing to be created is a new workflow element.
To edit approval level properties
-
Open the Workflow Editor.
-
Select the Toolbox > Workflow > Edit item.
-
Edit the workflow properties.
- Click OK.
Table 27: Approval workflow properties
|
Name |
Approval workflow name. |
|
System halt (days) |
Number of days to elapse after which the approval workflow, and therefore the system, automatically halts the entire approval process. |
|
Description |
Text field for additional explanation. |
Detailed information about this topic
An approval level provides a method of grouping individual approval steps. All the approval steps in one approval level are run in parallel. All the approval steps for different approval levels are run one after the other. You use the connectors to specify the order.
Specify the individual approval steps in the approval levels. At least one approval step is required per level. Enter the approval steps first before you add an approval level.
To add an approval level
-
Select the Toolbox > Approval levels > Add item.
This opens the properties dialog for the first approval step.
-
Enter the approval step properties.
- Save the changes.
You can edit the properties of an approval level as soon as you have added an approval level with at least one approval step.
To edit approval level properties
-
Select the approval level.
-
Select the Toolbox > Approval levels > Edit item.
-
Enter a display name for the approval level.
- Save the changes.
NOTE: You can define more than one approval step for each approval level. In this case, the approvers of an approval level can make a decision about a request in parallel rather than sequentially. The request cannot be presented to the approvers at the next approval level until all approval steps of an approval level have been completed within the approval process.
To add more approval steps to an approval level
-
Select the approval level.
-
Select the Toolbox > Approval steps > Add item.
-
Enter the approval step properties.
- Save the changes.
Detailed information about this topic
