The navigation structure of the user interface is hierarchical and allows users to drill down to the selection of an object definition. The top level of the hierarchy is used to classify the data managed by One Identity Manager into specified categories. Categories include a range of different menu items. Select a category on the category tab. You can configure additional settings in the configuration menu.
Figure 2: Navigation view in the Manager with the "Organizations" category as an example
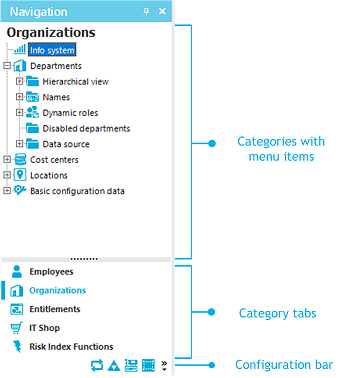
TIP: If menu items are linked to preprocessor-relevant configuration parameters, you can display the preprocessor conditions behind the menu items. To do this, enable the program setting Show additional navigation information.
Specific mouse commands are available:
-
You can open or close a menu item by double-clicking on the entry name.
-
Click the name of the menu item to show the found objects in the result list, as long as a corresponding object for that object type is found. If there are no objects for a defined menu item, an empty result list is shown.
Table 10: General key combinations for the navigation view
|
Ctrl + Q |
Activate navigation structure. |
|
Down arrow, up arrow, page down key, page up key, home, end |
Move up/down the navigation structure. |
|
<+> or right arrow key |
Open menu item. |
|
<-> or left arrow key |
Close menu item. |
|
Data |
Select an entry. |
|
F5 |
Update the navigation view. |
The navigation view has its own context menu. Menu commands are shown or hidden depending on the selected menu item.
Table 11: Entries in the context menu of the navigation view in the Manager
|
New |
A new object with the selected object type is added. Already entered insert values are applied. |
|
Open on new tab |
The object is opened in a new form in the document view. |
|
Refresh view |
Updates the navigation view. |
|
Search |
The system searches for objects in the navigation. |
|
Add to my One Identity Manager |
Copies the selected menu item to the My One Identity Manager category. This helps you navigate quickly to frequently used menu items. The data is saved in the user configuration. |
|
Add to favorites |
Adds the selected object to your favorites. |
|
Remove from favorites |
Removes the selected object from your favorites. |
|
Show process information |
The process view shows the process data for the selected object. For detailed information about the evaluation of process information, see the One Identity Manager Operational Guide. |
|
Tasks |
The available tasks for the object are displayed and you can run the desired task. |
|
Definition |
Shows detailed information about configuring the menu item. This menu item is only available in expert mode. |
|
Show deferred operations |
Shows the deferred operations for the objects in this category. For detailed information about planning activation times, see the One Identity Manager Operational Guide. |
The navigation view features a configuration bar with its own configuration menu.
To open the configuration menu of the navigation view
Table 12: Entries in the navigation view configuration menu
|
Show more categories |
More categories are shown in the list. The category icon is removed from the configuration bar. |
|
Show fewer categories |
More categories in the list are hidden. These are represented by icons in the configuration bar. |
|
Settings |
Opens the program settings. |
|
Add or remove categories |
Categories can be removed from or added to the list. |
Related topics
The category My One Identity Manager shows the user-specific entries in the Manager. All the available infosystems and specific reports for the current user are shown here. In this category you can create and apply user-specific filters.
To copy a menu item to the My Manager category in One Identity Manager
To delete a menu item from the My Manager category in One Identity Manager
Table 13: Additional entries in the context menu for the my One Identity Manager category
|
Remove from My One Identity Manager |
Removes the selected menu item from this category. |
|
New filter |
Search criteria for database queries are saved as filters. |
|
Edit filter |
The selected filter can be edited. |
|
Remove filter |
Deletes the selected filter. |
|
Attaching |
The selected filter is attached to a category. When you select a category, all objects that correspond to the filter are shown on a separate form page. |
|
Export filter |
Exports the selected filter as an XML file. |
|
Import filter |
Imports filters that exist as XML files. |
Related topics
The result list shows all the objects that correspond to the object definition and the conditions of the selected menu entry. Select an entry from the list. The object is loaded and the first available form appears in the document view. If there are no objects for the selected menu entry, the document view continues to show the most recently selected form.
A list title is shown in the title bar of the result list. This depends on which menu item in the navigation structure was used to select the object. This list title also contains the number of elements in a list.
Figure 3: Example for result list in the Manager
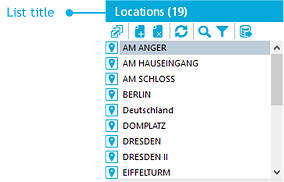
In the result list, an object is marked with the symbol that was set when the interface was configured. If an object is deleted by the One Identity Manager Service, the object is initially marked for deletion. It is permanently deleted only after a set time period. Objects that are selected for deletion are marked with the icon  .
.
NOTE: Objects marked for deletion are struck through on the overview form.
By default, an object is loaded by means of a double-click and the first available form is displayed in the document view.
To load objects with a single click
-
Select the Database > Settings menu item.
-
On the User tab, activate the Use single clicks option.
Select single objects one after the other to update the opened form in the document view. Only one form is open at a time.
To display multiple forms in the document view:
-
Use Alt + Click or click Open on new tab from the context menu to open the objects.
This means that you can quickly switch between objects without having to reload the object from the list again. The forms stay open when you switch between categories.
To edit multiple objects at the same time:
-
Use Shift + selection or Ctrl + selection to select the objects in the result list.
-
Open the main data form using Input, the corresponding icon in the result list or the Tasks > Change main data context menu item.
New objects are displayed below the Added entry in the result list. The objects used are displayed below the Recently used entry in the result list.
To display recently used objects in the Manager
-
Select the Database > Settings menu item.
-
On the User tab, activate the Show recently used objects option and enter the Object type count.
Table 14: Common key combinations for the result list in the Manager
|
Ctrl + R |
Enable result list. |
|
Down arrow, up arrow, page down key, page up key, home, end |
Move up/down the list. |
|
Enter, Alt + Enter |
Open an item. |
|
Shift + selection + Enter , Ctrl + selection + Enter |
Select multiple entries and open the main data form to edit multiple entries. |
|
F5 |
Update the result list. |
The result list has its own toolbar and context menu.
Table 15: Toolbar features in the Manager
|

|
Edit. Opens the main data form. |
|

|
New. Creates a new object. |
|
|
Delete. Deletes the object. |
|

|
Undo delete. Redo delete. |
|

|
Reload the data. Reloads the objects. |
|

|
Search. Search in result list. |
|

|
Filter. Filter result list. |
|

|
Export result list. |
Table 16: Entries in the result list context menu in the Manager
|
New |
A new object with the selected object type is added. Already entered insert values are applied. |
|
Delete |
The selected object is deleted once the security prompt is confirmed. |
|
Undo delete |
After confirming the security prompt, the object is undeleted. This option is only available if the object was marked for deletion. |
|
Open on new tab |
The object is opened in a new form in the document view. |
|
Search |
The system searches for objects in the navigation. |
|
Add to favorites |
Adds the selected object to your favorites. |
|
Remove from favorites |
Removes the selected object from your favorites. |
|
Show process information |
The process view shows the process data for the selected object. For detailed information about the evaluation of process information, see the One Identity Manager Operational Guide. |
|
Tasks |
The available tasks for the object are displayed and you can run the desired task. |
|
Properties |
Show other properties of the active object. This menu item is only available in expert mode. |
Related topics
When you select an object, the task view shows the tasks and title of available reports. To run a task or open a report, select an item in the task view. Use the tooltip to show a more detailed description of a task or a report.
Figure 4: Task view in the Manager
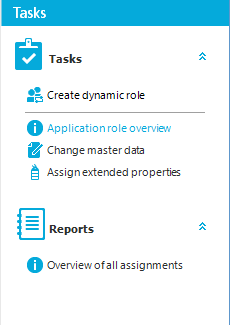
TIP: If tasks are linked to preprocessor-relevant configuration parameters, the preprocessor conditions are shown behind the tasks. To do this, enable the program setting Show additional navigation information.
Related topics
