Mail-enabled public folders are loaded into the One Identity Manager database by synchronization and cannot be edited in One Identity Manager.
To display mail-enabled public folders
-
In the Manager, select the Active Directory > Exchange system administration > <Organization> > Recipient configuration > Mail-enabled public folders category.
-
Select the mail-enabled distribution group in the result list.
-
Select the Change main data task.
To display mail acceptance for mail-enabled public folders
-
In the Manager, select the Active Directory > Exchange system administration > <Organization> > Recipient configuration > Mail-enabled public folders category.
-
Select the mail-enabled distribution group in the result list.
-
Select the Assign mail acceptance task to display recipients whose messages are accepted.
- OR -
Select the Assign mail rejection task to display recipients whose messages are rejected.
To display the sent permission for a mail-enabled public folder
-
In the Manager, select the Active Directory > Exchange system administration > <Organization> > Recipient configuration > Mail-enabled public folders category.
-
Select the mail-enabled distribution group in the result list.
-
Select the Assign send permissions task.
The following main data is displayed:
Table 40: Mail-enabled public folder main data
|
Exchange organization |
Name of the organization. |
|
Public Folder |
Connected public folder. |
|
Name |
Name of the mail-enabled public folder. |
|
Alias |
Unique alias for further identification of the mail-enabled public folder. |
|
Display name |
Display name of the mail-enabled public folder. |
|
Simple display |
Simple display name for systems that cannot interpret all the characters of normal display names. |
|
Domain |
Active Directory domain of the mail-enabled public folder. |
|
Container |
Active Directory container of the mail-enabled public folder. |
|
Proxy addresses |
Other email addresses for the mail-enabled public folder. |
|
Email address |
Email address of the mail-enabled public folder. |
|
Alternative recipient |
Alternative recipient to which messages from this mail-enabled public folder are forwarded. |
|
Do not display in address list |
Specifies whether the mail-enabled public folder is visible in address books. Set this option if you want to prevent the mail-enabled public folder from being displayed in address books. This option applies to all address books. |
|
Max. send size [KB] |
Maximum size of message in KB that a mail-enabled public folder can send. The Microsoft Exchange organization global settings in the Exchange System Manager come into effect for message delivery if there are no limitations. |
|
Max. send size [KB] |
Maximum size of message in KB that a mail-enabled public folder can receive. The Microsoft Exchange organization global settings in the Exchange System Manager come into effect for message delivery if there are no limitations. |
|
Send and forward |
Specifies whether to send and forward messages. If this option is set, messages are sent to alternative recipients and mailbox owners. |
NOTE: The following modules must be installed to support Exchange Hybrid:
NOTE: You cannot move mailboxes between local Microsoft Exchange and Exchange Online with One Identity Manager. Microsoft offers migration scenarios for moving mailboxes. For more information, see your Microsoft documentation.
One Identity Manager support creating, editing, and deleting of remote mailboxes in Exchange Hybrid. Remote mailboxes are mailboxes that are declared in the local Microsoft Exchange environment but were added in an Exchange Online environment.
There are the following different types of remote mailboxes:
-
Remote mailbox
-
Remote room mailbox
-
Remote equipment mailbox
-
Remote shared mailbox
These mailboxes can be added to distribution lists or be given sending limits in the local Microsoft Exchange environment, for example.
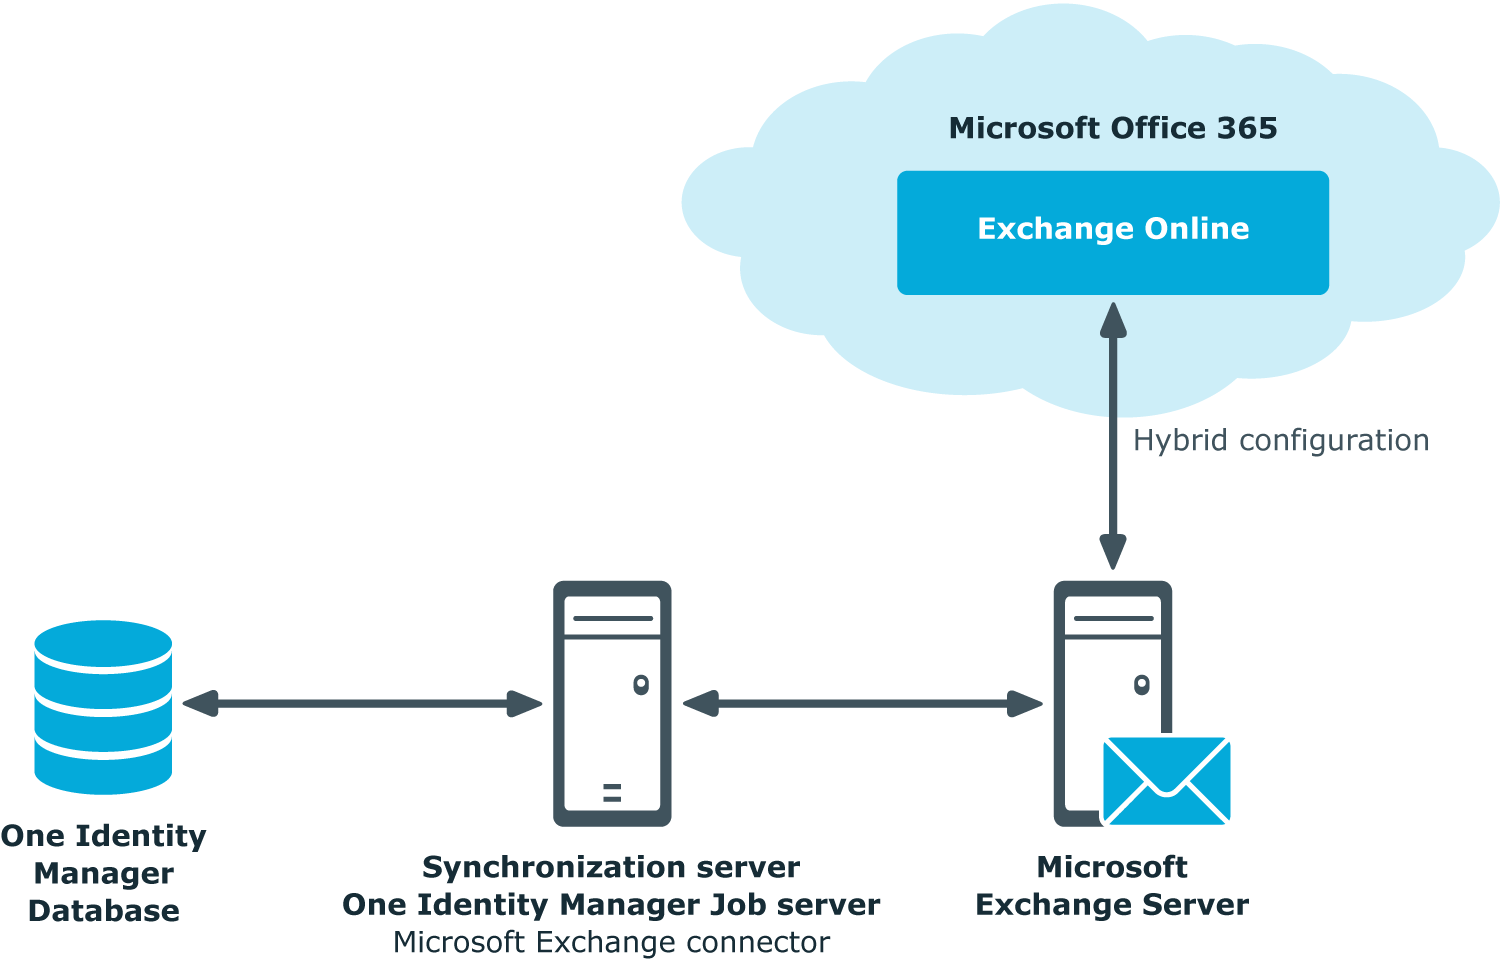
The synchronization server running the Microsoft Exchange connector is responsible for synchronizing remote mailboxes. The other target system involved (Active Directory, Microsoft Exchange, Azure Active Directory, and Exchange Online) must be synchronized in order to access remote mailboxes.
Figure 2: Architecture for synchronization
Detailed information about this topic
Take the following into account when synchronizing Exchange Hybrid remote mailboxes:
-
The mapping for remote mailboxes is part of the Microsoft Exchange project template. Remote mailboxes are synchronized using the Microsoft Exchange connector.
-
If an Exchange Hybrid environment already exists but there is no Exchange Hybrid module installed, a warning appears when you synchronize. Install the Exchange Hybrid module and create a new synchronization project.
-
The following order is recommended for synchronizing the target systems.
-
Azure Active Directory
-
Local Active Directory
Synchronization can be simultaneous with Azure Active Directory synchronization.
-
Exchange Online
-
Local Microsoft Exchange
It is better to synchronize after synchronizing Exchange Online.
-
In One Identity Manager, the connection must be defined between the local Microsoft Exchange organization (EX0Organization) and the corresponding Azure Active Directory tenant (AADOrganization).
This connection is normally created automatically when the synchronization project is created for local Microsoft Exchange. This assumes that Azure Active Directory was already loaded in to the One Identity Manager at the time. You can establish this link manually at any time.
To declare the Azure Active Directory tenant in a Microsoft Exchange organization
-
In the Manager, select the Active Directory > Exchange system administration category.
-
Select the organization from the result list.
-
Select the Change main data task.
-
On the Hybrid configuration tab, under Azure Active Directory tenant, select the Azure Active Directory tenant to which your local Microsoft Exchange is connected.
-
Save the changes.
Related topics
You cannot move mailboxes between local One Identity Manager and Microsoft Exchange with Exchange Online. Microsoft offers migration scenarios for moving mailboxes. For more information, see your Microsoft documentation.
Synchronizing Microsoft Exchange after moving a mailbox from local Exchange Online to Microsoft Exchange in One Identity Manager results in:
After successful migration, delete outstanding mailboxes in One Identity Manager.
-
Check whether the mailbox was migrated and whether the Active Directory user account is connected with the local mailbox and a remote mailbox.
Migrated mailboxes are displayed in the Manager in the Active Directory > Troubleshooting > Mailboxes migrated to Exchange Online category.
-
Delete the outstanding mailbox.
If you apply an account definition to local mailboxes, create a new account definition for remote mailboxes.
-
If the mailbox account definition currently in use, expects an account definition for Active Directory user accounts, enter this account definition as prerequisite for the remote mailbox account definition.
IMPORTANT: The remote mailbox account definition may not be distributed automatically to everybody. Otherwise One Identity Manager creates new remote mailboxes.
Example of exchanging account definitions for migrated mailboxes
The following is an example explaining how you can replace account definitions with migrated mailboxes
NOTE: The workflows described here are only for orientation. Always take your customized workflows into account while replacing.
You always required a custom migration scenario if the account definitions are requested through the IT Shop.
Example:
Local mailboxes are managed through an account definition. This account definition requires an account definition for Active Directory user accounts.
The account definition is directly assigned to identities.
After migration, remote mailboxes are also managed through account definitions.
-
Create an account definition for remote mailboxes. Enter the Active Directory user account's account definition as prerequisite.
-
After migrating a local mailbox:
-
Make sure that the remote mailbox exists in One Identity Manager and is linked to the Active Directory user account.
-
In One Identity Manager, delete the outstanding local mailbox.
-
Assign the account definition for remote mailboxes to the identity.
-
Remove the account definition for local mailboxes from the identity.
Example:
Local mailboxes are managed through an account definition. This account definition requires an account definition for Active Directory user accounts.
The account definition is inherited by the identities through it's department relation.
After migration, remote mailboxes are also managed through account definitions.
-
Create a parallel structure to the department and assign the account definition for local mailboxes to this parallel structure.
The purpose of this parallel structure is to retain the local mailboxes' account definition assignment to an identity until the mailbox has been successfully migrated.
-
After completing DBQueue Processor processing, you can remove the account definition for local mailboxes from the department.
-
Create an account definition for remote mailboxes. Enter the Active Directory user account's account definition as prerequisite.
-
Create another parallel structure and assign the account definition for remote mailboxes to it..
The purpose of this parallel structure is to assign the remote mailboxes' account definition to identities after mailbox migration and to retain the assignment of the required account definition for Active Directory.
-
Delete the outstanding mailbox after migrating the local mailbox successfully.
-
After migrating all the department's local mailboxes, you can:
-
Assign a department to the remote mailboxes' account definition.
-
Remove the parallel structure.
