Step 1: Configuring the Policy Object
Step 1: Configuring the Policy Object
You can configure the Policy Object you need by modifying the Policy Object that implements the previous scenario; see Scenario 1: Using uniqueness number earlier in this section.
Display the Properties dialog box for that Policy Object and go to the Policies tab. Then, select the policy from the list, and click View/Edit to display the User Logon Name Generation Policy Properties dialog box.
The Generation Rules tab in the User Logon Name Generation Policy Properties dialog box looks similar to the User Logon Name (pre-Windows 2000) Generation Rules page in the wizard you used to configure the policy. You can use that tab to add or modify policy rules.
First, modify the rule to remove the uniqueness number entry. On the Generation Rules tab, select the rule and click View/Edit to display the Configure Value dialog box. Then, select the uniqueness number entry as shown in the following figure, and click Remove.
Figure 47: Configure Value
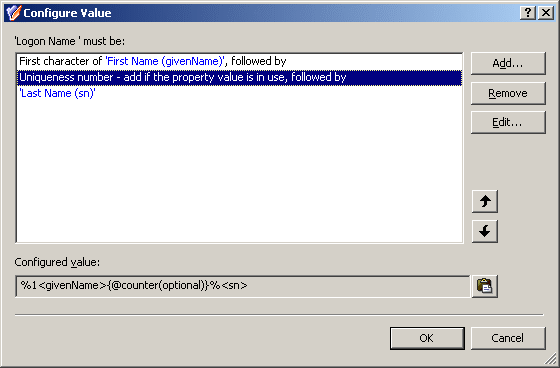
Click OK to close the Configure Value dialog box.
Next, configure the additional policy rules as follows.
- On the Generation Rules tab, click Add to display the Configure Value dialog box.
- In the Configure Value dialog box, click Add to display the Add Entry window.
- Configure the entry to include the first two character of the user first name:
- Under Entry type, click User Property.
- Under Entry properties, click Select.
- In the Select Object Property window, click First Name in the Object property list, and then click OK.
- Under Entry properties, click The first, and enter 2 in the box next to that option.
- Click OK to close the Add Entry window.
- In the Configure Value dialog box, click Add to display the Add Entry window.
- Configure the entry to include the user last name:
- Under Entry type, click User Property.
- Under Entry properties, click Select.
- In the Select Object Property window, click Last Name in the Object property list, and then click OK.
- Click OK to close the Add Entry window.
- Click OK to close the Configure Value dialog box.
- Repeat Steps 1 through 6 with the following alteration:
In Step 3, sub-step d), enter 3 in the box next to the The first option.
After you complete these steps, the list of rules on the Generation Rules tab should look as follows:
Figure 48: Generation rules
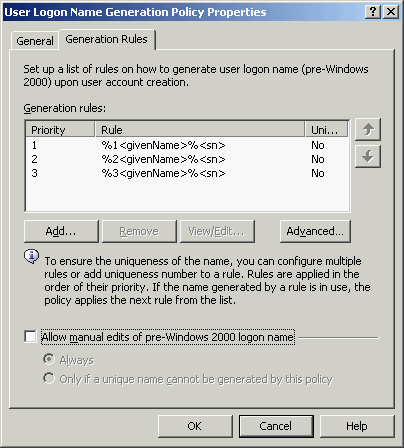
Click OK to close the User Logon Name Generation Policy Properties dialog box.
Step 2: Applying the Policy Object
Step 2: Applying the Policy Object
You can apply the Policy Object by using the Scope tab in the Properties dialog box for that Policy Object:
- On the Scope tab, click the Scope button to display the Active Roles Policy Scope window for the Policy Object you are managing.
- Click Add and select the domain, OU, or Managed Unit where you want to apply the policy.
You can also use the Remove button to remove items where you want the policy to no longer be applied.
- Click OK to close the Active Roles Policy Scope window.
- Click OK to close the Properties dialog box for the Policy Object.
For more information on how to apply a Policy Object, see Applying Policy Objects and Managing policy scope earlier in this chapter.
Group Membership AutoProvisioning
Group Membership Autoprovisioning policies help you automate adding or removing the specified objects (such as user objects) to or from the specified groups.
In case of cloud-only Azure objects, you can use the Group Membership Autoprovisioning policy to automatically assign (or unassign) Azure users and Azure guest users to (or from) the specified O365 group(s) in the same Azure tenant.
NOTE: Policy Object settings specific to Azure cloud-only objects (such as cloud-only Azure users, guest users, or contacts) are available only if your Active Roles deployment is licensed for managing cloud-only Azure objects. Contact One Identity support for more information.
Also, Policy Objects specific to Azure cloud-only objects will work correctly only if an Azure tenant is already configured in the AD of the organization, and Active Roles is already set as a consented Azure application for that Azure tenant. For more information on these settings, see Configuring a new Azure tenant and consenting Active Roles as an Azure application.
To set up a policy, select the type of objects you want to provision, select the affected group(s), and then configure the policy rules. Once set up, the policy adds (or removes) directory objects to (or from) the selected groups depending on whether the provisioned objects meet the specified rules.
To help you get started with configuring policy-based administration in your organization, Active Roles includes a set of built-in Policy Objects that offer provisioning and deprovisioning rules to the most typical administrative use cases. To find the built-in Policy Objects, navigate to the following node of the Active Roles MMC console:
Configuration > Policies > Administration > Builtin
NOTE: Active Roles does not automatically check for changes in directory objects, containers or groups specified for provisioning in the configured Policy Objects. This means that if any changes are made in any directory resources in use in a policy, you must update the impacted policies manually. For example, if a directory group used by a Group Membership AutoProvisioning Policy Group is deleted, the Policy Group must be updated manually to reflect the changes.
How this policy works
A Group Membership AutoProvisioning policy performs provisioning tasks such as adding or removing users from groups. A policy can be configured to define a list of groups and conditions so that a user account is automatically added to, or removed from, those groups depending on whether the properties of the user account meet the policy conditions.
Active Roles automatically checks users against conditions, and adds or removes users from specified groups based on the check results. Although the capabilities of this policy are similar to those provided by Dynamic Groups, a Group Membership AutoProvisioning policy gives the administrator extra flexibility and control over group memberships.
Whereas the Dynamic Groups feature delivers a rules-based mechanism for managing a group membership list as a whole, a Group Membership AutoProvisioning policy allows the administrator to define membership rules on a per-user basis. This policy automates the process of adding particular users to particular groups without affecting the other members of those groups.
