Configuring a custom generation rule
Configuring a custom generation rule
To configure a custom rule, click Other combination of user properties, and then click the Configure button. This displays the Configure Value dialog box, discussed earlier in this chapter (see How to configure a Property Generation and Validation policy). You can use that dialog box to set up a value for the ‘Alias’ must be condition, the same way you configure a Property Generation and Validation policy.
To start configuring a value, click Add in the Configure Value dialog box. This displays the Add Entry window.
A value is a concatenation of one or more entries. In the Add Entry window, you can select the type of the entry to add, and then configure the entry. The following table summarizes the available types of entries.
Table 20: Available entries
|
Text |
Adds a text string to the value. |
|
Uniqueness Number |
Adds a numeric value the policy will increment in the event of an alias naming conflict. |
|
User Property |
Adds a selected property (or a part of a property) of the user account to which the policy will assign the alias. |
|
Parent OU Property |
Adds a selected property (or a part of a property) of an organizational unit in the hierarchy of containers above the user account to which the policy will assign the alias. |
|
Parent Domain Property |
Adds a selected property (or a part of a property) of the domain of the user account to which the policy will assign the alias. |
Instructions on how to configure an entry depend on the type of the entry. For each type of an entry, you can find the instructions earlier in this chapter:
When you are done configuring a value, click OK to close the Configure Value dialog box. This will add the value to the policy rule. If necessary, you can modify the value by clicking the Configure button and then managing the list of entries in the Configure Value dialog box.
When you are done configuring the policy rule, click Next on the E-mail Alias Generation Rule page and follow the instructions in the wizard to create the Policy Object.
Steps for configuring an E-mail Alias Generation policy
To configure an E-mail Alias Generation policy
- On the Policy to Configure page, select E-mail Alias Generation, and then click Next.
- On the E-mail Alias Generation Rule page, do the following:
- Select one of the pre-configured generation rules, or create a custom alias-generation rule. To create a custom rule, click Other combination of user properties, click Configure, and complete the Configure Value dialog box by using the procedure outlined later in this topic.
- If you want the e-mail alias to be allowed for manual edit, select Allow manual edits of e-mail alias. Then, do one the following:
- Click Always to authorize the operator who creates or updates the user account to modify the e-mail alias.
- Click Only if a unique alias cannot be generated by this policy to allow manual changes only in the situation where a policy-generated alias is already assigned to a different user account.
Click Next.
- On the Enforce Policy page, you can specify objects to which this Policy Object is to be applied:
- Click Add, and use the Select Objects dialog box to locate and select the objects you want.
- Click Next, and then click Finish.
To complete the Configure Value dialog box
- Click Add.
- Configure an entry to include in the value (for instructions, see Steps for configuring entries).
- In the Configure Value dialog box, add more entries, delete or edit existing ones, and then click OK.
Scenario: Generating e-mail alias based on user names
The policy described in this scenario generates the e-mail alias in accordance with this rule: user first name, optionally followed by a three-digit uniqueness number, followed by a period, followed by the user last name. Examples of aliases generated by this rule are as follows:
- John.Smith
- John001.Smith
- John002.Smith
The policy generates the alias John001.Smith for the user John Smith if the alias John.Smith is in use. If both John.Smith and John001.Smith are in use, the policy generates the alias John002.Smith, and so on.
To implement this scenario, you must perform the following actions:
- Create and configure the Policy Object that defines the appropriate policy.
- Apply the Policy Object to a domain, OU, or Managed Unit.
As a result, when assigning an e-mail alias to a user account in the container you selected in Step 2, the Active Roles user interfaces provide a Generate button to create the alias in accordance with the policy rule. In the event of an alias naming conflict, clicking the Generate button causes the policy to add a uniqueness number to the alias.
The following two sections elaborate on the steps to implement this scenario.
Step 1: Creating and configuring the Policy Object
Step 1: Creating and configuring the Policy Object
You can create and configure the Policy Object you need by using the New Provisioning Policy Object wizard. For information about the wizard, see Creating a Policy Object in the Policy Object management tasks section earlier in this chapter.
To configure the policy, click E-mail Alias Generation on the Select Policy Type page of the wizard. Then, click Next.
On the E-mail Alias Generation Rule page, click Other combination of user properties, and then click Configure.
Complete the Configure Value dialog box as follows:
- Click Add.
- Configure the entry to include the user first name:
- Under Entry type, click User Property.
- Under Entry properties, click Select.
- In the Select Object Property window, click First Name in the Object property list, and then click OK.
- Click OK.
- Click Add.
- Configure the entry to optionally include a uniqueness number:
- Under Entry type, click Uniqueness Number.
- Under Entry properties, set the entry options:
- Click Add if the property value is in use.
- Select the Fixed-length number, with leading zeroes check box.
- In the box next to Length of the number, in digits, type 3.
- Click OK.
- Click Add.
- Configure the entry to include the period character:
- In Text value under Entry properties, type the period character.
- Click OK.
- Click Add.
- Configure the entry to include the user last name:
- Under Entry type, click User Property.
- Under Entry properties, click Select.
- In the Select Object Property window, click Last Name in the Object property list, and then click OK.
- Click OK.
After you complete these steps, the list of entries in the Configure Value dialog box should look like the following figure.
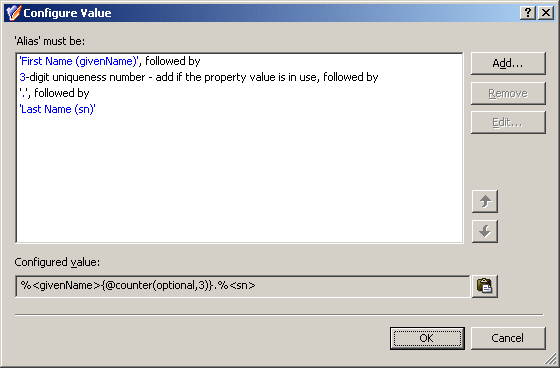
- Click OK to close the Configure Value dialog box. Then, click Next and follow the instructions in the wizard to create the Policy Object.
