Chat now with support
Chat mit Support

Active Roles 7.5.3 - Administration Guide

Introduction About Active Roles Getting Started Rule-based Administrative Views Role-based Administration
Access Templates as administrative roles Access Template management tasks Examples of use Deployment considerations Windows claims-based Access Rules
Rule-based AutoProvisioning and Deprovisioning
About Policy Objects Policy Object management tasks Policy configuration tasks
Property Generation and Validation User Logon Name Generation Group Membership AutoProvisioning E-mail Alias Generation Exchange Mailbox AutoProvisioning AutoProvisioning for SaaS products OneDrive Provisioning Home Folder AutoProvisioning Script Execution Office 365 and Azure Tenant Selection User Account Deprovisioning Office 365 Licenses Retention Group Membership Removal Exchange Mailbox Deprovisioning Home Folder Deprovisioning User Account Relocation User Account Permanent Deletion Group Object Deprovisioning Group Object Relocation Group Object Permanent Deletion Notification Distribution Report Distribution
Deployment considerations Checking for policy compliance Deprovisioning users or groups Restoring deprovisioned users or groups Container Deletion Prevention policy Picture management rules Policy extensions
Workflows
Understanding workflow Workflow activities overview Configuring a workflow
Creating a workflow definition Configuring workflow start conditions Configuring workflow parameters Adding activities to a workflow Configuring an Approval activity Configuring a Notification activity Configuring a Script activity Configuring an If-Else activity Configuring a Stop/Break activity Configuring an Add Report Section activity Configuring a Search activity Configuring CRUD activities Configuring a Save Object Properties activity Configuring a Modify Requested Changes activity Enabling or disabling an activity Enabling or disabling a workflow Using the initialization script
Example: Approval workflow E-mail based approval Automation workflow Activity extensions
Temporal Group Memberships Group Family Dynamic Groups Active Roles Reporting Management History
Understanding Management History Management History configuration Viewing change history
Workflow activity report sections Policy report items Active Roles internal policy report items
Examining user activity
Entitlement Profile Recycle Bin AD LDS Data Management One Identity Starling Management One Identity Starling Two-factor Authentication for Active Roles Managing One Identity Starling Connect Azure AD, Office 365, and Exchange Online management
Configuring Active Roles to manage hybrid AD objects Managing Hybrid AD Users Unified provisioning policy for Azure O365 Tenant Selection, Office 365 License Selection, and Office 365 Roles Selection, and OneDrive provisioning Office 365 roles management for hybrid environment users Managing Office 365 Contacts Managing Hybrid AD Groups Managing Office 365 Groups Managing Azure Security Groups Managing cloud-only Azure users Managing cloud-only Azure guest users Managing cloud-only Azure contacts Changes to Active Roles policies for cloud-only Azure objects Managing room mailboxes
Managing Configuration of Active Roles
Connecting to the Administration Service Adding and removing managed domains Using unmanaged domains Evaluating product usage Creating and using virtual attributes Examining client sessions Monitoring performance Customizing the console Using Configuration Center Changing the Active Roles Admin account Enabling or disabling diagnostic logs Active Roles Log Viewer
SQL Server Replication Appendix A: Using regular expressions Appendix B: Administrative Template Appendix C: Communication ports Appendix D: Active Roles and supported Azure environments Appendix E: Enabling Federated Authentication Appendix F: Active Roles integration with other One Identity and Quest products Appendix G: Active Roles integration with Duo Appendix H: Active Roles integration with Okta

Step 2: Applying the Policy Object

Step 2: Applying the Policy Object

You can apply the Policy Object by using the Enforce Policy page in the New Provisioning Policy Object wizard, or you can complete the wizard and then use the Enforce Policy command on the domain, OU, or Managed Unit where you want to apply the policy.

For more information on how to apply a Policy Object, see Applying Policy Objects and Managing policy scope earlier in this chapter.

Exchange Mailbox AutoProvisioning

Policies in this category are intended to automate the selection of a mailbox store or database when designating a user as mailbox-enabled or creating a mailbox on Microsoft Exchange Server.

You can specify Exchange Servers and mailbox stores or databases where mailbox creation is allowed, and specify rules to distribute mailboxes among multiple stores. For example, you can configure a policy to automatically choose a store that holds the least number of mailboxes.

How this policy works

When making a user mailbox-enabled or creating a mailbox, Active Roles relies on this policy to select the mailbox store or database. The policy defines a single store, or a set of stores, in which creation of mailboxes is allowed. Some specific features of the policy behavior are as follows:

  • If the policy specifies a single store, mailboxes are created in that store. A different store cannot be selected by the operator who creates or updates the user account.
  • If the policy specifies multiple stores, the store is selected either automatically (by Active Roles) or manually (by the operator who creates or updates the user account), depending on policy options.

In case of multiple stores, the policy provides these options to govern the selection of a store:

  • Manually.  Allows the operator to select a store from the list defined by the policy.
  • By using the round-robin method.  Redirects mailbox creation requests sequentially across the stores, selecting the first store for the first request, the second store for the second request and so on. After the last store is reached, the next request is passed to the first store in the sequence.
  • Containing the least number of mailboxes.  Forwards mailbox creation requests to the store that holds the least amount of mailboxes.

How to configure an Exchange Mailbox AutoProvisioning policy

To configure an Exchange Mailbox AutoProvisioning policy, select Exchange Mailbox AutoProvisioning on the Policy to Configure page in the New Provisioning Policy Object wizard or in the Add Provisioning Policy wizard. Then, click Next to display the Allowed Mailbox Stores page.

Figure 57: Allowed mailbox stores

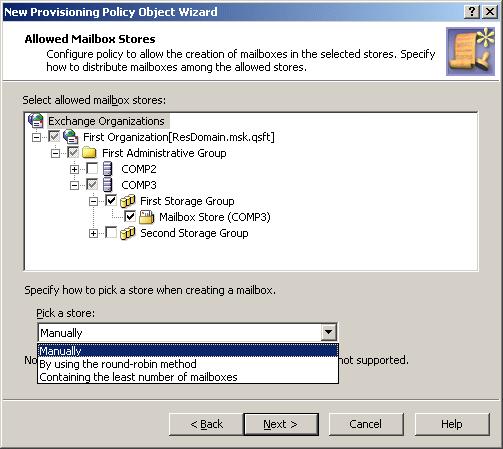
On this page, you can select the servers and mailbox stores or databases to be allowed for mailbox creation. Select mailbox stores from a single Exchange organization. If you select multiple stores, you can specify how to choose a store upon a mailbox creation request. From the Pick a store list, select one of these options:

  • Manually
  • By using the round-robin method
  • Containing the least number of mailboxes

When you are done, click Next and follow the instruction in the wizard to create the Policy Object.

Verwandte Dokumente

The document was helpful.

Bewertung auswählen

I easily found the information I needed.

Bewertung auswählen