Voluntary thresholds for the managed object count
By default, Active Roles does not limit the number of managed objects. However, as Active Roles’ license fee is based on the managed object count, you may need to verify if the object count is under a certain threshold. You can perform this task by specifying a threshold value for the number of managed objects. The scheduled task that counts managed objects then raises an alert each time it detects that the current number of managed objects exceeds the threshold value. The alert makes the Product Usage Statistics section red on the root page in the Active Roles console, and can send a notification over e-mail.
To configure thresholds and notification for the managed object count
- Log on as Active Roles Admin, and open the Active Roles console.
Only members of the Active Roles Admin account are authorized to configure thresholds and notification for the managed object count.
- In the console tree, select the root node: Active Roles.
- On the page in the details pane, expand the Product Usage Statistics section, and then click Set License threshold value to update the threshold.
- In the Threshold Value dialog box that appears, specify the desired threshold value for Active Directory domains (AD DS), AD LDS directory partitions (AD LDS), Azure tenants, or SaaS applications.
You can specify an AD DS threshold value, AD LDS threshold value, Azure tenant threshold value, and SaaS threshold value independently from each other. Active Roles raises an alert if the total number of managed objects in AD DS, AD LDS directory partitions, Azure tenant, or SaaS application exceeds the corresponding threshold value. If the threshold value is specified for any of these, then Active Roles does not evaluate the managed object counts at all.
- If you want Active Roles to notify of the threshold violation alert over e-mail, then, in the Threshold Value dialog box, configure the notification settings as follows:
- Select the Notify of threshold violations by e-mail check box.
- Click the button next to the Recipients field, and specify who you want to receive the notification messages. You can select recipients from an address book (requires Microsoft Outlook to be configured), or supply individual e-mail addresses.
- Click the button next to the E-mail server settings field. Then, on the Mail Setup tab in the dialog box that appears, supply the server name and other settings specific to your outgoing SMTP server.
If multiple mail configuration objects exist in your Active Roles environment, then you may first need to select the appropriate object from the E-mail server settings list. Mail configuration objects can be created in the Configuration/Server Configuration/Mail Configuration container in the Active Roles console.
- When finished, click OK to close the Threshold Value dialog box.
Installation label
The Active Roles console allows you to set a text label that helps you identify your Active Roles installation in the Managed Object Statistics report—a report that lists the managed object counts (see Viewing product usage statistics). You can use the installation label to distinguish, for example, between production and non-production or pilot installations. The label text is displayed in the title of the Managed Object Statistics report.
To set or change the installation label
- Log on as Active Roles Admin, and open the Active Roles console.
Only members of the Active Roles Admin account are authorized to set or change the installation label.
- In the console tree, select the root node: Active Roles.
- On the page in the details pane, expand the Product Usage Statistics section, and then click the Change link next to the Installation label field.
The console does not display the Change link unless you are logged on as Active Roles Admin.
- In the Installation Label dialog box that appears, type the label text you want, and then click OK.
Creating and using virtual attributes
Active Roles provides the facility to define custom (virtual) attributes for any existing object type. This allows additional object properties to be specified without extending the Active Directory schema. For example, custom attributes can be used to store specific user data.
You can configure a virtual attribute to store the attribute value in the Active Roles database. Otherwise, to use the virtual attribute, you need to implement a script policy to handle the attribute value.
To create a virtual attribute
- In the console tree, expand Configuration | Server Configuration.
- Under Server Configuration, right-click Virtual Attributes and select New | Virtual Attribute.
- Follow the instructions in the Add Virtual Attribute wizard.
- In the Common-Name and the LDAP Display Name boxes, type a common name and an LDAP display name for the new attribute.
In the Unique X.500 object ID box, you can optionally change the default value of the attributeID property (OID) for the new attribute. The default value is generated automatically. If you want to generate your own value, you can use the Oidgen (oidgen.exe) tool, included with the Windows Server Resource Kit.
In the Schema ID GUID box you can optionally change the default value of the schemaIDGUID property. The default value is generated automatically. If you want the new attribute to have the fixed schemaIDGUID property, replace the default value with your own value. For example, you can generate GUID with the Uuidgen tool, included with the Microsoft Platform SDK.
- Optionally, in the Description box, type a description for the new virtual attribute. Click Next.
- In the Syntax list, click the syntax you want for the new virtual attribute. If you want the new attribute to be multi-valued, select the Multi-valued check box. Click Next.
- Select the check boxes next to the object classes with which you want the virtual attribute to be associated. Click Next.
If you need the new attribute to be associated with object classes that are not listed by default, select the Show all possible classes check box.
- If you want to store the values of the attribute in the Active Roles database, select the check box on the Attribute Storage page.
If you choose not to store the attribute values in the database, a script policy is required to supply the attribute value when retrieving the attribute and to save the attribute value when updating the attribute.
However, you should use this option carefully. Storing attribute values in the Active Roles configuration database may considerably increase the database size.
This option can be modified after the attribute is created, by managing properties of the virtual attribute.
- Click Next, and then click Finish to complete the wizard.
After the new virtual attribute has been added, reconnect to the Administration Service. The new virtual attribute appears in the Virtual Attributes container under Configuration/Server Configuration.
To view or modify the value of a virtual attribute on an object
- Right-click the object, and select All Tasks | Advanced Properties.
- Select the Show all possible attributes and the Include attributes with empty values check boxes, for the list in the Advanced Properties dialog box to display all attributes of the object.
- Click the attribute in the list, and then click the button beneath the list.
- In the dialog box that opens, view or modify the value of the attribute.
Scenario: Implementing a Birthday attribute
This scenario illustrates how to create and use a virtual attribute to store information on the birthdays of users.
To create the Birthday attribute
- In the console tree, expand Configuration | Server Configuration.
- Under Server Configuration, right-click Virtual Attributes, and select New | Virtual Attribute.
- Click Next.
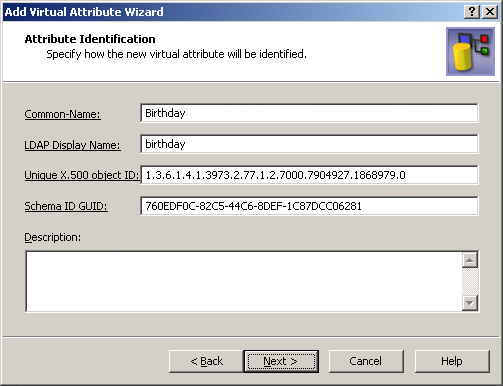
- In the Common-Name and LDAP Display Name boxes, type Birthday, as shown in the following figure.
Figure 145: Attribute identification
- Click Next.
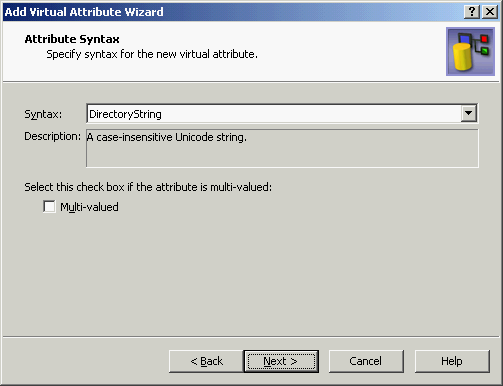
The Attribute Syntax page should look as shown in the following figure.
Figure 146: Attribute syntax
- Click Next.
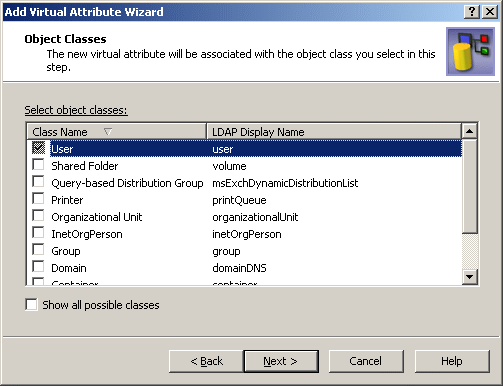
- On the Object Classes page, select the check box next to User, as shown in the following figure.
Figure 147: Object classes
- Click Next.
- On the Attribute Storage window, select the Store values of this virtual attribute in the Active Roles Administration database check box.
- Click Next, and then click Finish to complete the wizard.
To enable the new attribute, reconnect to the Administration Service: right-click the console tree root and click Reconnect.
In the Active Roles console, you can manage the Birthday attribute on a user account as follows:
- Right-click the user account and select All Tasks | Advanced Properties.
- In the Advanced Properties dialog box, select both the Show all possible attributes and Include attributes with empty values check boxes.
- Click Birthday in the list of properties, and then click Edit.
- In the Value box, type a birthday date.
- Click OK.
You can also manage the Birthday attribute via the Active Roles Web Interface.
First, you need to add the Birthday field to a form that displays user properties, and associate that field with the Birthday attribute. You can accomplish this by customizing the form. For instructions on how to add a field to a form, refer to the Active Roles Web Interface Administration Guide.
Then, the Birthday attribute can be managed by accessing user properties in a Web Interface site. For example, users can view and modify this attribute via Site for Self-Administration, provided that you have self-administration implemented (see Scenario 2: Implementing Self-administration in the Role-based Administration chapter earlier in this document).
