You can apply the Policy Object without closing its Properties dialog. Go to the Scope tab and do the following:
-
On the Scope tab, click the Scope button to display the Active Roles Policy Scope window for the Policy Object you are managing.
-
Click Add and select the domain, OU, or Managed Unit where you want to apply the policy to.
You can also use the Remove button to remove items where you want the policy to no longer be applied.
-
Click OK to close the Active Roles Policy Scope window.
-
Click OK to close the Properties dialog for the Policy Object.
For more information on how to apply a Policy Object, see Applying Policy Objects and Managing policy scope.
Group Membership AutoProvisioning policies help you automate adding or removing the specified objects (such as user objects) to or from the specified groups.
In case of cloud-only Azure objects, you can use the Group Membership Autoprovisioning policy to automatically assign (or unassign) Azure users and Azure guest users to (or from) the specified O365 group(s) in the same Azure tenant.
NOTE: Policy Object settings specific to Azure cloud-only objects (such as cloud-only Azure users, guest users, or contacts) are available only if your Active Roles deployment is licensed for managing cloud-only Azure objects. Contact One Identity support for more information.
Also, Policy Objects specific to Azure cloud-only objects will work correctly only if an Azure tenant is already configured in the AD of the organization, and Active Roles is already set as a consented Azure application for that Azure tenant. For more information on these settings, see Configuring a new Azure tenant and consenting Active Roles as an Azure application.
To set up a policy, select the type of objects you want to provision, select the affected group(s), and then configure the policy rules. Once set up, the policy adds (or removes) directory objects to (or from) the selected groups depending on whether the provisioned objects meet the specified rules.
To help you get started with configuring policy-based administration in your organization, Active Roles includes a set of built-in Policy Objects that offer provisioning and deprovisioning rules to the most typical administrative use cases. To find the built-in Policy Objects, navigate to the following node of the Active Roles Console:
Configuration > Policies > Administration > Builtin
NOTE: Active Roles does not automatically check for changes in directory objects, containers or groups specified for provisioning in the configured Policy Objects. This means that if any changes are made in any directory resources in use in a policy, you must update the impacted policies manually. For example, if a directory group used by a Group Membership AutoProvisioning Policy Group is deleted, the Policy Group must be updated manually to reflect the changes.
A Group Membership AutoProvisioning policy performs provisioning tasks such as adding or removing users from groups. A policy can be configured to define a list of groups and conditions so that a user account is automatically added to, or removed from, those groups depending on whether the properties of the user account meet the policy conditions.
Active Roles automatically checks users against conditions, and adds or removes users from specified groups based on the check results. Although the capabilities of this policy are similar to those provided by Dynamic Groups, a Group Membership AutoProvisioning policy gives the administrator extra flexibility and control over group memberships.
Whereas the Dynamic Groups feature delivers a rules-based mechanism for managing a group membership list as a whole, a Group Membership AutoProvisioning policy allows the administrator to define membership rules on a per-user basis. This policy automates the process of adding particular users to particular groups without affecting the other members of those groups.
To configure a Group Membership AutoProvisioning policy via the Active Roles Console (also known as the MMC interface), perform the following procedure.
To configure a Group Membership AutoProvisioning policy
-
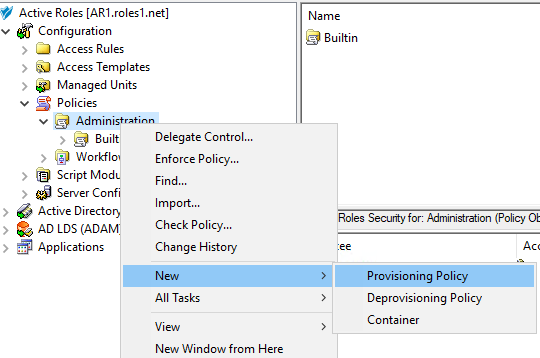
Navigate to Configuration > Policies > Administration.
-
To open the New Provisioning Policy Object Wizard dialog, right-click in the middle pane to open the context menu, and then select New > Provisioning Policy.
-
On the Name and Description page, provide a unique Name for the new Policy Object. Optionally, also provide a Description. To continue, click Next.
-
On the Policy to Configure page, select Group Membership AutoProvisioning, and then click Next.
-
On the Object Type Selection page, to specify the type of object you want the policy to add or remove from groups, click Select, then click OK.
TIP: If you do not see the object type you need, expand the list by selecting Show all possible object types.
-
On the Policy Conditions page, set up conditions that specify how the policy adds or removes the selected object types to or from groups. To create a new condition with the Set Up Condition dialog, click Add.
-
To select the object property on which you want to set up the condition, click Property to open the Object property page.
-
Select the property you want the condition to check, then click OK.
TIP: If you do not see the object type you need, expand the list by selecting Show all possible object types.
-
In Operation, click the operation type you want to assign to the condition.
-
To specify additional configuration for the condition, enter a variable into the Value field, then click OK to close the Add Value dialog.
Alternatively, click Configure Value, then click Add, and configure an entry manually in the Add Entry dialog. For more information on manual configuration, see Configuring entries. To close the Add Value dialog, click OK.
-
(Optional) To modify or remove an existing condition, click View/Edit or Remove on the Policy Conditions page, respectively.
-
Click Next on the Policy Conditions page to continue onto the Policy Action page.
-
On the Policy Action page, specify whether you want the policy to add or remove objects if the configured conditions are met.
-
Select Add object to groups if object satisfies policy conditions if you want Active Roles to add the object to the specified group(s) if the configured conditions are met.
-
Select Remove object from groups if object satisfies policy conditions if you want Active Roles to remove the object from the specified group(s) if the configured conditions are met.
Click Next to continue.
-
On the Group Selection page, specify the group(s) you want the policy to add the objects to (or remove from, depending on your choice on the Policy Action page). Click Add to open the Select Objects dialog, and then use either the Look in: drop-down or click Browse to specify the group(s). Once you are ready, click Next to continue.
NOTE: Consider the following limitations when configuring a Group Membership Autoprovisioning policy for cloud-only Azure objects:
-
When provisioning cloud-only Azure users or Azure guest users, you must specify an O365 Group (or O365 Groups) in this step. To do so, click Browse to open the Browse for Container dialog, and then navigate to the following node for the list of O365 Groups in the organization:
Azure > <azure-tenant-name> > Office 365 Groups
-
The Group Membership AutoProvisioning policy can only add or remove cloud-only Azure users and guest users to or from O365 Groups that are located in the same Azure tenant as the Azure users and guest users. Selecting O365 Groups located in another Azure tenant causes the configured Policy Object to not work properly.
-
On the Enforce Policy page, specify the objects to which the configured Policy Object will be applied. Click Add, and then use the Select Objects dialog to locate and select the objects.
TIP: When provisioning cloud-only Azure users or guest users, you can either select the respective object category (such as the Azure user or Azure guest user node) in this step, or the Azure tenant that contains the Azure objects.
-
Click Next, and then click Finish to create the new policy.
