Applying the Policy Object
You can apply the Policy Object by using the Enforce Policy page in the New Provisioning Policy Object Wizard, or you can complete the wizard and then use the Enforce Policy command on the domain, OU, or Managed Unit where you want to apply the policy.
For more information on how to apply a Policy Object, see Applying Policy Objects and Managing policy scope.
Exchange Mailbox Deprovisioning
Policies of this category are intended to automate the following tasks on deprovisioning Microsoft Exchange resources for deprovisioned users:
-
Hide deprovisioned users from address lists.
-
Prevent non-delivery reports from being sent.
-
Grant designated persons full access to deprovisioned mailboxes.
-
Redirect email addressed to deprovisioned users.
-
Force the mailbox of the deprovisioned user to send automatic replies.
When configuring a policy of this category, you specify how you want Active Roles to modify the user’s account and mailbox upon a request to deprovision a user. The purpose is to reduce the volume of email sent to the mailbox of the deprovisioned user, and to authorize designated persons to monitor such email.
How the Exchange Mailbox Deprovisioning policy works
When processing a request to deprovision a user, Active Roles uses this policy to determine the Exchange mailbox deprovisioning options, and then updates the user account and mailbox accordingly.
The available mailbox-deprovisioning options are summarized in the following table. For each option, the table outlines the policy effect on a user mailbox.
Table 13: Policy effect on a user’s mailbox
|
Hide the mailbox from the Global Address List (GAL), to prevent access to the mailbox |
Prevents the deprovisioned user from appearing in your Exchange organization’s address lists. If you select this option, the deprovisioned user is hidden from all address lists.
This option renders the mailbox inaccessible. You cannot log on to Exchange Server as the mailbox user or otherwise access the hidden mailbox. |
|
Prevent non-delivery reports (NDR) from being sent |
Prevents non-delivery reports from being generated when emails are sent to the deprovisioned mailbox. (Non-delivery report is a notice that a message was not delivered to the recipient.) |
|
Grant the user’s manager full access to the mailbox |
Provides the person designated as the deprovisioned user’s manager with full access to the mailbox of that user. The manager is determined based on the Manager attribute of the deprovisioned user account in Active Directory. |
|
Grant the selected users or groups full access to the mailbox |
Provides the specified users or groups with full access to the deprovisioned user mailbox. |
|
Disallow forwarding messages to alternate recipients |
Email addressed to the deprovisioned user is not forwarded to an alternate recipient. |
|
Forward all incoming messages to the user’s manager |
E-mail addressed to the deprovisioned user is forwarded to the user’s manager. The manager is determined based on the Manager attribute of the deprovisioned user account in Active Directory. |
|
Leave copies in the mailbox |
Email addressed to the deprovisioned user is delivered to both the mailbox of the user’s manager and the mailbox of the deprovisioned user. If you do not select this option, such email is only delivered to the manager’s mailbox. |
|
Don’t change the mailbox autoreply settings |
Active Roles makes no changes to the Automatic Replies configuration of the mailbox. Thus, if the mailbox is configured to send automatic replies, deprovisioning the mailbox user does not cause the mailbox to stop sending automatic replies. |
|
Auto-reply with the following messages (once for each sender) |
Active Roles configures the mailbox to send the Automatic Replies messages specified by the policy. This option provides for the following policy settings:
-
The Automatic Replies message that is sent to senders within the organization.
-
Whether to send an Automatic Replies message to senders outside of the organization (external senders).
-
Whether to send an Automatic Replies message to all external senders or only to the user’s contacts.
-
The Automatic Replies message that is sent to external senders. |
Configuring an Exchange Mailbox Deprovisioning policy
You can configure a new Exchange Mailbox Deprovisioning policy with the Active Roles Console.
To configure an Exchange Mailbox Deprovisioning policy
-
On the Policy to Configure page, select Exchange Mailbox Deprovisioning, then click Next.
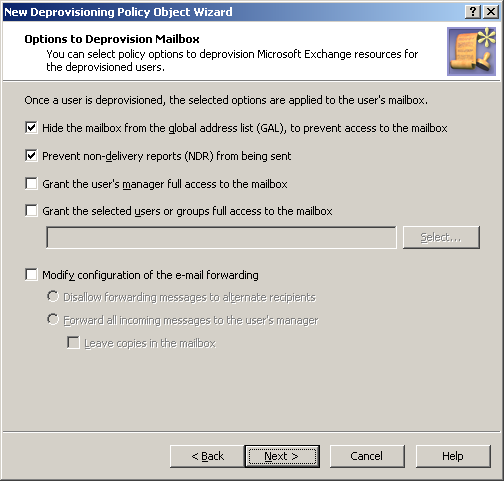
Figure 67: Options to Deprovision Mailbox
-
On the Options to Deprovision Mailbox page, select the options you want the policy to apply when deprovisioning a user account. You can select any combination of these options to deprovision Microsoft Exchange resources for the deprovisioned user account:
-
Hide the mailbox from the Global Address List (GAL), to prevent access to the mailbox
-
Prevent non-delivery reports (NDR) from being sent
-
Grant the user’s manager full access to the mailbox
-
Grant the selected users or groups full access to the mailbox
-
Modify configuration of the e-mail forwarding
-
If you selected the Grant the selected users or groups full access to the mailbox check box, click Select to specify the users or groups you want.
-
If you selected the Modify configuration of the e-mail forwarding check box, do one of the following:
-
Click Forward all incoming messages to the user’s manager to specify that the email messages sent to the deprovisioned user are to be forwarded to the manager of that user. Then, select or clear the Leave copies in the mailbox check box to specify whether you want the messages to be delivered to both the user’s mailbox and the manager’s mailbox or only to the manager’s mailbox.
-
Click Next.
-
On the Automatic Replies page, choose from the following options:
-
If you selected the Automatically reply with the following messages (once for each sender) option, do the following:
-
In the Inside organization box, specify the autoreply message to be sent to senders within the user’s organization.
-
If you want the mailbox to send an autoreply message to external senders, select the Auto-reply to people outside organization check box, and specify the message in the area beneath that check box.
-
Select the User's contacts only or Anyone outside organization option depending on whether you want the mailbox to auto-reply only to external senders that are in the user’s Contacts folder or to all external senders, respectively.
-
Click Next.
-
On the Enforce Policy page, you can specify objects to which this Policy Object is to be applied:
-
Click Next, then click Finish.
