Chatee ahora con Soporte
Chat con el soporte

syslog-ng Store Box 6.9.0 - Administration Guide

Preface Introduction The concepts of SSB The Welcome Wizard and the first login Basic settings User management and access control Managing SSB Configuring message sources Storing messages on SSB Forwarding messages from SSB Log paths: routing and processing messages Configuring syslog-ng options Searching log messages Searching the internal messages of SSB Classifying messages with pattern databases The SSB RPC API Monitoring SSB Troubleshooting SSB Security checklist for configuring SSB Glossary

Network settings

The Basic Settings > Network tab contains the network interface and naming settings of syslog-ng Store Box (SSB).

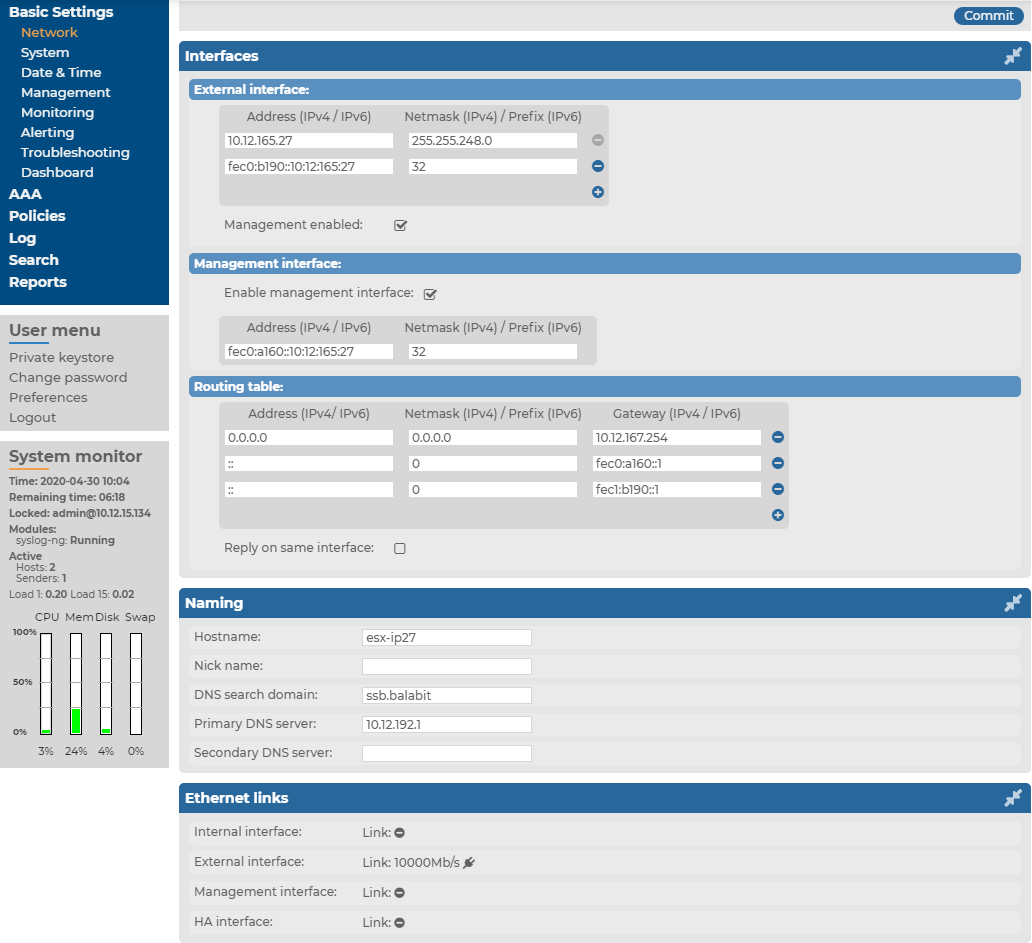
Figure 27: Basic Settings > Network > Interfaces — Network settings

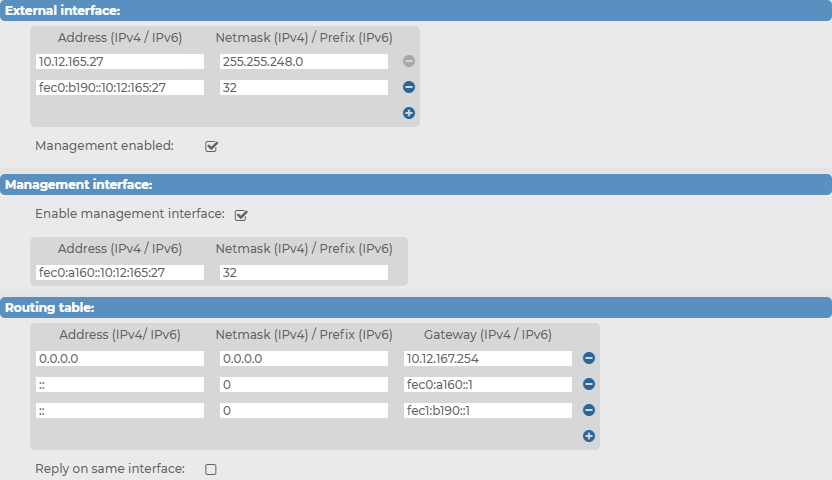
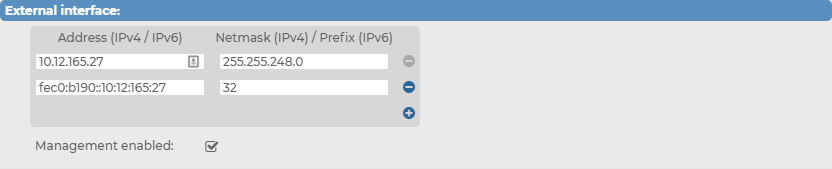
  • Interfaces > External interface: The address and netmask / prefix of the SSB network interface that receives client connections. Click the and icons to add new alias IP addresses (also called alias interfaces) or delete existing ones. You must configure at least one external interface. If you disable the management interface, you can also access the SSB web interface through the external interface. When multiple external interfaces are configured, the first one refers to the physical network interface, all others are alias interfaces. You can access the SSB web interface from all external interfaces (if no management interface is configured).

    Optionally, you can enable access to the SSB web interface even if the management interface is configured by activating the Management enabled function.

    Caution:

    If you enable management access on an interface and configure alias IP address(es) on the same interface, SSB will accept management connections only on the original address of the interface.

    NOTE: The IPv6 support on syslog-ng Store Box (SSB) only enables management and UI access, but SSB cannot send or accept logs through IPv6 addresses. As a result, the external interface must have at least one IPv4 address configured.

    NOTE: Do not use IP addresses that fall into the following ranges:

    • IPv4 addresses

      • 1.2.0.0/16 (reserved for communication between SSB cluster nodes)

      • 127.0.0.0/8 (localhost IP addresses)

    • IPv6 addresses

      • ::1/128 (loopback address)
      • fe80::/10 (link-local addresses)

    NOTE: The speed of the interface is displayed for every interface. In SSB version 4 F5 and later, you cannot manually change the speed of the interface.

    On SSB T-10 appliances, if both the 1-Gb (label 1) and 10-Gb (label A) interfaces are plugged in, SSB displays the auto-detected speed of the interface where Ethernet link is detected (that is, the cable is plugged in, and the other side is powered on).

    When SSB is deployed in a virtual environment and only a single network interface is configured, that single network interface starts to serve as the management interface. In such cases, the Management enabled function becomes redundant. Instead, a message displays that access to the web interface and the RPC API is enabled on every configured IP address.

    Figure 28: Basic Settings > Network > Interfaces — Management enabled on every configured IP address

  • Interfaces > Management interface: The adress and netmask / prefix of the SSB network interface used to access the SSB web interface. If the management interface is configured, the web interface can be accessed only through this interface, unless:

    • Access from other interfaces is explicitly enabled.

    • Only one network interface has been defined, which then serves as the management interface.

    NOTE: Do not use IP addresses that fall into the following ranges:

    • IPv4 addresses

      • 1.2.0.0/16 (reserved for communication between SSB cluster nodes)

      • 127.0.0.0/8 (localhost IP addresses)

    • IPv6 addresses

      • ::1/128 (loopback address)
      • fe80::/10 (link-local addresses)
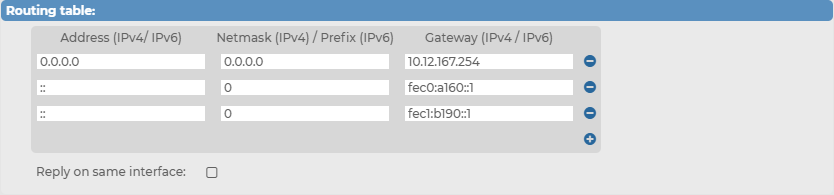
  • Interfaces > Routing table: When sending a packet to a remote network, SSB consults the routing table to determine the path it should be sent. If there is no information in the routing table, the packet is sent to the default gateway.

    Use the routing table to define static routes to specific hosts or networks. You have to use the routing table if the internal interface is connected to multiple subnets, because the default gateway is (usually) towards the external interface. Click the and icons to add new routes or delete existing ones. A route means that messages sent to the Address (IPv4/IPv6) / Netmask (IPv4) / Prefix (IPv6) network should be delivered to Gateway (IPv4 / IPv6). An option is also provided to override the default behavior of always routing outgoing packets based on the destination address and instead reply on the interface of the incoming packets.

    For more information, see Configuring the routing table.

  • Naming > Hostname: Name of the machine running SSB.

  • Naming > Nick name: The nickname of SSB. Use it to distinguish the devices. It is displayed in the core and boot login shells.

  • Naming > DNS search domain: Name of the domain used on the network. When resolving the domain names of the audited connections, SSB will use this domain to resolve the target hostname if the appended domain entry of a target address is empty.

  • Naming > Primary DNS server: IP address of the name server used for domain name resolution.

  • Naming > Secondary DNS server: IP address of the name server used for domain name resolution if the primary server is unaccessible.

Configuring the external interface

This section describes how to activate the external interface.

To activate the external interface

  1. Navigate to Basic Settings > Network > Interfaces.

    Figure 29: Basic Settings > Network > Interfaces > External interface — Configuring the external interface

  2. Under External interface, select Management enabled.

  3. Address (IPv4 / IPv6): enter the IP address of SSB's external interface.

  4. Netmask (IPv4) / Prefix (IPv6): enter the netmask / prefix related to the IP address.

    NOTE: The IPv6 support on syslog-ng Store Box (SSB) only enables management and UI access, but SSB cannot send or accept logs through IPv6 addresses. As a result, the external interface must have at least one IPv4 address configured.

    NOTE: When entering IPv6 addresses, consider that the IPv6 address configured on the external interface and the IPv6 address configured on the management interface cannot be the same.

  5. Click .

Configuring the management interface

This section describes how to activate the management interface.

NOTE: When syslog-ng Store Box (SSB) is deployed in a virtual environment and only a single network interface is configured, that single network interface starts to serve as the management interface. In such cases, the Enable management interface function becomes redundant and is not displayed on the user interface.

To activate the management interface

  1. Navigate to Basic Settings > Network > Interfaces.

    Figure 30: Basic Settings > Network > Interfaces > Management interface — Configuring the management interface

  2. Under Management interface, select Enable management interface.

  3. Address (IPv4 / IPv6): enter the IP address of SSB's management interface.

  4. Netmask (IPv4) / Prefix (IPv6): enter the netmask / prefix related to the IP address.

    NOTE: Do not use IP addresses that fall into the following ranges:

    • IPv4 addresses

      • 1.2.0.0/16 (reserved for communication between SSB cluster nodes)

      • 127.0.0.0/8 (localhost IP addresses)

    • IPv6 addresses

      • ::1/128 (loopback address)
      • fe80::/10 (link-local addresses)

    NOTE: When entering IPv6 addresses, consider that the IPv6 address configured on the external interface and the IPv6 address configured on the management interface cannot be the same.

  5. Caution:

    After clicking , the web interface will be available only through the management interface. The web interface will not be accessible using the current (external) interface, unless the Management enabled option is selected for the external interface.

    Make sure that the Ethernet cable is plugged in and that the management interface is connected to the network by checking the status of the Ethernet links in Basic settings > Network > Ethernet links. If the cable is plugged in and the interface is connected to the network, the icon and the connection speed is displayed next to Link: in the respective interface field.

    When using High Availability, ensure that the management interface of both SSB units is connected to the network.

    The HA interface section indicates if a link is detected on the high availability interface.

    Click .

Configuring the routing table

The routing table contains the network destinations syslog-ng Store Box (SSB) can reach. You have to make sure that the local services of SSB (including connections made to the backup and archive servers, the syslog server, and the SMTP server) are routed properly.

You can add multiple addresses along with their respective gateways.

Caution:

Complete the following procedure only if the management interface is configured, otherwise the data sent by SSB will be lost. For details on configuring the management interface, see Configuring the management interface.

To configure the routing table

  1. To add a new routing entry, navigate to Basic Settings > Network > Interfaces and in the Routing table field, click .

    Figure 31: Basic Settings > Network > Interfaces > Routing

  2. Enter the IP address of the remote server into the Address (IPv4 / IPv6) field.

  3. Enter the related netmask /prefix into the Netmask (IPv4) / Prefix (IPv6) field.

  4. Enter the IP address of the gateway used on that subnetwork into the Gateway (IPv4 / IPv6 field.

    NOTE: Do not use IP addresses that fall into the following ranges:

    • IPv4 addresses

      • 1.2.0.0/16 (reserved for communication between SSB cluster nodes)

      • 127.0.0.0/8 (localhost IP addresses)

    • IPv6 addresses

      • ::1/128 (loopback address)
      • fe80::/10 (link-local addresses)
  5. If you want to reply on the same interface where a packet came in, select Reply on same interface. This instructs SSB to disregard connected networks other than the network of the incoming packet's interface when routing reply packets.

  6. Click .

Documentos relacionados

The document was helpful.

Seleccionar calificación

I easily found the information I needed.

Seleccionar calificación