Forwarding log messages to HDFS destinations
You can forward log messages from syslog-ng Store Box(SSB) to Hadoop Distributed File System (HDFS) servers, allowing you to store your log data on a distributed, scalable file system. This is especially useful if you have huge amounts of log messages that would be difficult to store otherwise, or if you want to process your messages using Hadoop tools.
Forwarding log messages from SSB to an HDFS destination comprises the following steps:
- Configure a Kerberos policy.
- Configure the HDFS cluster.
- Configure an HDFS destination.
- Create a log path.
Configuring a Kerberos policy
The syslog-ng Store Box(SSB) appliance authenticates to the HDFS cluster through a trusted third party, a Kerberos server. Once SSB has been granted a ticket by Kerberos, it is then able to write data to the HDFS servers.
To configure a Kerberos policy
-
Navigate to Policies > Kerberos and select  to create a new policy.
-
In the Default realm field, enter the name of the Kerberos realm where your SSB resides.
-
If you have to specify the address of the Key Distribution Center (KDC) server, click first, and then enter the FQDN or IP address of the KDC server that is issuing tickets within your Kerberos realm.
If your DNS server is configured to map Kerberos realms to KDC hostnames, you do not need to specify KDC servers here.
-
Add a Kerberos principal policy. First, select  under Kerberos principals.
- Enter a name for your policy. This name will be used later, on the Policies > HDFS Cluster page of SSB, to identify the Kerberos principal policy you want to use. For more information, see Configuring the HDFS cluster.
-
Upload the keytab file that contains keys for your principal.
This is the principal that has write access to the HDFS cluster.
The keytab file was provided to you by the Kerberos administrator, and it contains the encrypted key required to authenticate your principal to Kerberos.
-
Select your principal from the Principal list.
The keytab file you have uploaded may contain keys for several principals. This list displays all the principals with keys in the uploaded keytab file.
- Test whether or not your principal is able to authenticate to Kerberos. Click Test authentication.
- When all works fine, click
 .
.
Figure 169: Policies > Kerberos — Configuring a Kerberos policy

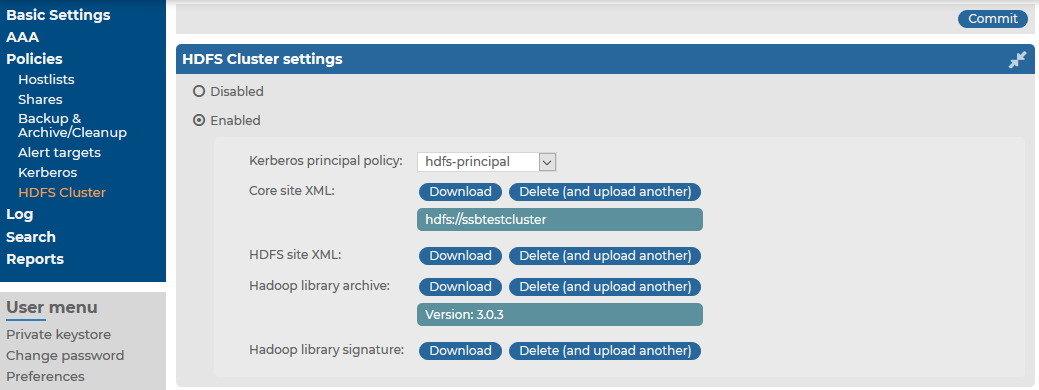
Configuring the HDFS cluster
The following describes how to configure settings related to the HDFS cluster where you want to forward logs.
Prerequisites:
To configure settings related to the HDFS cluster where you want to forward logs
-
Navigate to Policies > HDFS Cluster and select Enabled.
-
Select the Kerberos principal policy configured previously (for details, see Configuring a Kerberos policy).
-
Upload the Core site XML file of your HDFS cluster. You may have to ask for this file from your HDFS cluster administrator.
-
Upload the HDFS site XML file of your HDFS cluster. You may have to ask for this file from your HDFS cluster administrator.
- In the Hadoop library archive field, upload the Hadoop binary tarball matching the version of your HDFS cluster infrastructure. Binary tarballs are distributed on the official Apache site.
- In the Hadoop library signature field, upload the signature GPG file matching the used binary version. Signature GPG files are distributed on the official Apache site.
- Click .
The version number of the Hadoop library archive is displayed.
Figure 170: Policies > HDFS Cluster — Configuring the HDFS cluster
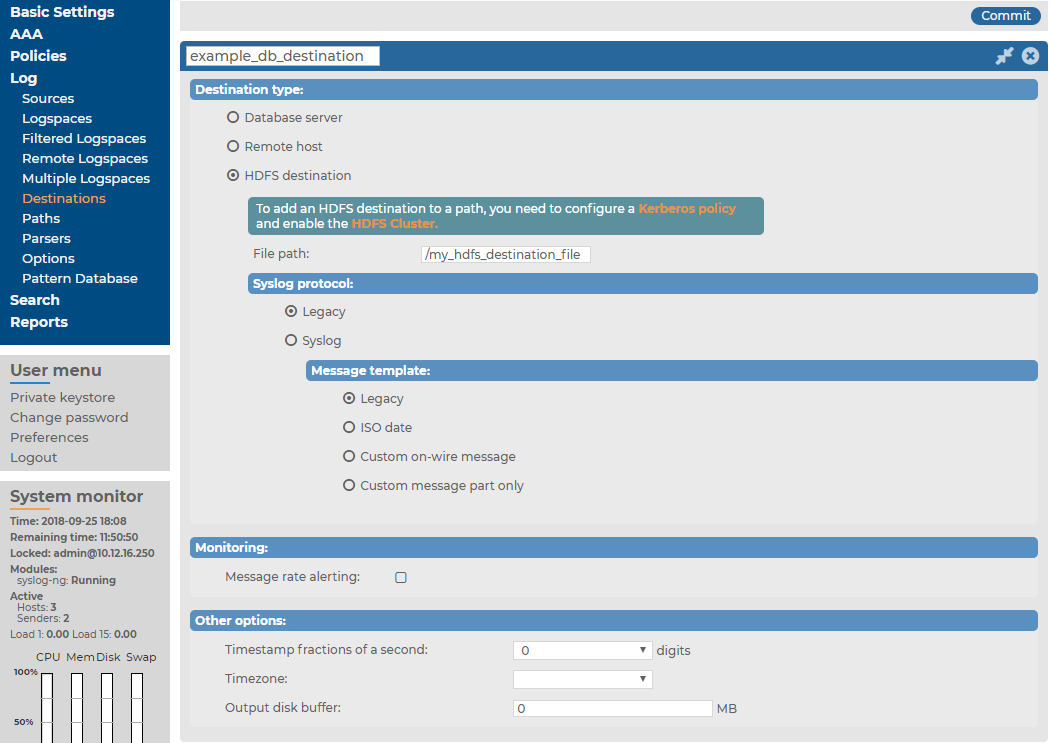
Configuring an HDFS destination
The following describes how to configure the HDFS destination where you want to forward logs.
Prerequisites:
To configure the HDFS destination
- Navigate to Log > Destinations and select to add a new destination.
- Enter a name for the destination.
- Select HDFS destination.
- In File path, specify the absolute path for the destination file on the HDFS server.
Figure 171: Log > Destinations — Configuring an HDFS destination
-
Select the syslog protocol to use from the Syslog protocol field.
-
To use the legacy BSD-syslog protocol described in RFC 3164, select Legacy and specify the message template to use. Select Legacy to use the message format described in the RFC, or ISO date to replace the original time stamp with an ISO8061 compliant time stamp that includes year and timezone information. To customize the format of the message contents using macros, select Custom message part only, or Custom on-wire message to completely reformat the message (including the headers). For details on using macros, see Hard versus soft macros in the syslog-ng PE Administration Guide and Templates and macros in the syslog-ng PE Administration Guide. If you have no special requirements, use the ISO date template.
-
To use the new IETF-syslog protocol, select Syslog. Note that most syslog applications and devices currently support only the legacy protocol. If you need, you can customize the contents of the message using macros. Note that for the IETF-syslog protocol, the header cannot be customized. For details on using macros, see Hard versus soft macros in the syslog-ng PE Administration Guide and Templates and macros in the syslog-ng PE Administration Guide.
- Configure message rate alerting. For detailed instructions, see Configuring message rate alerting.
-
The time stamps of most log messages is accurate only to the second. The syslog-ng Store Box(SSB) appliance can include more accurate time stamps: set how many digits should be included in the Timestamp fractions of a second field. This option corresponds to the frac_digits() parameter of syslog-ng.
-
If the server and SSB are located in a different timezone and you use the Legacy message template (which does not include timezone information), select the timezone of the server from the Timezone field.
-
Set the size of the disk buffer (in Megabytes) in the Output disk buffer field. If the remote server becomes unavailable, SSB will buffer messages to the hard disk, and continue sending the messages when the remote server becomes available. This option corresponds to the log_disk_fifo_size() parameter of syslog-ng.
Note that SSB does not pre-allocate the hard disk required for the disk buffer, so make sure that the required disk space is available on SSB. For details on creating archiving policies and adjusting the disk-fillup prevention, see Archiving and cleanup and Preventing disk space fill up.
Example: Calculating disk buffer size
The size of the disk buffer you need depends on the rate of the incoming messages, the size of the messages, and the length of the network outage that you want to cover. For example:
-
SSB is receiving 15000 messages per second
-
On the average, one message is 250 bytes long
-
You estimate that the longest time the destination will be unavailable is 4 hours
In this case, you need a disk buffer for 250 [bytes] * 15000 [messages per second] * 4*60*60 [seconds] = 54000000000 [bytes], which is 54000 Megabytes (in other words, a bit over 50 GB).
-
Click .
-
To start sending messages to the destination, include the new destination in a logpath. For details, see Log paths: routing and processing messages.
On the Log > Paths page, the HDFS destination will be displayed in the remote category.
