To establish an SSH connection through One Identity Safeguard for Privileged Sessions (SPS) with PuTTY, follow one of the methods:
Common method
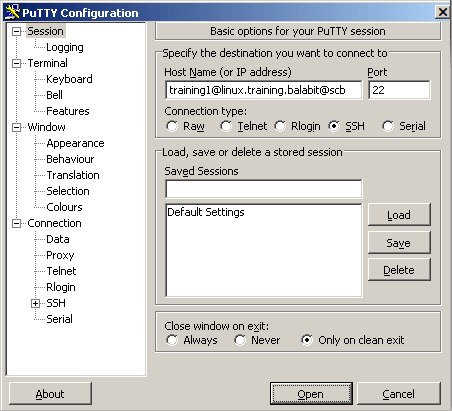
To establish the SSH-connection using the most common method, enter the username, the target server's hostname (or IP address), and the hostname (or IP address) of SPS using the <username>@<server>@<scb> format in PuTTY.
If you do not specify the username or the address in nontransparent SSH and Telnet connections, One Identity Safeguard for Privileged Sessions (SPS) displays an interactive prompt where you can enter the username and the server address.
Example
Assuming the following values:
You can enter the following destination in PuTTY:
training1@linux.training.example@scb
Figure 321: Configuring SSH inband destination in PuTTY

Alternative method
To establish the SSH-connection using a different method,
-
Enter only the hostname (or IP address, depending on your configuration) of SPS in PuTTY.
-
At the login prompt, provide the username on the target server, and the target server's hostname (or IP address) using the <username>@<server> format.
To establish an SSH connection through One Identity Safeguard for Privileged Sessions (SPS), follow these steps:
-
Enter the following command:
# ssh <username>@<server>@<scb>
...where <username> is the username, <server> is the target server's hostname (or IP address), and <scb> is the hostname (or IP address) of SPS.
If you do not specify the username or the address in nontransparent SSH and Telnet connections, One Identity Safeguard for Privileged Sessions (SPS) displays an interactive prompt where you can enter the username and the server address.
Example
Assuming the following values:
You can enter the following command:
# ssh training1@linux.training.example@scb
-
Alternative approach:
-
Enter only the hostname (or IP address, depending on your configuration) of SPS:
# ssh <scb>
-
At the login prompt, provide the username on the target server, and the target server's hostname (or IP address) using the <username>@<server> format
The following steps provide instructions for establishing SSH connections with servers that are listening on a non-standard port (the Inband destination selection > Targets > Port option is not 22), and the port number targeted by the clients is also a non-standard port (the To > Port option of the Connection Policy).
-
Enter the following in PuTTY:
-
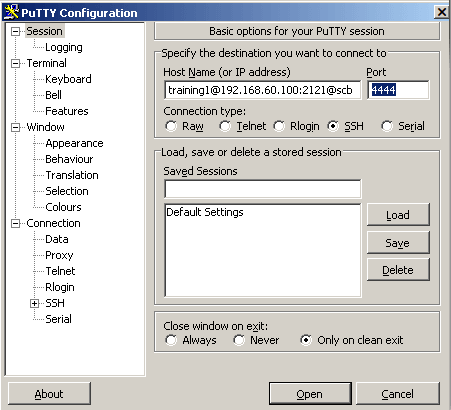
In the Host Name field, enter the username on the target server, the target server's hostname (or IP address) and port number, and the hostname (or IP address) of One Identity Safeguard for Privileged Sessions (SPS) in the <username>@<server>:<port>@<scb> format
If you do not specify the username or the address in nontransparent SSH and Telnet connections, One Identity Safeguard for Privileged Sessions (SPS) displays an interactive prompt where you can enter the username and the server address.
-
In the Port field, enter the port number of the SPS server
Example
Assuming the following values:
-
The username is training1
-
The target server is 192.168.60.100
-
The target server is listening on port 2121
-
The SPS server is scb
-
The SPS server is listening on port 4444
You can enter the following destination hostname in PuTTY:
training1@192.168.60.100:2121@scb
Also change the destination port to the SPS server's port number:
4444
Figure 322: Configuring SSH inband destination for nonstandard ports in PuTTY

-
Alternative approach:
-
Enter only the hostname (or IP address, depending on your configuration) and port number of SPS in PuTTY.
-
At the login prompt, provide the username on the target server, and the target server's hostname (or IP address) and port number using the <username>@<server>:<port> format.
The following steps provide instructions for establishing SSH connections with servers that are listening on a non-standard port (the Inband destination selection > Targets > Port option is not 22), and the port number targeted by the clients is also a non-standard port (the To > Port option of the Connection Policy).
-
Enter the following command:
# ssh -p <scb_port> <username>@<server>:<port>@<scb>
...where <scb_port> is the port number of One Identity Safeguard for Privileged Sessions (SPS), <username> is the username on the target server, <server:port> is the target server's hostname (or IP address), <port> is the target server's port number, and <scb> is the hostname (or IP address) of SPS.
If you do not specify the username or the address in nontransparent SSH and Telnet connections, One Identity Safeguard for Privileged Sessions (SPS) displays an interactive prompt where you can enter the username and the server address.
Example
Assuming the following values:
-
The username is training1
-
The target server is 192.168.60.100
-
The target server is listening on port 2121
-
The SPS server is scb
-
The SPS server is listening on port 4444
You can enter the following command:
# ssh -p 4444 training1@192.168.60.100:2121@scb
-
Alternative approach:
-
Enter only the hostname (or IP address, depending on your configuration) and port number of SPS with the following command:
# ssh -p <scb_port> <scb>
-
At the login prompt, provide the username on the target server, and the target server's hostname (or IP address) and port number using the <username>@<server>:<port> format.


