サポートと今すぐチャット
サポートとのチャット

One Identity Safeguard for Privileged Sessions 8.0 LTS - Administration Guide

Preface Introduction The concepts of One Identity Safeguard for Privileged Sessions (SPS)
The philosophy of One Identity Safeguard for Privileged Sessions (SPS) Policies Credential Stores Plugin framework Indexing Supported protocols and client applications Modes of operation Connecting to a server through One Identity Safeguard for Privileged Sessions (SPS) Archive and backup concepts Maximizing the scope of auditing IPv6 in One Identity Safeguard for Privileged Sessions (SPS) SSH host keys Authenticating clients using public-key authentication in SSH The gateway authentication process Four-eyes authorization Network interfaces High Availability support in One Identity Safeguard for Privileged Sessions (SPS) Versions and releases of One Identity Safeguard for Privileged Sessions (SPS) Accessing and configuring One Identity Safeguard for Privileged Sessions (SPS)
Cloud deployment considerations The Welcome Wizard and the first login Basic settings
Supported web browsers The structure of the web interface Network settings Configuring date and time System logging, SNMP and e-mail alerts Configuring system monitoring on SPS Data and configuration backups Archiving Cleaning up audit data Using plugins Forwarding data to third-party systems Starling integration
User management and access control
Login settings Managing One Identity Safeguard for Privileged Sessions (SPS) users locally Setting password policies for local users Managing local user groups Managing One Identity Safeguard for Privileged Sessions (SPS) users from an LDAP database Handling user names in User Principal Name (UPN) format Authenticating users to a RADIUS server Authenticating users with X.509 certificates Authenticating users with SAML2 Managing user rights and user groups Creating rules for restricting access to search audit data Displaying the privileges of users and user groups Listing and searching configuration changes
Managing One Identity Safeguard for Privileged Sessions (SPS)
Controlling One Identity Safeguard for Privileged Sessions (SPS): reboot, shutdown Managing One Identity Safeguard for Privileged Sessions (SPS) clusters Managing a High Availability One Identity Safeguard for Privileged Sessions (SPS) cluster Upgrading One Identity Safeguard for Privileged Sessions (SPS) Managing the One Identity Safeguard for Privileged Sessions (SPS) license Accessing the One Identity Safeguard for Privileged Sessions (SPS) console Sealed mode Out-of-band management of One Identity Safeguard for Privileged Sessions (SPS) Managing the certificates used on One Identity Safeguard for Privileged Sessions (SPS)
General connection settings HTTP-specific settings ICA-specific settings MSSQL-specific settings RDP-specific settings SSH-specific settings Using Sudo with SPS Telnet-specific settings VMware Horizon View connections VNC-specific settings Indexing audit trails Using the Sessions interface Advanced authentication and authorization techniques Reports The One Identity Safeguard for Privileged Sessions (SPS) REST API One Identity Safeguard for Privileged Sessions (SPS) scenarios Troubleshooting One Identity Safeguard for Privileged Sessions (SPS)
Network troubleshooting Gathering data about system problems Viewing logs on One Identity Safeguard for Privileged Sessions (SPS) Changing log verbosity level of One Identity Safeguard for Privileged Sessions (SPS) Collecting logs and system information for error reporting Collecting logs and system information of the boot process for error reporting Support hotfixes Status history and statistics Troubleshooting a One Identity Safeguard for Privileged Sessions (SPS) cluster Understanding One Identity Safeguard for Privileged Sessions (SPS) RAID status Restoring One Identity Safeguard for Privileged Sessions (SPS) configuration and data VNC is not working with TLS Configuring the IPMI from the BIOS after losing IPMI password Incomplete TSA response received
Using SPS with SPP Configuring external devices Using SCP with agent-forwarding Security checklist for configuring One Identity Safeguard for Privileged Sessions (SPS) Jumplists for in-product help Configuring SPS to use an LDAP backend Glossary

Authentication banner

You can display a banner with a configurable text on the web and console login screen of One Identity Safeguard for Privileged Sessions (SPS).

Users will see the banner every time they try to log in to SPS. The login screen displays the banner text as plain text, with whitespaces preserved.

To enter a banner message, navigate to Users & Access Control > SettingsAuthentication banner.

Figure 73: Users & Access Control > Settings > Authentication banner — Enter a banner message

Web interface timeout

By default, One Identity Safeguard for Privileged Sessions (SPS) terminates the web session of a user after 10 minutes of inactivity. To change the value of this timeout, adjust the Users & Access Control > Settings > Web interface timeout option.

Figure 74: Users & Access Control > Settings — Web interface timeout

Managing One Identity Safeguard for Privileged Sessions (SPS) users locally

By default, One Identity Safeguard for Privileged Sessions (SPS) users are managed locally on SPS. To add local users in SPS, complete all steps of the following procedure:

  1. Create users.

    For detailed instructions on how to create local users, see Creating local users in One Identity Safeguard for Privileged Sessions (SPS).

  2. Assign users to groups.

    For details about how to add a usergroup, see Managing local user groups.

  3. Assign privileges to groups.

    For information on how to control the privileges of usergroups, see Managing user rights and user groups.

Creating local users in One Identity Safeguard for Privileged Sessions (SPS)

This section describes how to create local users.

NOTE: The admin user is available by default, and has all possible privileges. It is not possible to delete this user.

When using RADIUS authentication together with local users, the users are authenticated to the RADIUS server, only their group memberships must be managed locally on One Identity Safeguard for Privileged Sessions (SPS). For details, see Authenticating users to a RADIUS server.

To create a local user

  1. Navigate to Users & Access Control > Local Users and click .

    Figure 75: Users & Access Control > Local Users — Creating local users
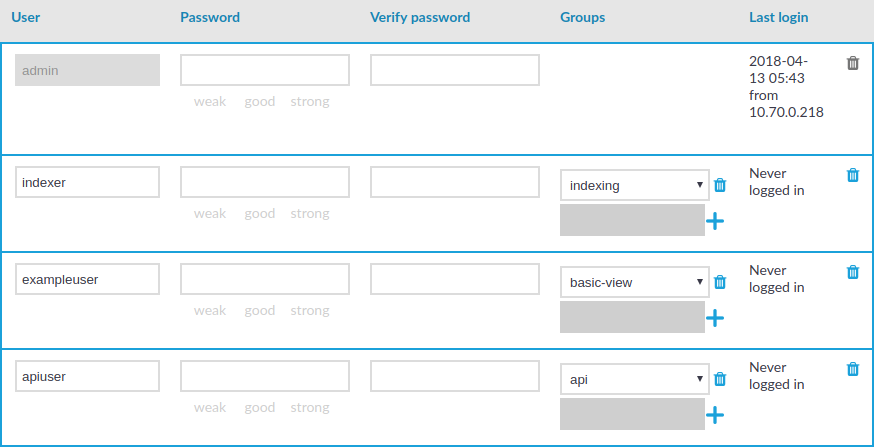
  2. Enter the username in the User field.

    NOTE: For the username of SSH users, only valid UTF-8 strings are allowed.

    The following characters cannot be used in usernames: <>\/[]:;|=,+*?

  3. Enter a password for the user in the Password and Verify password fields.

    The strength of the password is indicated below the Password field, as you type. To set a policy for password strength, see Setting password policies for local users. The user can change the password later from the SPS web interface, and you can modify the password of the user here.

    Use strong passwords: at least 8 characters that include numbers, letters, special characters, and capital letters. For local One Identity Safeguard for Privileged Sessions (SPS) users, require the use of strong passwords (set Users & Access Control > Login options > Minimal password strength to strong). For more information, see Setting password policies for local users in the Administration Guide.

    NOTE: SPS accepts passwords that are not longer than 150 characters and supports the following characters:

    • Letters A-Z, a-z

    • Numbers 0-9

    • The space character

    • Special characters: !"#$%&'()*+,-./:;<>=?@[]\^-`{}_|

    NOTE: If possible, use a random password generator.

    To create a strong password:

    • Use special characters

    • Use long passwords

    • Mix uppercase and lowercase letters

    For strong passwords, do not use:

    • Personal information in the passwords

    • Sequential letters or numbers

    • The word password as the password

    • Keyboard paths (for example, qwerty)

  4. Click in the Groups section and select a group that the user will be a member of. Repeat this step to add the user to multiple groups.

    You can also modify the group membership of local users here.

    To remove a user from a group, click next to the group.

  5. To save the modifications, click Commit.

関連ドキュメント

The document was helpful.

評価を選択

I easily found the information I needed.

評価を選択