To revert back to a specific version of the policy file
- From the Open menu, select Version to open the Open Version dialog.
- Select a policy group and a version of a policy and click OK.
- After you modify the policy, save it, accepting the warning message to save over the existing policy.
The policy file is saved as a new version; not as the version number that you opened.
You can make changes to the policy in the text editor by either typing in changes or using the commands in the Edit panel to insert, copy, or paste text; check for errors; or disable and enable syntax highlighting.
As you edit a policy, the Errors pane lists syntax errors by line and column number. You can double click an error to navigate directly to the line containing the error.
To use the commands in the Edit panel to modify the policy file
-
Open the Insert menu and select one of these options:
- Insert Local User to open the Select Local User dialog.
- Insert Local Group to open the Select Local Group dialog.
- Insert AD User to open the Select AD User dialog.
- Insert AD Group to open the Select AD Group dialog.
Note: The Select AD dialogs allow you to select a container from which to begin the search.
The AD options are only available if you are logged in as an Active Directory user with rights to edit the policy file; that is, an account in the Manage Sudo Policy or Manage PM Policy role. Non-Unix-enabled groups require that you configure the Authentication Services sudo_vas group provider module. See Configuring Sudo Access Control in the Authentication Services Administration Guide for details.
- Insert Host to open the Select host dialog.
- Insert Alias to open the Select Alias dialog (only available in the Sudo Policy Editor.)
Note: The Select Alias dialog allows you to filter the list of Alias names by:
- All Aliases
- Command Alias
- Host Alias
- Runas Alias
- User Alias
- Insert List to open the Edit Entries dialog (only available in the PM Policy Editor).
The Edit Entries dialog allows you to insert lists of data either manually, pasted from another file, or imported from a file. Separate multiple items with commas, for example:
Fred, Ethel, Lucy
The Insert List option allows you to copy and paste a comma-delimited lists into the text box and will automatically add the list of data objects with quotes around each individual entry. For example, if you paste the following into the Add entries box:
/usr/bin/kill,/usr/bin/cp,/usr/bin/passwd,/usr/bin/head
when you click Add, the console lists the entries and puts quotes around each one, like this:
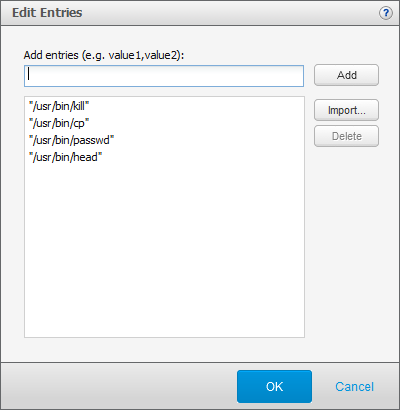
Once you have the objects listed on the Edit Entries dialog, click OK to include them in the policy.
Note: For more information about the Edit Entries dialog, click the help link.
- Click the Error Check button to validate the formatting and syntax of the policy file.
Note: When checking sudo policy for errors, note that the #include and #includedir directives are currently ignored by Privilege Manager for Sudo. Remove or comment out any #include or #includedir directives in your sudo policy. Error-checking of policy files that contain a #include or #includedir may generate false errors. It is safe to ignore such errors when saving the sudo policy, but it is best practice to remove or comment out such directives.
The Errors pane is located across the bottom of the Edit Policy view and provides feedback on any syntax errors encountered when you click the Error Check button. You can double click an error to navigate directly to the line containing the error.
- Select the Highlight Syntax option to view color-coded syntax.
Note: Managing large policy files may affect the policy editor performance.
- Use the controls in the Search panel to search for keywords in the policy file.
Type a text string and click Next or Previous.
Privilege Manager roles (or profiles) define who, what, where, when, and how users are permitted to perform various privileged account actions.
When you open a PM Policy file for editing, it lists the roles associated with the policy using the following icons:
 Privilege Manager Role
 Privilege Manager Restricted Shell Role
Note: If a role is disabled, it is grayed out; if a role currently has an error, it displays  .
.
From the Privilege Manager Roles view, you can perform the following tasks:
- Properties
View and modify privileged account actions for a role.
- Add Role
Type of roles you can add include:
- Delete Role
- Change Version
Opens a different version of the policy making that version the active policy.
- Policy Change Report
Review all policy modifications.
- Manage Defaults
Define policy defaults as global settings for all Privilege Manager roles.
By default, Privilege Manager for Unix provides the following role profiles:
- Privilege Manager Roles
- admin
Permits the root user on any host to submit any standard or 'normal' (that is, not a Privilege Manager Shell program) command as the root user on the local host.
- demo
Permits any user on any host to submit the id and the whoami commands as the root user on the local host.
- helpdesk
Permits users in the helpdesk UNIX group, on any host, to reset (change) any user's password on the local host by running the passwd command as root.
- webadmin
Permits users in the webadmin UNIX group to start and stop the Apache webserver on the local host.
- Privilege Manager Restricted Shell Roles
- qpm4u_login
Permits any user to run a 'wrapped' standard shell program which enables keystroke logging for all commands the user runs.
- restricted
Permits any user to run any restricted Privilege Manager Shell program as the root user on the local host.
Note: Because the shell runs in restricted mode, the following restrictions apply:
- PATH, ENV and SHELL variables are read-only
- User cannot change directory
- User can only run programs in $PATH
- User cannot run a command identified by an absolute/relative path
- User cannot use I/O redirection
Note:
- Shell built-in commands are checked as well as normal executable commands.
- A specified list of “dangerous” commands are forbidden, such as passwd, shutdown, and kill.
- A specified list of benign commands are permitted without authorization.
- A specified list of benign commands are permitted without authorization if the input to the command is from a pipe.
- root
Permits the root user to run any Privilege Manager Shell program in unrestricted mode, as the root user on the local host.
Note:
- Shell built-in commands are permitted without authorization.
- Certain benign commands are permitted without authorization if the input to the command is from a pipe.
- Commands within a specified list are forbidden without authorization.
Note:
- Only the admin, demo, root, and qpm4u_login profile roles are enabled by default. You can enable (or disable) a profile role by selecting the Enable keystroke logging option in the role General Settings.
- The Access & Privilege reports provide information about what commands a user is allowed to run from each profile. See Access & Privileges reports for details.
