Wizard for entering filters
At certain points you can define custom filter conditions. The filter conditions are formulated like a condition (WHERE clause) for a database query.
You can enter database queries directly or put them together with a wizard. Use the  and
and  button to switch to the relevant view.
Each condition is displayed in a special control in the wizard. The controls contain connection points to logically join single conditions or delete single conditions. The connection points are set if you mouse over the edge of the respective control.
Figure 2: Wizard for entering filters
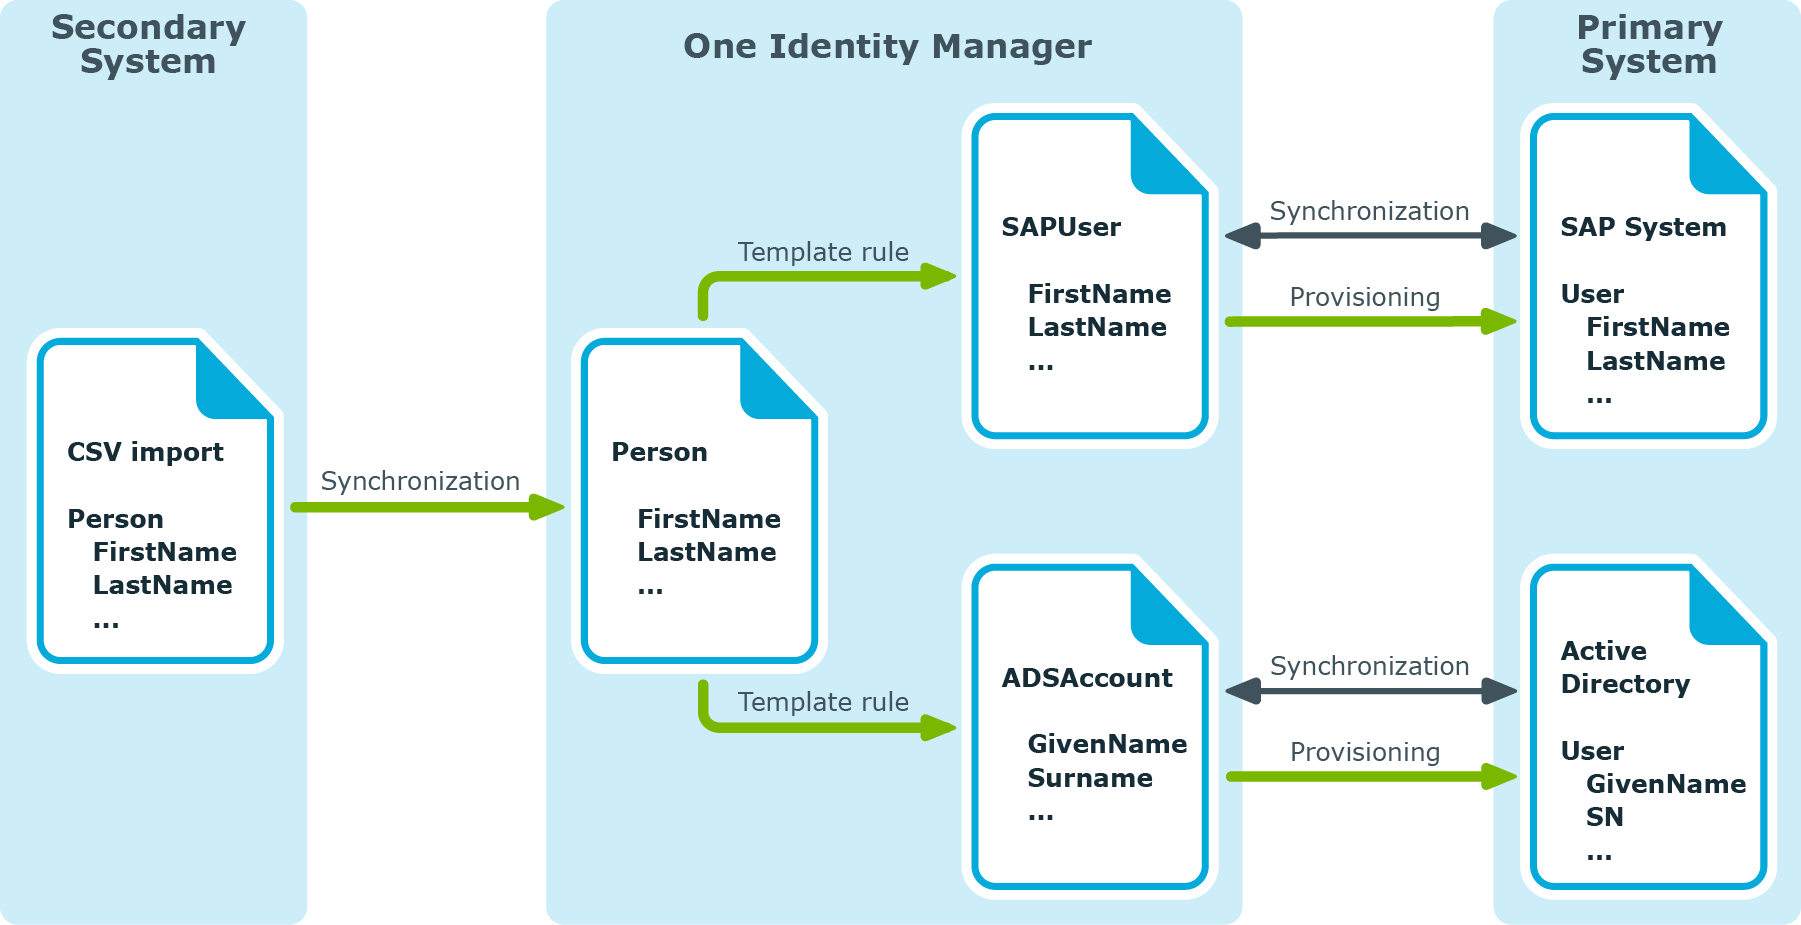
To create a filter with a wizard
- Click Create condition.
This inserts a control for the first condition.
- Enter the condition.
- Click the left-hand part of the condition and select the property to filter by.
The properties for filtering are listed. You can also define other properties and use variables.
- Specify the comparison operator. Click the comparison operator to change it.
The comparison operators =, <>, <, >, <=, >=, and like for defining conditions are supported.
- Specify the comparison value on the right-hand side of the condition.
You can enter a string for a comparison value or select a property from the list. You can also use variables.
NOTE: To switch back to the input field again, select Input field from the menu.
- To link condition you can use the logical operators AND, OR, and NOT.
- Mouse over the edge of the control to which you wish to create a link.
The connection points appear.
- Mouse over a connection point and select the connection.
This adds a new control for the next condition.
NOTE: To remove a control, select the Delete connection point.
Support for scripting
You can apply scripts at various points in the ; for example, when defining the schema properties, in the object filter, or when you define data operations for system connections through the native database connector.You can enter scripts in C# or Visual Basic .NET depending on script's language, which was specified for the synchronization project. You write scripts in a special editing dialog. It has an advanced edit mode which provides additional actions.
To switch to advanced mode
- Press Ctrl + Alt + Enter or click the button at the bottom right.
Figure 3: Directly entering a database query
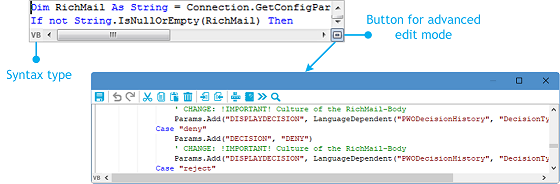
Table 14: Meaning of icon in advanced edit mode
|

|
Quits advanced edit mode. |
|

|
Undoes last change. |
|

|
Redoes last change. |
|

|
Cuts selected code. |
|

|
Copies selected code into clipboard. |
|

|
Inserts code from clipboard. |
|

|
Deletes selected code. |
|

|
Decreases insert. |
|

|
Increases insert. |
|

|
Automatic text formatting. |
|

|
Shows/hides line numbers. |
|

|
Inserts code snippet. |
|

|
Word wraps automatically. |
|

|
Searches within code. |
Additional input aids are provided for creating script code.
Syntax highlighting
The input fields support syntax highlighting depending on the syntax type.
Auto-completion
Auto-completion can be used when creating script code. The amount of scripted code to enter is reduced by displaying the names of properties or functions that can be used. To use auto-completion, use the shortcut Ctrl + SPACE in the relevant positions within the input fields. The contents of the list is determined by the key words in the code. This way, you can use scripts from the script library.
Entering code snippets
One Identity Manager provides code snippets for you to use as templates. You can insert code snippets using the following options:
- Using the icon
- Select the icon.
- Using a shortcut
NOTE: If you select a code snippet directly using a shortcut or the
icon, a short description and the shortcut name are displayed in a tooltip.
TIP: You can use custom code snippets. To do this, create a CustomSnippets directory in the One Identity Manager installation directory to store the code snippets. Use Visual Studio documentation to develop your own code snippets.
If the script tests a fixed value that contains at least two dollar characters, the dollar characters must be masked.
Related topics
Save changes permanently
Different wizards are run to add new objects like , mappings, or workflows with the . The data you enter is temporarily saved. Changes to these objects are also saved only temporarily.
To save changes to the synchronization project permanently
- In the Synchronization Editor toolbar, click Commit to database.
- OR -
- To save the synchronization project with change labels, open the Commit to database menu item and click Commit and assign a change label. For detailed information about working with change labels, see the One Identity Manager Operational Guide.
One Identity Manager compresses the schemas when the synchronization project is saved for the first time. This removes schema data from the synchronization projects that is not required in the synchronization configuration. This can speed up loading the synchronization project.
Related topics
Establish remote connection
To configure with a target system, One Identity Manager must load the data from the target system. One Identity Manager communicates directly with the target system to do this. Sometimes direct access from the workstation, on which the is installed, is not possible. For example, because of the firewall configuration or the workstation does not fulfill the necessary hardware and software requirements. If direct access is not possible from the workstation, you can set up a remote connection.
Prerequisite
The remote connection server and the workstation must be in the same Active Directory domain.
To permit remote access to a target system
- Provide a server installed with the following software.
- One Identity Manager Service with the RemoteConnectPlugin
Table 15: RemoteConnectPlugin parameters
|
Authentication method |
ADSGroup |
Method with which incoming queries can be authenticated.
Permitted values: ADGroup |
|
Permitted AD group |
|
Distinguished name or object SID of the Active Directory group whose members are permitted to use a remote connection. This parameter is only required for the ADGroup authentication method. |
|
Port |
2880 |
Port for reaching the server. |
NOTE: Authentication of a remote connection can only be done through an Active Directory group.
For more information, see the One Identity Manager Configuration Guide.
- connector
- Target specific client components as they must be installed on the synchronization server.
For more information, see the administration guides for connecting target systems.
- Declare the remote connection server as in One Identity Manager.
- Start the One Identity Manager Service.
TIP: The remote connection server requires the same configuration as the synchronization server (with regard to the installed software and entitlements). Use the synchronization as remote connection server at the same time, by simply installing the RemoteConnectPlugin as well.
To edit a Job server
- In the Designer, select the Base Data | Installation | Job server category.
- Enter a new Job server using the Job servers | New menu item.
- Edit the Job server's master data.
- Select the View | Server functions menu item and specify the server functionality.
Select a minimum of the following server functions:
- <target system connector>
- One Identity Manager Service installed
- Select the View | Machine roles menu item and assign roles to the server.
Select at least the following roles:
- Server/Jobserver/<target system>
- Enter the queue name of the Job server in the configuration file of the One Identity Manager Service.
For more information, see the One Identity Manager Configuration Guide and the administration guides for connecting target systems.
Remote access may be necessary, if:
- A must be set up.
- An existing synchronization project must be configured but there is generally no direct access to the target system.
- A existing synchronization project must be configured but there is temporarily no direct access to the target system.
One Identity Manager requires a connection to the target system, for example, to update the target system schema, to define the scope, or to test the object matching rules. A message appears if you cannot connect to the target system when editing the synchronization configuration. Then you can decide whether you want to connect through a remote connection server, temporarily. In this case, a remote connection dialog opens.
- An existing synchronization project needs to be configured but some connection data is encrypted and the encryption values are not known to the Synchronization Editor user.
To set up a remote connection for a new synchronization project.
To set up a remote connection for an existing synchronization project.
- Open the synchronization project.
- In the Synchronization Editor toolbar, click Remote connection....
This opens the remote connection dialog.
- Enter the remote connection properties.
- Click Connect.
This sets up the remote connection. The connection remains in place for as long as the synchronization project is open in the Synchronization Editor.
Table 16: Remote connection properties
| Select remote connection server automatically |
Select this option if you want the remote connection server to be selected automatically. |
| Job server |
In the menu, select the Job server you want for One Identity Manager communicating with the target system.
All Job servers are displayed for which the server function One Identity Manager Service installed is selected. |
| Select remote connection server manually |
Select this option if you do not want the remote connection server to be selected automatically because, for example, the server name cannot be resolved. |
| Server |
Enter the full server name or the server's IP address. |
| Port |
RemoteConnectPlugin uses the port 2880. |
To close a remote connection
- In the Synchronization Editor toolbar, click Remote connection....
Related topics

button.
