Chat now with support
Chat with Support

Identity Manager 8.1.4 - Target System Synchronization Reference Guide

Target system synchronization with the Synchronization Editor Working with the Synchronization Editor Basics of target system synchronization Setting up synchronization
Starting the Synchronization Editor Creating a synchronization project Configuring synchronization
Setting up mappings Setting up synchronization workflows Connecting systems Editing the scope Using variables and variable sets Setting up start up configurations Setting up base objects
Overview of schema classes Customizing the synchronization configuration Checking the consistency of the synchronization configuration Activating the synchronization project Defining start up sequences
Running synchronization Synchronization analysis Setting up synchronization with default connectors Updating existing synchronization projects Script library for synchronization projects Additional information for experts Resolving errors when connecting target systems Configuration parameters for target system synchronization Configuration file examples Glossary

Configuring synchronization

Not all system connectors provide a project templateClosed for creating a full configured synchronization projectClosed. Therefore, you can also create a synchronization project manually. In this case, the project wizard sets up the system connection. All other synchronization configuration components must be configured after you have saved the synchronization project.

To manually set up synchronization of the One Identity Manager database with a target system

  1. Install and configure a synchronization server and declare the server as a Job serverClosed in One Identity Manager.
  2. Create a new synchronization project.
    • The project wizard sets up the system connection.
    • On the Select project template page, select Create blank project.
  1. Add mappings. Define property mapping rules and object matching rules.

  2. Create synchronization workflows.

  3. Create a start up configuration.

  4. Define the synchronization scope.

  5. Specify the base object of the synchronization.

  6. Specify the extent of the synchronization log.

  7. Run a consistency check.

  8. Activate the synchronization project.

  9. Save the new synchronization project in the database.

Detailed information about this topic

Setting up mappings

MappingsClosed 
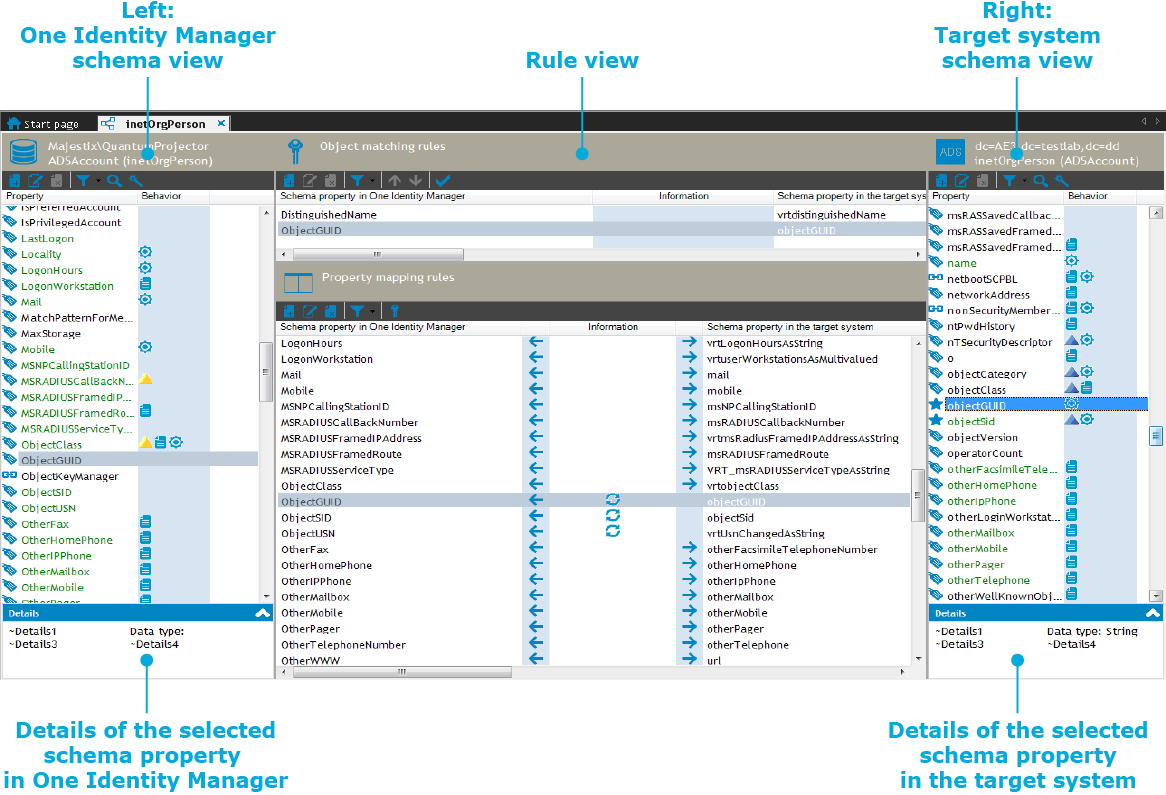
group together the rules used to map the schema properties of two connected systems. For this, a schema class is created for every schema type which requires mapping. A schema class limits the result list of a schema type through defined filer criteria. A mapping maps schema properties from exactly one target system schema class to the schema properties of exactly one schema class in the One Identity Manager schema. A schema class without a filter condition represents the schema type.

Property mapping rules describe how the target system schema properties are mapped in the One Identity Manager schema. Object matching rules assign schema properties through which system objects can be uniquely identified. For example, Active Directory groups can be uniquely identified by the schema properties DistinguishedName and ObjectGUID.

You specify in the mapping, which mapping direction is permitted for the connected schema classes. Furthermore, you can also specify the permitted mapping direction for individual property mapping rules.

Default mappings for target system synchronizationClosed are added if the synchronization projectClosed was created with a default project templateClosed. You can edit or delete these mappings or create new mappings. If the synchronization project was created without a project template, no mappings are set up.

The schema property mapping is edited with the mapping editor.

Detailed information about this topic

Mapping editor

The schema property mappingClosed is edited with the mapping editor. The mapping editor is divided into two schema view and two rule views. Each mapping editor view has its own toolbar.

Figure 15: Views in the mapping editor

TIP:

To display mapped schema properties of a shelf

  • Select a property mapping rule or an object mapping rule in the shelf view.

    All the schema properties mapped by this shelf are displayed.

    - OR -

  • Select the schema property in the schema view.

    All the property mapping and object mapping rules mapped by this schema property are marked.

Table 31: Meaning of icons in the navigation view
Icon Meaning
Create a new mapping.
Edit mapping.
Delete mapping.
Table 32: Meaning of icons in the schema tool bar
Icon Meaning
Add schema property.
Edit selected schema property.
Delete selected schema property.
FilterClosed schema properties.
Search schema properties.
Filter schema properties with similar names in other schema respectively.
Table 33: Meaning of icons in the rule tool bar
Icon Meaning
Add rule.
Edit selected rule.
Delete selected rule.
Filter rules.
Transform selected property mapping rule into an object matching rule.
Sorts object matching rule.
Tests object matching rule.
Create new rules with help of the mapping wizard.
Table 34: Meaning of icons in the schema view
Icon Meaning
The schema property is a unique key.
The schema property references another schema property.
Schema propertyClosed with a special feature.
User-defined virtual schema property.
The schema property contains several values.
Mandatory property.
Rule based mandatory property.
The schema property is read-only.
The schema property is write-only.
The value of the schema property is calculated automatically.
Table 35: Meaning of icons in the rule view
Icon Meaning
Direction of synchronizationClosed: One Identity Manager.
Direction of synchronization: target system.
A condition limited use of the rule.
Mapping in the opposite direction of synchronization is permitted.
Indicates configuration errors. Mouse over the icon to display the error description.

How to create a mapping

To create a mappingClosed

  1. Select the Mappings category.
  2. Click in the navigation view.
  3. Enter the general properties of a mapping and create the required schema classes.
  4. Click OK.
Related Documents

The document was helpful.

Select Rating

I easily found the information I needed.

Select Rating