
Using plugins
To download the official plugins for your product version, navigate to the product page on the Support Portal. The official plugins are also available on GitHub .
To write your own custom plugin, feel free to use our Plugin SDK.
Figure 68: Basic Settings > Plugins — Viewing the uploaded plugins

The following plugin types can be uploaded to SPS:
-
Authentication and Authorization plugins
For more information, see Integrating external authentication and authorization systems.
-
Credential Store plugins
For more information, see Using a custom Credential Store plugin to authenticate on the target hosts.
-
Configuration Synchronization plugins
For more information, see Using a configuration synchronization plugin.
-
Signing CA plugins
For more information, see Signing certificates on-the-fly.
For more information about how to create an external Signing CA plugin, see Creating an external Signing CA.
Uploading plugins
To upload a plugin to SPS
-
Navigate to Basic Settings > Plugins and click Upload plugin.
-
Browse for the plugin .zip file and click Open.
NOTE: It is not possible to upload or delete plugins if SPS is in sealed mode.
Verifying the integrity of a plugin
To verify the integrity of the plugin archive (that is, that the .zip file has officially been issued by One Identity and has not been tampered with before its extraction and uploading the plugin), complete the following steps. These also verify whether the plugin has been modified after upload or not.
This procedure only applies to plugins downloaded from the official repositories.
Prerequisites
-
Make sure that you have already uploaded a plugin.
For more information on uploading plugins, see Uploading plugins.
To verify the integrity of a plugin
-
Navigate to Basic Settings > Plugins.
-
Select the plugin that you want to verify.
-
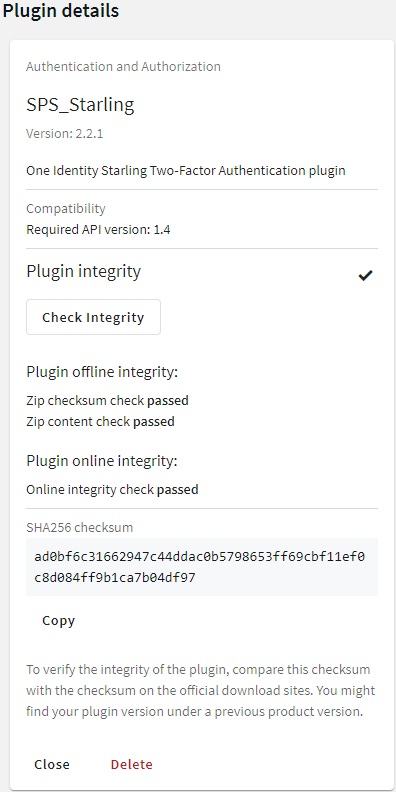
Under Plugin details > Plugin integrity, click Check integrity.
Figure 69: Basic Settings > Plugins > Plugin details — Verifying plugin integrity
There are three integrity checks:
-
Plugin offline integrity > Zip checksum check
This check verifies whether the recalculated checksum is the same as the checksum that has been stored in the configuration after uploading plugin.
-
Plugin offline integrity > Zip content check
This check verifies whether the plugin runtime files are the same since you have uploaded the plugin .zip.
-
Online integrity check
This check verifies whether the plugin .zip checksums match with the .zip checksums stored online.
NOTE: The online integrity check works only if you have joined to Starling.
For more information, see Starling integration
-
To verify the integrity of a plugin manually
-
Under Plugin details > Plugin integrity > SHA256 checksum, click Copy.
-
To verify the integrity of the plugin, compare this checksum with the checksum on the official download sites. You might find your plugin version under a previous product version.
On the support portal:
-
Navigate to the product page on the Support Portal that you have downloaded the plugin from. Click on the name of the plugin.
-
Next to the sha256 section, you will see the checksum of the official One Identity plugin.
On GitHub:
-
Navigate to the GitHub plugin repository that you have downloaded the plugin from. Click on the name of the plugin.
-
Navigate to the releases tab.
-
Scroll to the specific release that you use.
-
Under the SHA256 checksum section, you will see the checksum of the official One Identity plugin.
-
-
Compare the checksum of the official One Identity plugin with the one you have copied from Plugin details > Plugin integrity > SHA256 checksum.
Forwarding data to third-party systems
SPS can forward session data to Splunk, ArcSight, or other third-party systems that enable you to search, analyze, and visualize the forwarded data.
NOTE: Since SPS version 5.11, the universal SIEM forwarder supports Splunk easier than in previous versions. If you want to integrate your SPS with Splunk, One Identity recommends using the universal SIEM forwarder instead of the Splunk forwarder (which will be deprecated as of SPS version 6.4).
Using the universal SIEM forwarder
The universal SIEM forwarder can automatically send data about the audited sessions to Splunk, ArcSight, or other third-party systems. The messages are standard syslog messages in RFC3164 format (also called legacy-syslog or BSD-syslog format). The body of the syslog message (the MESSAGE part) can be formatted as JavaScript Object Notation (JSON), Common Event Format (CEF), or JSON-CIM format. For information about the details of the messages that the universal SIEM forwarder sends to the external SIEM network elements, see Message format forwarded to SIEMs.
One of the main advantages of the universal SIEM forwarder is that it has a lower impact on network and performance.
Each message contains the minimal information relevant to the event. Use the built-in correlation feature of the SIEM to combine events by session ID and view all information in one place.
Use the universal SIEM forwarder if you need a less resource-heavy solution. For more information, see Using the universal SIEM forwarder.