
Monitoring the status of nodes in your cluster
This section describes how to monitor the status of nodes in your cluster.
To monitor the status of nodes in your cluster
-
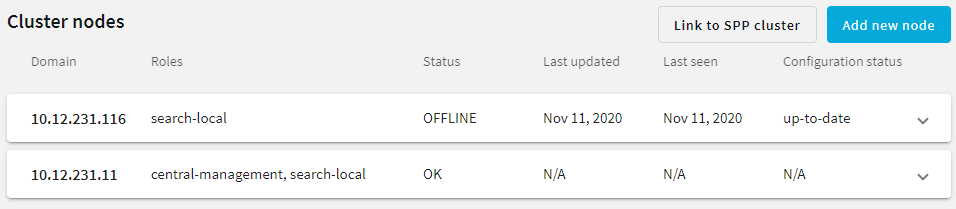
On the web interface of your Central management node, navigate to Basic Settings > Cluster management. This page displays all nodes of the cluster.
Figure 118: Basic Settings > Cluster management — Monitoring the status of the cluster nodes
The following status information is displayed for each node:
-
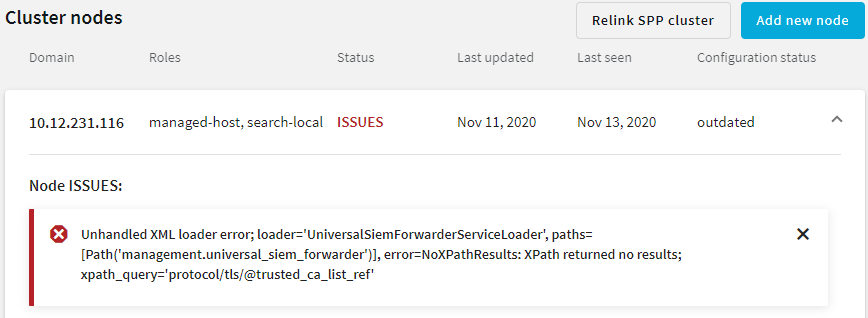
Status: Indicates whether any issues occurred during configuration synchronization. It has the following values:
Table 6: Basic Settings > Cluster management — Status values in the Cluster nodes screen Value Description OK Configuration synchronization was successful, no issues occurred. ISSUES While synchronizing the configuration, some issue(s) occurred. If this happens, click ISSUES in the Status column to reveal more information about the detected problem.
OFFLINE Status information was sent by the node longer than 60 seconds ago.
- Last updated: Indicates the last time the configuration of the node was synchronized, in ISO 8601 format.
-
Last seen: Indicates the last time the node sent status information to the Central Management node, in ISO 8601 format.
-
Configuration status: Indicates the status of configuration synchronization. It has the following values:
Table 7: Basic Settings > Cluster management — Configuration status values in the Cluster nodes screen Value Description UP-TO-DATE The node has fetched the latest configuration from the Central management node, and has applied it. It is in sync with the Central management node. PENDING There has been a configuration change on the Central management node, but the change has not yet been synchronized to the node. OUTDATED There has been some error on the node, therefore it is running an old configuration. NOT FETCHED The node has not fetched any configuration yet. N/A
The node is the Central management node, so it is not fetching its configuration from any other node.
You can monitor the status of your nodes through the REST API, too. For details, see "Query the status of all nodes in the cluster" in the REST API Reference Guide and "Query one particular node" in the REST API Reference Guide.
-
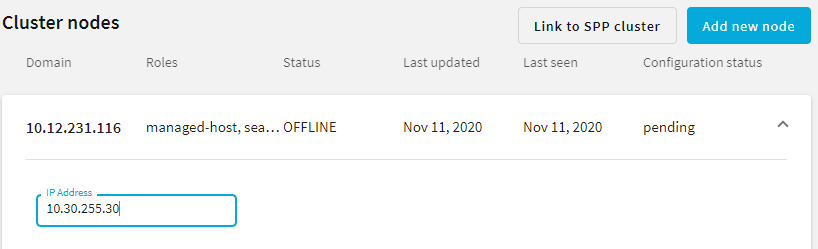
Updating the IP address of a node in a cluster
If the node that you joined to the cluster is a Managed host node, you can still change its IP address even after the join.
NOTE: This is not available for nodes that do not have the Managed host role assigned to them.
To update the IP address of a Managed host node that is already the member of a cluster
- On the web interface of your Central management node, navigate to Basic Settings > Cluster management.
-
Click
on the row of the node that node that you want to update.
The node row is expanded, showing the node address and the available roles.
Figure 119: Basic Settings > Cluster management — Update IP address of node
- In the IP Address field, update the IP address of the node.
Caution: Ensure that you are making the change for the Managed Host node. Do not change the IP address of the Central Management node.
- Click Update.
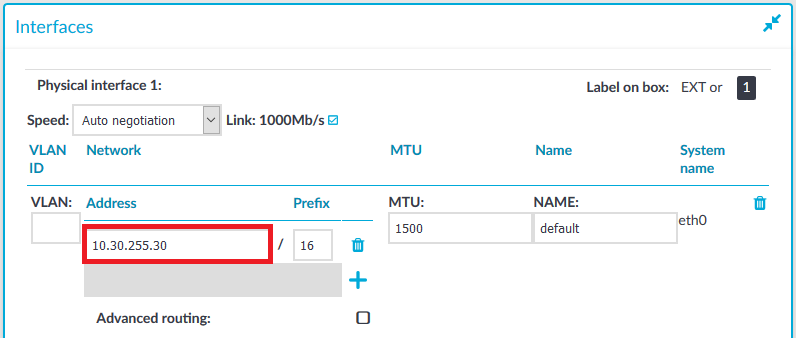
- On the web interface of the node with the IP address to update, navigate to Basic Settings > Network > Interfaces.
- In the Address field, update the IP address of the node.
Figure 120: Basic Settings > Network > Interfaces — Updating the IP address of your node
- Click
.


Managing a cluster with configuration synchronization without central search
You can configure your Safeguard for Privileged Sessions (SPS) cluster in the following ways:
-
Configuration synchronization without a central search: This method allows you to perform your configuration settings on your Central management node. Managed host nodes periodically fetch and merge the settings into their own: this is called "configuration synchronization". Central search is not configured in this method, so you can search for sessions on each node, including the Central management node.
For more information on this method, see Configuration synchronization without a central search.
-
Central search with configuration synchronization: This method allows you to use a Central management node with a Search master role to view session data recorded by the minion nodes of your cluster, as well as manage all the nodes in the cluster from one central location.
For more information on this method, see Central search with configuration synchronization.
IMPORTANT: One Identity does not recommend having a central search configuration without configuration synchronization.
The following figure shows a cluster with configuration synchronization without central search.
Figure 121: Configuration synchronization without central search
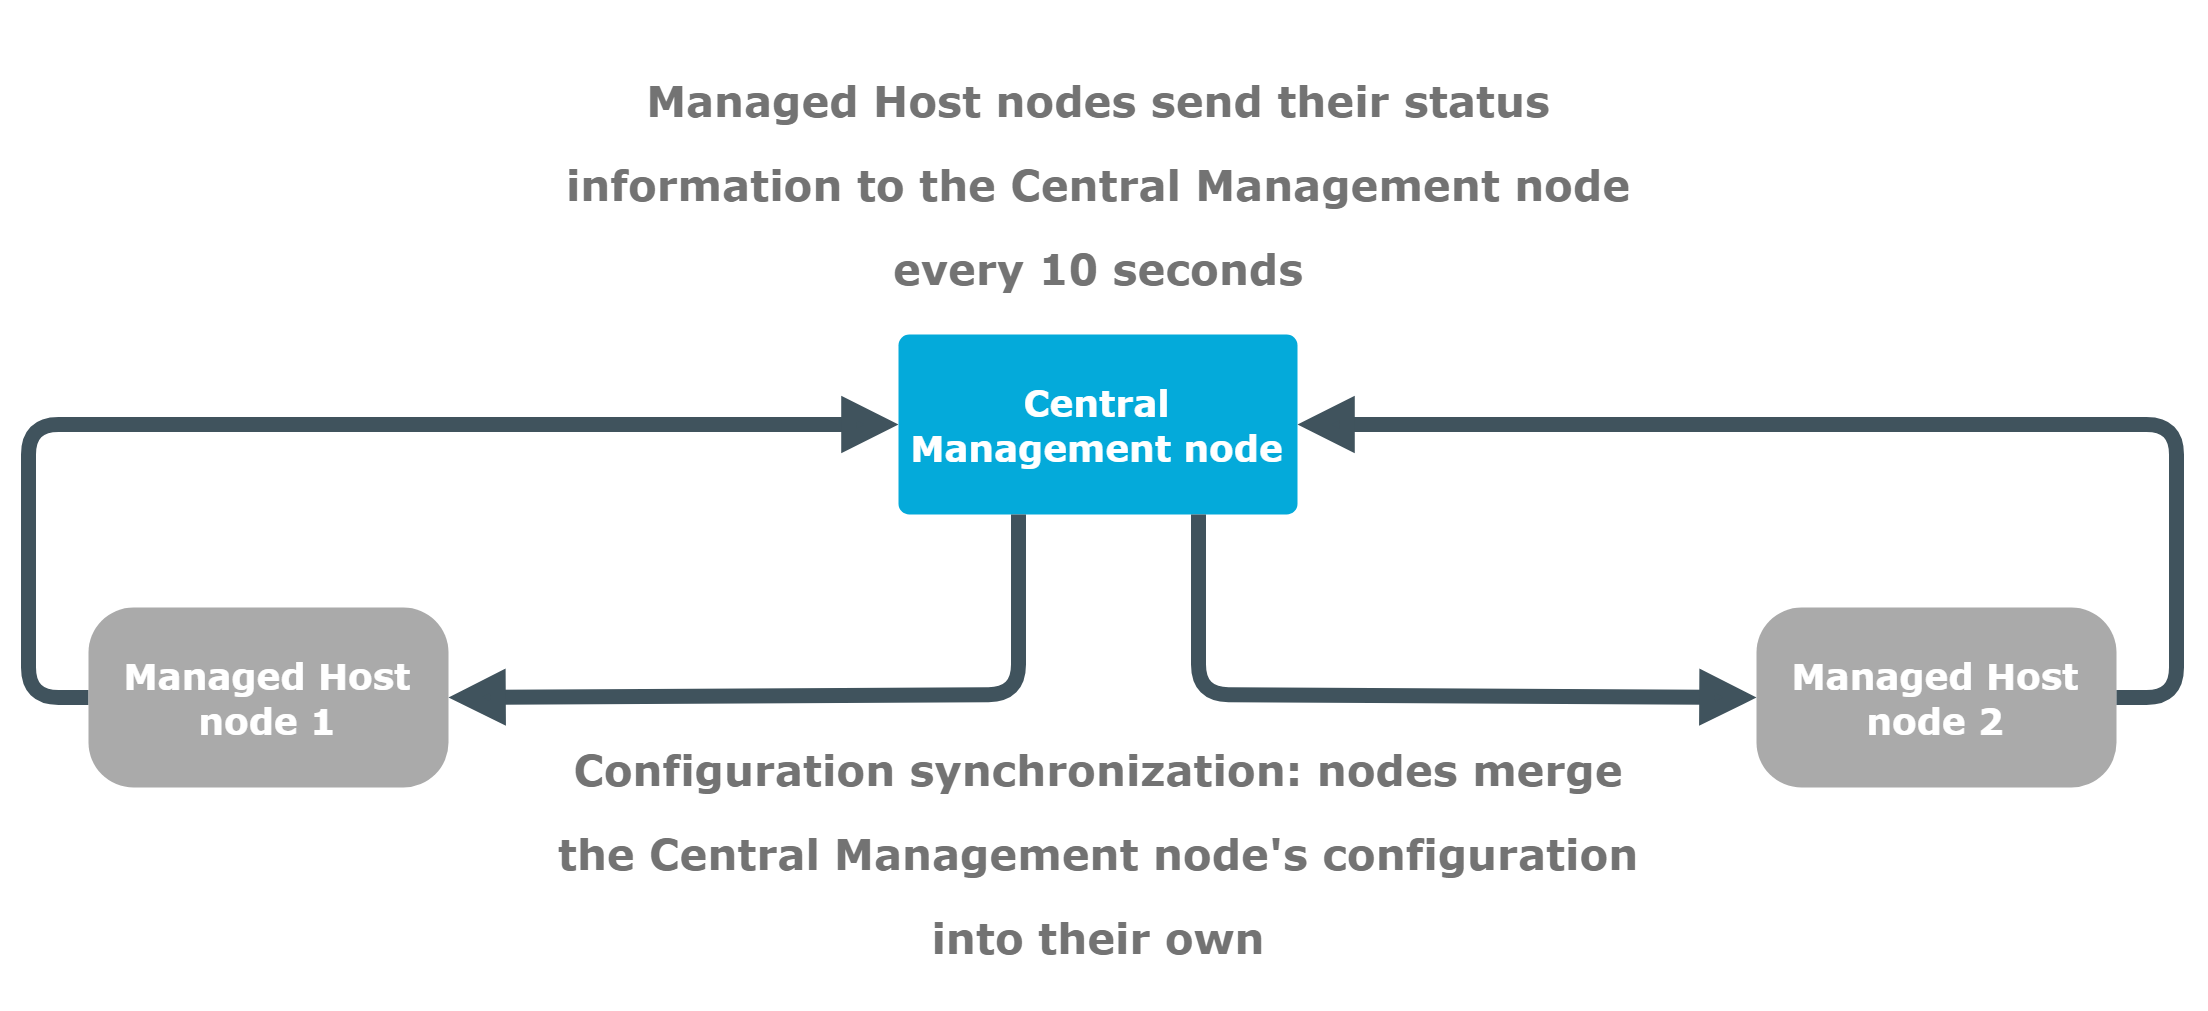
The figure above is an example of an SPS cluster configured as follows:
- There is a Central management node.
- There are two Managed host nodes (Managed host node 1 and 2).
- The Central Management node is connected to the two Managed host nodes.
- The Managed host nodes fetch their configuration from the Central management node, and merge it into their own configuration.
- The Managed host nodes send their status information to the Central management node every 10 seconds.
The Central management node and the connected Managed host nodes require different configuration settings as described in the table below:
| Role | Use and configuration settings |
|---|---|
|
Central management node |
|
|
Managed host node |
|
For more information on each role, see Cluster roles.
Managing a cluster with central search configuration and configuration synchronization
You can configure your Safeguard for Privileged Sessions (SPS) cluster in the following ways:
-
Configuration synchronization without a central search: This method allows you to perform your configuration settings on your Central management node. Managed host nodes periodically fetch and merge the settings into their own: this is called "configuration synchronization". Central search is not configured in this method, so you can search for sessions on each node, including the Central management node.
For more information on this method, see Configuration synchronization without a central search.
-
Central search with configuration synchronization: This method allows you to use a Central management node with a Search master role to view session data recorded by the minion nodes of your cluster, as well as manage all the nodes in the cluster from one central location.
For more information on this method, see Central search with configuration synchronization.
IMPORTANT: One Identity does not recommend having a central search configuration without configuration synchronization.
The following figure shows a cluster configured for central search with configuration synchronization.
Figure 122: Central search with configuration synchronization
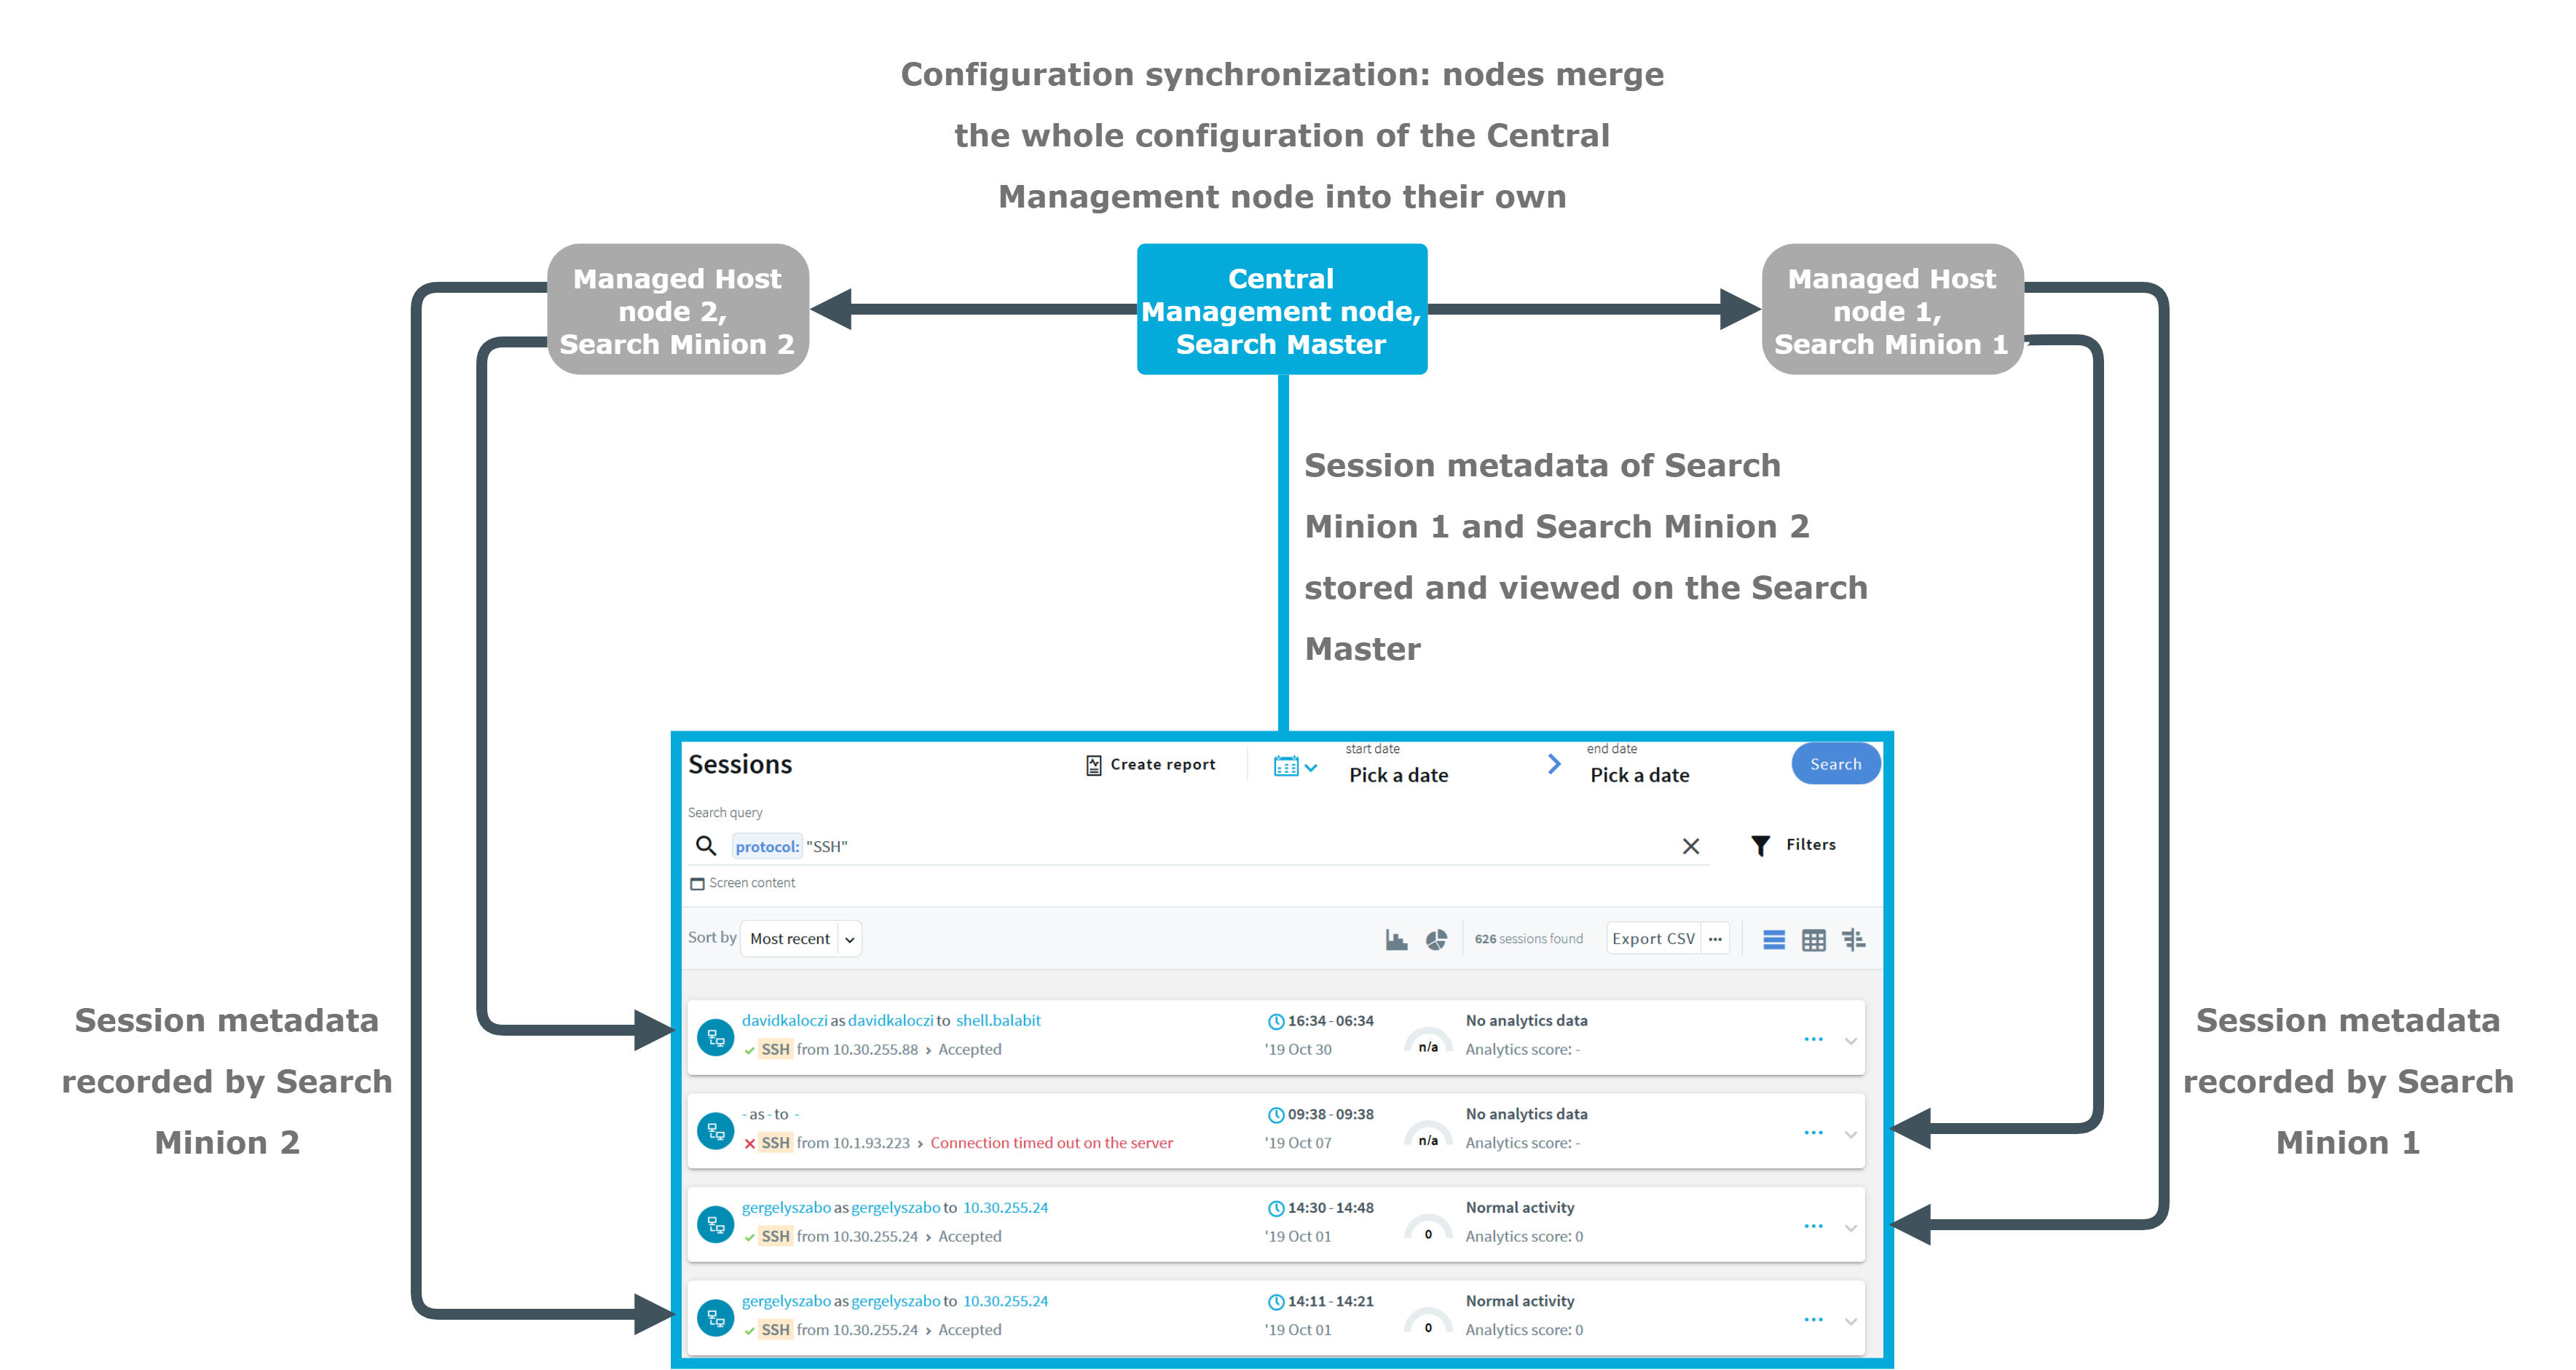
The figure above is an example of an SPS cluster configured as follows:
- There is a Central management node, which has a Search master role.
- There are two Managed host nodes (Managed host node 1 and 2), each configured with a Search minion role.
- The Central management node is connected to the two minion nodes.
- The minion nodes record sessions, which are displayed on the Search interface of the Central management node.
- The minion nodes fetch their configuration from the Central management node, and merge it into their own configuration.
The Central management node with a Search master role and the connected Managed host nodes with Search minion roles require different configuration settings as described in the table below:
| Role | Use and configuration settings |
|---|---|
|
Central management node, Search master |
|
|
Managed host node, Search minion |
|
For more information on each role, see Cluster roles.