
Client-side authentication settings
For the client-side connection, One Identity Safeguard for Privileged Sessions (SPS) can authenticate the client inband (within the SSH protocol) using the following authentication methods:
Figure 221: SSH Control > Authentication Policies — Configuring client-side authentication methods
-
Local user database: Authenticate the client locally on the SPS gateway. For details, see Local client-side authentication.
-
LDAP: SPS will authenticate the client to the LDAP database set in the LDAP Server of the connection policy. To use LDAP authentication on the client side, select LDAP, and select the permitted authentication methods (Password, Public key). More than one method can be permitted.
NOTE:
-
SPS will authenticate the client-side connection to the LDAP server configured in the connection policy. This is not necessarily the same as the LDAP server used to authenticate the users accessing the SPS web interface.
-
The public keys of the users stored in the LDAP database must be in OpenSSH format.
-
-
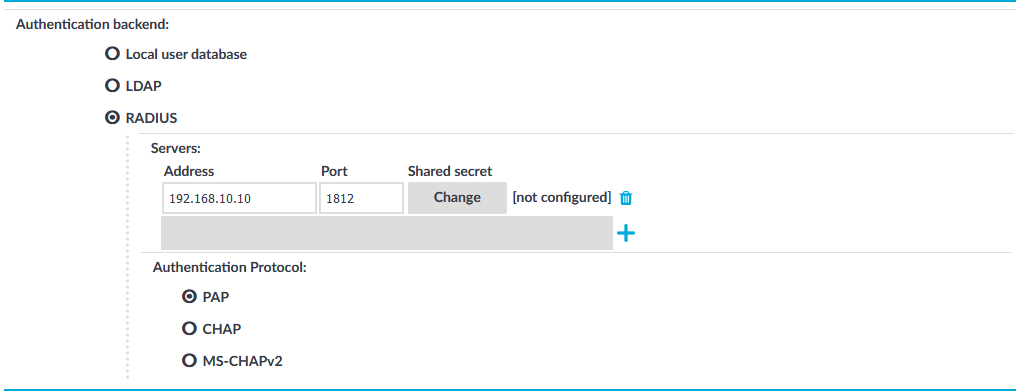
RADIUS: SPS will authenticate the client to the specified RADIUS server. Select RADIUS, enter the IP address or hostname of the RADIUS server into the Address field, the port number of the RADIUS server into the Port field, and the shared secret of the RADIUS server into the Shared secret field. Only password-authentication is supported (including one-time passwords), challenge-response based authentication is not.
To use the:
-
Password Authentication Protocol, select PAP.
-
Challenge-Handshake Authentication Protocol, select CHAP.
-
Microsoft version of the Challenge-Handshake Authentication Protocol, select MS-CHAPv2.
Use an IPv4 address.
To add more RADIUS servers, click
and fill in the respective fields.
-
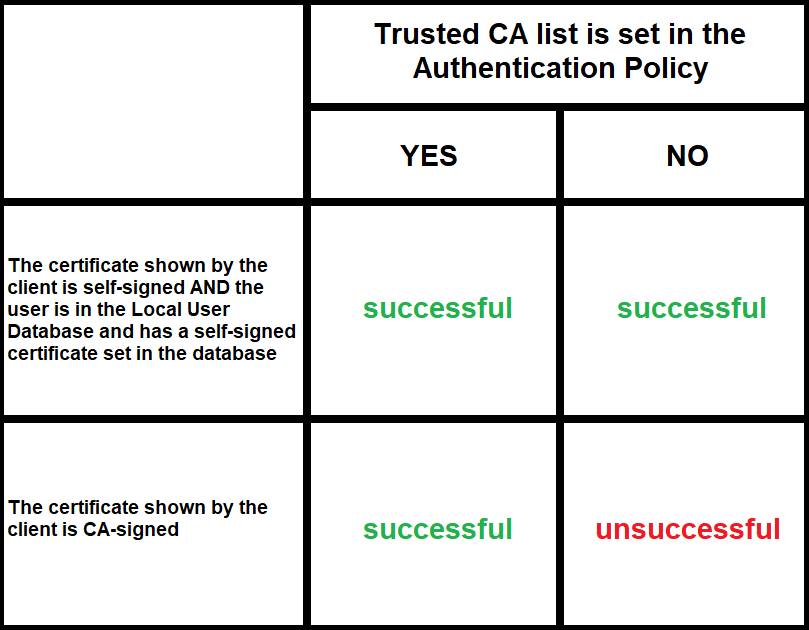
To use certificates to authenticate the client, you can use the LDAP and the Local user database backends.
Figure 222: Client-side inband gateway authentication with different certificates
Local client-side authentication
The following describes how to perform authentication locally on One Identity Safeguard for Privileged Sessions (SPS) for client-side connections.
NOTE: The users can be authenticated to their passwords or public-keys uploaded to SPS.
The accounts created to access the SPS web interface cannot be used to authenticate SSH connections.
Prerequisites
To perform authentication locally on SPS for client-side connections, an existing Local User Database is needed. To create a Local User Database, complete the following procedure: Creating a Local User Database.
To perform authentication locally on SPS for client-side connections
-
Navigate to SSH Control > Authentication Policies, and select the authentication policy to modify.
- Select the permitted authentication methods (Password, Public key).
-
Select Local user database.
-
Select the Local user database from the list that defines the users who can access the server.
-
Click
.
Relayed authentication methods
For the server-side connection (between One Identity Safeguard for Privileged Sessions (SPS) and the target server), the following authentication methods are available.
NOTE: Even though these settings refer to the server-side connection, the client must support the selected authentication method and have it enabled. For example, to use publickey authentication on the server side, the client must support publickey authentication as well as provide a fake publickey, even if a different authentication method is used on the client side.
The Connection Policy will ignore the settings for server-side authentication (set under Relayed authentication methods for SSH protocol) if a Credential Store is used in the Connection Policy.
Figure 223: SSH Control > Authentication Policies — Configuring relayed authentication methods
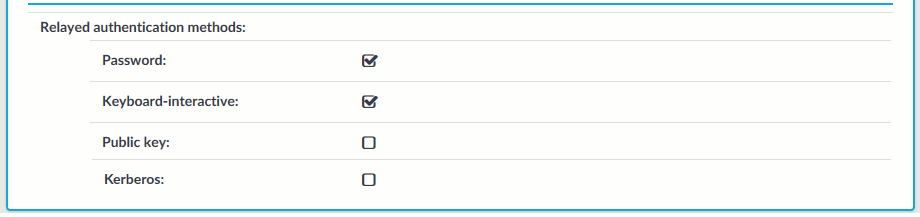
-
Password: Authentication based on username and password. The server will request a password from the user, even if a password-based authentication was already successful on the client-side.
-
Keyboard-Interactive: Authentication based on exchanging messages between the user and the server. This method includes authentication schemes like S/Key or TIS authentication. Note that depending on the configuration of the SSH server, password-based authentication can also require using the keyboard-interactive authentication method.
-
Public Key: Authentication based on public-private encryption keypairs. SPS supports the following public-key authentication scenarios:
-
Publish to LDAP: SPS generates a keypair, and uses this keypair in the server-side connection. The public key of this keypair is also uploaded to the LDAP database set in the LDAP Server of the connection policy. That way the server can authenticate the client to the generated public key stored under the user's username in the LDAP database.
-
Fix: Uses the specified private key in the server-side connection.
-
Agent: Allow the client to use agent-forwarding, and use its own keypair on the server-side.
During agent-forwarding, the following keys are accepted:
- rsa
-
ed25519
-
ecdsa-sha2-nistp256
-
ecdsa-sha2-nistp384
-
ecdsa-sha2-nistp521
If this option is used, SPS requests the client to use its SSH agent to authenticate on the target server. Therefore, you must configure your clients to enable agent forwarding, otherwise authentication will fail. For details on enabling agent forwarding in your SSH application, see the documentation of the application.
TIP: Some clients may override agent forwarding requests for SFTP and SCP by default. For further information about ensuring access to the server in this case, see Using SCP with agent-forwarding.
One Identity recommends using 2048-bit RSA keys (or stronger).
-
-
Kerberos: Authentication based on Kerberos. Only available if you selected Kerberos as the gateway authentication method. For more information, see Kerberos authentication settings.
Configuring your Kerberos environment
To integrate One Identity Safeguard for Privileged Sessions (SPS) with your Kerberos environment, so that your clients can authenticate on the target servers using Kerberos tickets, you have to configure your environment appropriately.
To configure your Kerberos environment
-
Configure your DNS server.
-
On your Domain Name Server (DNS), add SRV records that describe which Key Distribution Center (KDC) belongs to the domain. Add both TCP and UDP entries for each domain. For example, if your domain is example.com and the hostname of your KDC server is kdc.example.com, this entry looks like:
_kerberos._tcp.example.com 0 0 88 kdc.example.com
_kerberos._udp.example.com 0 0 88 kdc.example.com
-
If your environment uses multiple realms, repeat the previous step for every realm.
-
Verify that the servers that your clients will connect to via SPS have proper reverse-dns entries. Otherwise, your clients cannot access the target servers if you use the Inband destination selection feature of SPS.
-
-
Create a keytab file for SPS.
-
On your KDC server, create a principal for the SPS host, using the domain name of your SPS. For example:
host/scb.example.com@EXAMPLE.COM
-
If your environment uses multiple realms, repeat the previous step on the KDC of every realm.
-
Export the key of the principal into a keytab file.
-
If your environment uses multiple realms, merge the keytab files of the different realms into a single file, for example, using the ktadd or the ktutil utilities.
-
If your environment uses multiple realms, repeat the previous step on the KDC of every realm.
-
-
Configure the SSH application of your client hosts to enable Kerberos (GSSAPI) ticket forwarding. (In most applications this is disabled by default.)
Expected result
You have configured your environment to use Kerberos authentication with SPS, and created a keytab file for your SPS host. For details on uploading the keytab file and configuring SPS see Kerberos authentication settings.