
Creating and editing protocol-level SSH settings
SSH settings determine the parameters of the connection on the protocol level. For example, when the server-side connection is built, the timeout value, and greeting message of the connection. The following parameters determine which algorithms are used in the connections, and can be set independently for the client and the server side: key exchange, host key, cipher, MAC, and compression algorithms.
|
|
Caution:
Before modifying any of the algorithm settings, check whether the default algorithms are supported by your SSH client and server. If yes, then you can leave these settings untouched. If not and you need to amend the default algorithm settings, ensure that the client and server sides are harmonized. You can either do that in One Identity Safeguard for Privileged Sessions (SPS) or on the client/server itself. Note that modifying algorithm settings in SPS is recommended to advanced users only. If you are unsure about which settings to amend, then contact our Support Team for assistance. |

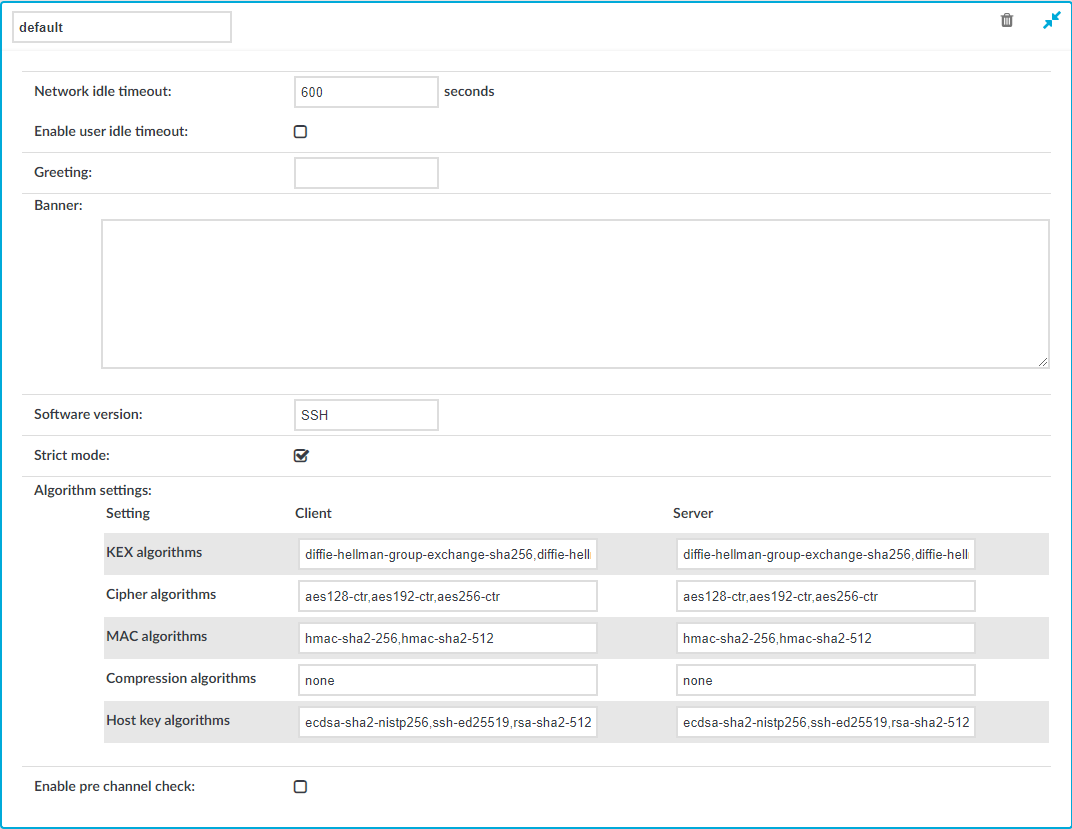
Figure 228: SSH Control > Settings — SSH settings
To create a new SSH settings profile or edit an existing one
-
Navigate to the SSH Control > Settings and click
to create an SSH setting profile. Enter a name for the profile (for example strongencryption).
-
Click
to display the parameters of the SSH connection.
-
Network idle timeout: Connection timeout value in seconds. To avoid early timeout, set it to a larger value, for example a week (604800 seconds).
Even if the user is not active, the session can contain activity that must be audited (for example, the output of a script). The idle timeout period will start only after this activity has stopped.
Caution: Determining if a connection is idle is based on the network traffic generated by the connection, not the activity of the user. For example, if an application or the taskbar of a graphical desktop displays the time which is updated every minute, it generates network traffic every minute, negating the effects of timeout values greater than one minute and preventing One Identity Safeguard for Privileged Sessions (SPS) from closing the connection.
-
User idle timeout: If no user activity is detected, terminate the session after the configured time has passed since the last user activity.
This can be useful if only user-generated network traffic is important in a session. By using this option, situations described in the caution of Network idle timeout (such as a taskbar clock keeping the network traffic open indefinitely) can be avoided. To enable user idle timeout, select Enable user idle timeout and enter a value that is greater than or equal to the value of Network idle timeout.
-
To display a greeting message to the clients after connecting the server, enter the message into the Greeting field.
-
To display a banner message to the clients before authentication (as specified in RFC 4252 — The Secure Shell (SSH) Authentication Protocol), enter the message into the Banner field. For example, this banner can inform the users that the connection is audited.
-
Optional. You can specify additional text to append to the SSH protocol banner, for example to mask the OpenSSH version upon connection. Enter the text in the Software version field.
-
If needed, modify the encryption parameters. SPS enforces policies on the various elements of the encrypted SSH communication, such as the MAC, key-exchange, and cipher algorithms that are permitted to be used. The parameters can be set separately for the client and for the server side. The attributes are comma-separated strings listing the enabled methods/algorithms, in the order of preference.
For a complete list of the available parameters, see Supported encryption algorithms.
NOTE:
Do not use the CBC block cipher mode, or the diffie-hellman-group1-sha1 key exchange algorithm.
-
To check the protocol-level parameters of the connections very strictly, select the Strict mode option. This option is enabled by default. When this option is enabled:
SPS will reject connections that use unrealistic parameters, for example:
-
The number of columns and rows of the terminal is bigger or equal than 512.
-
The size of the screen is greater than 8192 pixels in either directions.
SPS will reject port-forwarding connections where the address in the port-forwarding request and the channel-opening request does not match.
NOTE: Strict mode can interfere with certain client or server applications.
NOTE: Strict mode is not working with the Windows 10 internal Bash/WSL feature, because it uses a very large terminal window size. Using Windows 10 internal Bash/WSL is not supported.
-
-
Before establishing the server-side connection, SPS can evaluate the connection and channel policies to determine if the connection might be permitted at all, for example it is not denied by a Time Policy. To enable this function, select the Enable pre channel check option. That way SPS establishes the server-side connection only if the evaluated policies permit the client to access the server.
-
Click
.
-
Select this settings profile in the SSH settings field of your connections.
Supported encryption algorithms
The following tables contain all the encryption algorithms you can configure One Identity Safeguard for Privileged Sessions (SPS) to recognize. If you use a configuration that is only partially supported, SPS might ignore the connection without warning.
NOTE: Do not use the CBC block cipher mode, or any sha1-based KEX, MAC, or host key algorithm, which are considered weak.
Key exchange algorithms
The default SPS configuration for both the client and the server is the following:
ecdh-sha2-nistp256,ecdh-sha2-nistp384,ecdh-sha2-nistp521,diffie-hellman-group-exchange-sha256,diffie-hellman-group16-sha512,diffie-hellman-group18-sha512,diffie-hellman-group14-sha256
The following key exchange (KEX) algorithms are recognized:
Figure 229: Key exchange (KEX) algorithms
| Key exchange (KEX) | Default | Comment |
|---|---|---|
| ecdh-sha2-nistp256 | ✔ | |
| ecdh-sha2-nistp384 | ✔ | |
| ecdh-sha2-nistp521 | ✔ | |
| diffie-hellman-group1-sha1 | - | Not recommended |
| diffie-hellman-group14-sha1 | - | Not recommended |
| diffie-hellman-group14-sha256 | ✔ | |
| diffie-hellman-group15-sha512 | - | |
| diffie-hellman-group16-sha512 | ✔ | |
| diffie-hellman-group17-sha512 | - | |
| diffie-hellman-group18-sha512 | ✔ | |
| diffie-hellman-group-exchange-sha256 | ✔ | |
| diffie-hellman-group-exchange-sha1 | - | Not recommended |
During an SSH session, SPS performs a key re-exchange after each gigabyte of transmitted data or after each hour of connection time, whichever comes sooner.
Cipher algorithms
The default SPS configuration for both the client and the server is the following:
aes128-ctr,aes192-ctr,aes256-ctr
The following cipher algorithms are recognized:
Figure 230: Cipher algorithms
| Cipher algorithm | Default | Comment |
|---|---|---|
| 3des-cbc | – | Not recommended |
| blowfish-cbc | – | Not recommended |
| twofish256-cbc | – | Not recommended |
| twofish-cbc | – | Not recommended |
| twofish192-cbc | – | Not recommended |
| twofish128-cbc | – | Not recommended |
| aes256-cbc | – | Not recommended |
| aes192-cbc | – | Not recommended |
| aes128-cbc | – | Not recommended |
| aes256-ctr | ✔ | |
| aes192-ctr | ✔ | |
| aes128-ctr | ✔ | |
| serpent256-cbc | – | Not recommended |
| serpent192-cbc | – | Not recommended |
| serpent128-cbc | – | Not recommended |
| arcfour | – | Not recommended |
| idea-cbc | – | Not recommended |
| cast128-cbc | – | Not recommended |
| none | – | Means no cipher algorithm; not recommended |
Message authentication code (MAC) algorithms
The default SPS configuration for both the client and the server is the following:
hmac-sha2-256,hmac-sha2-512
The following MAC algorithms are recognized:
Figure 231: Message Authentication Code (MAC) algorithms
| MAC | Default | Comment |
|---|---|---|
| hmac-sha1 | – | Not recommended |
| hmac-sha1-96 | – | Not recommended |
| hmac-md5 | – | Not recommended |
| hmac-md5-96 | – | Not recommended |
| hmac-sha2-256 | ✔ | |
| hmac-sha2-512 | ✔ |
SSH compression algorithms
The default SPS configuration for both the client and the server is the following:
none
The following SSH compression algorithms are recognized:
Figure 232: SSH compression algorithms
| SSH compression algorithm | Default | Comment |
|---|---|---|
| zlib | – | Not recommended |
| none | ✔ | Means no compression |
Host key algorithms
The default SPS configuration for both the client and the server is the following:
ecdsa-sha2-nistp256,ssh-ed25519,rsa-sha2-512,rsa-sha2-256,ssh-rsa
The following host key algorithms are recognized:
Figure 233: Host key algorithms
| Host key algorithms | Default | Comment |
|---|---|---|
| ecdsa-sha2-nistp256 | ✔ | |
| ssh-ed25519 | ✔ | |
| rsa-sha2-512 | ✔ | |
| rsa-sha2-256 | ✔ | |
| ssh-rsa | ✔ |
Not recommended NOTE: The ssh-rsa public key signature algorithm that depends on SHA-1 is not recommended and will be disabled in a future release. |
Telnet-specific settings
The following sections describe configuration settings available only for the Telnet protocol. Use the following policies to control who, when, and how can access the Telnet connection. For a list of supported client applications, see Supported protocols and client applications.
-
Channel Policy: The Telnet protocol has only one channel type with no special configuration options. The available channel policy options are the following: Type, From, Target, Time policy, Four-eyes, Record audit trail, Gateway groups, Remote groups, and Content policy. For details on configuring these options, see Creating and editing channel policies.
-
TLS support: To enable TLS-encryption for your Telnet connections, see Enabling TLS-encryption for Telnet connections.
-
Authentication Policy: Authentication policies describe the authentication methods allowed in a connection. Different methods can be used for the client and server-side connections. For details, see Creating a new Telnet authentication policy.
-
Telnet settings: Telnet settings determine the parameters of the connection on the protocol level, including timeout value, and so on. For details, see Creating and editing protocol-level Telnet settings.
-
User lists in Channel Policies: User lists affect Telnet connections only when they are used together with Gateway Authentication. For details, see Configuring gateway authentication.
-
Content Policy: Content policies allow you to inspect the content of the connections for various text patterns, and perform an action if the pattern is found. For example, One Identity Safeguard for Privileged Sessions (SPS) can send an e-mail alert if a specific command is used in a Telnet terminal session. For details, see Creating a new content policy.
-
Authentication and Authorization plugin:
One Identity Safeguard for Privileged Sessions (SPS) provides a plugin framework to integrate SPS to external systems to authenticate or authorize the user before authenticating on the target server. Such plugins can also be used to request additional information from the users, for example, to perform multi-factor authentication.
For details, see Integrating external authentication and authorization systems.
Enabling TLS-encryption for Telnet connections
The following steps describe how to enable TLS-encryption in a Telnet connection policy. Note that when using encryption, One Identity Safeguard for Privileged Sessions (SPS) automatically changes the port number of the connection policy to 992.
Prerequisites
Depending on your requirements, one or more of the following might be needed:
-
An X.509 certificate and its private key. SPS can display the same certificate to the peers on both the client and the server side. You can also use different certificates for the client and server sides. Use your own PKI system to generate these certificates, as they cannot be created on SPS. Note that the Common Name of the certificate must contain the domain name or the IP address of SPS, otherwise the clients might reject the certificate.
-
To generate certificates on-the-fly for a connection, a signing certificate authority is required. For details on creating a signing CA, see Signing certificates on-the-fly.
-
To require the peers of SPS to have an X.509 certificate signed by a specific Certificate Authority, a list of the trusted certificate authorities is needed. For details on creating a trusted CA list, see Verifying certificates with Certificate Authorities.
One Identity recommends using 2048-bit RSA keys (or stronger).
To enable TLS-encryption in a Telnet connection policy
-
Navigate to Telnet Control > Connections and select the connection policy in which you want to enable TLS.
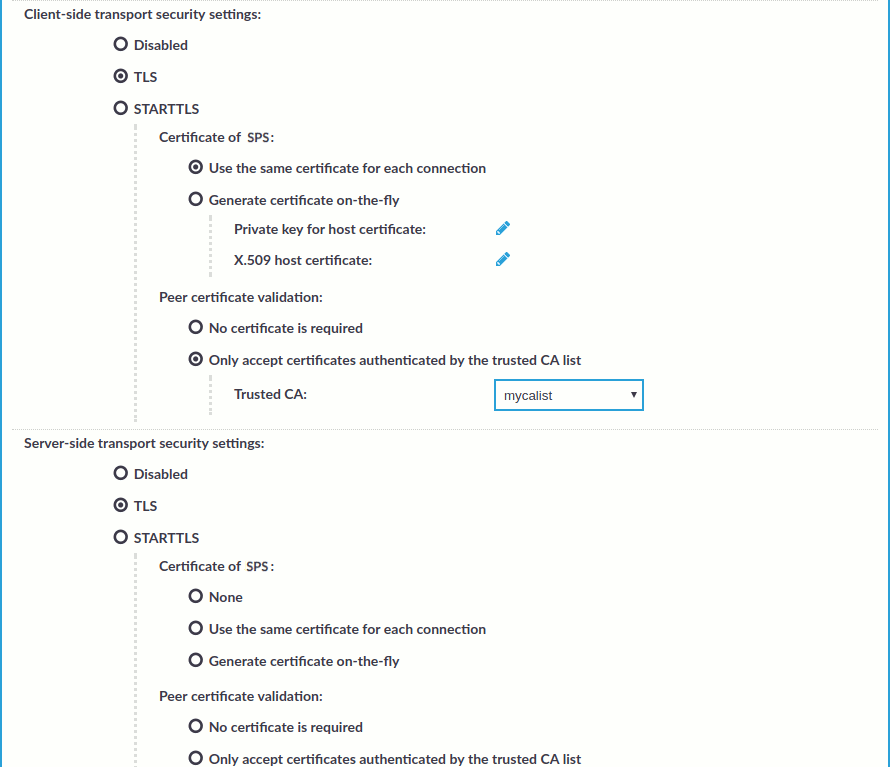
Figure 234: Telnet Control > Connections — Enabling TLS-encryption for Telnet connections
-
Set the encryption settings used between the client and SPS in the Client-side transport security settings section.
-
To require encryption, select TLS. When the connection is encrypted, SPS has to show a certificate to the peer.
-
To enable encrypted connections that use the STARTTLS method, select STARTTLS. Note that the peer must use the STARTTLS method. Unencrypted connections will be terminated after a brief period.
-
-
Select the certificate to show to the peers.
-
To use the same certificate for every peer, complete the following steps.
-
Generate and sign a certificate for SPS in your PKI system, and export the certificate and its private key.
-
Select Use the same certificate for each connection.
-
Select Private key for host certificate, click
and upload the private key.
-
Select X.509 host certificate, click
-
-
To use a separate certificate for every connection, complete the following steps.
-
Create a certificate authority that will be used to sign the certificates that SPS shows to the peer. For details, see Signing certificates on-the-fly.
-
Select Generate certificate on-the-fly.
-
In the Signing CA field, select the certificate authority to use.
-
-
-
Select how SPS should authenticate the peers.
-
To permit connections from peers without requesting a certificate, select No certificate is required.
-
To permit connections only from peers with a valid certificate that was signed by a specific CA, complete the following steps.
-
Create a list of trusted Certificate Authorities that will be used to validate the certificates of the peers. For details on creating a trusted CA list, see Verifying certificates with Certificate Authorities.
-
Select Only accept certificates authenticated by the trusted CA list.
-
Select the certificate authority list to use in the Trusted CA field.
-
-
-
Set the encryption settings used between SPS and the server in the Server-side transport security settings section.
-
To require encryption, select TLS. When the connection is encrypted, SPS has to show a certificate to the peer.
-
To enable encrypted connections that use the STARTTLS method, select STARTTLS. Note that the peer must use the STARTTLS method. Unencrypted connections will be terminated after a brief period.
-
-
Select the certificate to show to the server.
-
If the server does not require a certificate from SPS, select None.
-
To use the same certificate for every peer, complete the following steps.
-
Generate and sign a certificate for SPS in your PKI system, and export the certificate and its private key.
-
Select Use the same certificate for each connection.
-
Select Private key for host certificate, click
-
Select X.509 host certificate, click
-
-
To use a separate certificate for every connection, complete the following steps.
-
Create a certificate authority that will be used to sign the certificates that SPS shows to the peer. For details, see Signing certificates on-the-fly.
-
Select Generate certificate on-the-fly.
-
Select the certificate authority to use in the Signing CA field.
-
Limitations
NOTE: When using the Use the same certificate for each connection option and the connection policy that allows access to multiple servers using HTTPS, the client applications will display a warning because the certificate used in the connection will be invalid (namely, the Common Name of the certificate will not match the hostname or IP address of the server).
NOTE: Import the certificate of the signing Certificate Authority to your clients. Otherwise, the client applications will display a warning due to the unknown Certificate Authority.
-
-
Select how SPS should authenticate the peers.
-
To permit connections from peers without requesting a certificate, select No certificate is required.
-
To permit connections only from peers with a valid certificate that was signed by a specific CA, complete the following steps.
-
Create a list of trusted Certificate Authorities that will be used to validate the certificates of the peers. For details on creating a trusted CA list, see Verifying certificates with Certificate Authorities.
-
Select Only accept certificates authenticated by the trusted CA list.
-
Select the certificate authority list to use in the Trusted CA field.
-
-
-
Click
Expected result
The encryption settings are applied to the connection policy.