SPP to SPS link error resolution
Common linking error resolutions follow which may occur when linking SPS (SPP) to One Identity Safeguard for Privileged Sessions (SPS).
Typo in SPP's address, the address is not reachable
-
Error: The browser reports errors when SPS redirects to SPP's login page, for example, This site can’t be reached. The exact error message depends on the browser.
-
Resolution: Click the Back button of the browser and enter the correct address into the SPP Address field.
Typo in SPP's address, the address is alive, but not an SPP
-
Error: After clicking the Join button, a web site other than SPP's Login interface is displayed.
-
Resolution: Click the Back button of the browser and enter the correct address into the SPP Address field.
SPP's HTTPS certificate does not match its IP address or hostnam
-
Error message: Error joining to SPP: SPS has failed to join to SPP. For more information, see the error details. (JoinFailed)
-
Raw error:
{ "response": "Error sending request: SSLError: HTTPSConnectionPool(host='examplespp.company', port=443): Max retries exceeded with url: /service/core/v3/Cluster/SessionModules (Caused by SSLError(CertificateError(\"hostname 'examplespp.company' doesn't match '192.0.2.123'\",),))", "status": null, "url": "https://examplespp.company/service/core/v3/Cluster/SessionModules" } -
Resolution:
-
If SPP's certificate contains SPP's IPv4 address in the Common Name or subjectAltName field, then enter that IP address when linking SPS to SPP.
-
If SPP's certificate contains only its DNS name in the Common Name or subjectAltName field, then use that hostname when linking SPS to SPP.
-
Otherwise, set up an SSL server certificate for SPP which matches its IP address in the certificate's Common Name or subjectAltNamefields (see SSL Certificates in the Safeguard Administration Guide) and retry linking. Wait about five minutes to let the timeout of the failed link request expire before starting a new link request after a failed incomplete one. (Alternatively, see Reversing the SPP to SPS join in the Safeguard Administration Guide.)
-
Typo in SPP credentials
-
Error: Login to the SPP web interface fails.
-
Raw error:
{
        "error": "invalid_request",
        "error_description": "Access denied.",
        "success": false
    }
- Resolution: Make sure that the correct username and password are entered in the SPP username: and SPP password: prompts.
SPP user has insufficient permission
-
Error message: Error joining to SPP: SPS has failed to join to SPP. For more information, see the error details. (JoinFailed)
Authorization is required for this request. Code: 60108 URL: https://192.0.2.123/service/core/v3/Cluster/SessionModules Status: 403 - Resolution: When SPS redirects to SPP's Login interface, then login as an SPP user has "Appliance" and "Operations" permissions.
SPS is already linked to SPP
-
Error message: Error joining to SPP: SPS has failed to join to SPP. For more information, see the error details. (JoinFailed)
The session connection has a missing, invalid, or non-unique value [ NodeId ]. Code: 60657 URL: https://192.0.2.123/service/core/v3/Cluster/SessionModules Status: 400 - Resolution: See Reversing the SPP to SPS join in the Safeguard Administration Guide.
Linking takes too long (more than five minutes)
-
ERROR: Request to https://192.0.2.123/service/a2a/v2/PsmValidation failed, response (HTTP 403):
{ "Code": 60108, "Message": "Authorization is required for this request.", "InnerError": null } - Resolution: Make sure that SPS is not overloaded and try linking again.
SPP to SPS link issues
In addition to the monitoring tools in Safeguard for Privileged Passwords (SPP), you can use the SPP to SPS link issues during the linking process. Several SPS tools are described below.
Link process fails and real-time monitoring
If the linking process fails for any reason, consult the system logs.
To view the Safeguard for Privileged Sessions logs, navigate to Basic Settings > Troubleshooting > View log files.
To show only the logs for the linking process:
- Select a Logtype of syslog.
- Select the Day; today is the default.
- In the Show only messages containing text box, enter SPP-join.
Use the buttons at the bottom of the dialog to perform the following tasks:
- To download the log file, click Download.
- To follow the current log messages real-time, click Tail. The latest logs will update in a browser window while you interact with the linking process.
- To display the log messages, click View.
To increase the level of detail in the log, enable debug level logging:
- Navigate to Basic Settings > Troubleshooting > Create support bundle.
- Click Start.
Linking successful but connections do not work
When SPP and SPS report a successful linking, but the connections do not work, view the SPS connection logs.
In Safeguard for Privileged Sessions, navigate to Basic Settings > Troubleshooting > View log files.
To show only the logs for the linking process:
- Select a Logtype of ssh or rdp.
- Select the Day (today is the default).
- In the Show only messages containing text box, enter SPP-join.
To change the verbosity level of SPS, complete the following steps in Safeguard for Privileged Sessions:
- Navigate to the Global Options page of the traffic for which you want to change the log level. For example, go to SSH Control > Global Options to change the log level of SSH traffic, RDP Control > Global Options for remote desktop traffic, and so on.
-
Select the desired log level from the Verbosity level field. The verbosity level ranges from 1 (no logging) to 10 (extremely detailed), with level 4 being the default normal level.
|
|
CAUTION: High verbosity levels generate a very large amount of log messages and might result in a very high load on the machine. Log levels set around 9 to 10, may result in logs with highly sensitive data, for example, passwords in plain text format. |

Testing network issues
You can use the Diagnostics tools of SPP and SPS to test network issues. The following commands are available:
- ping: Sends a simple message to the specified host to test network connectivity.
- traceroute: Sends a simple message from SPS to the specified host and displays all hosts on the path of the message. It is used to trace the path the message travels between the hosts.
- connect: Attempts to connect the specified host using the specified port. It is used to test the availability or status of an application on the target host.
To execute one of the above commands on SPS, see Network troubleshooting.
To execute one of the above commands on SPP, see Diagnostics tools of SPP.
Creating an SPS Support Bundle
If you have an issue which needs Support assistance, you may be asked to provide an SPS Support Bundle. To collect system-state information (also known as a debug bundle) in One Identity Safeguard for Privileged Sessions, see Collecting logs and system information for error reporting.
Configuring external devices
This section describes scenarios about configuring external devices to redirect selected traffic to One Identity Safeguard for Privileged Sessions (SPS).
Topics:
Configuring advanced routing on Linux
Configuring advanced routing on Cisco routers
Configuring advanced routing on Sophos UTM (formerly Astaro Security Gateway) firewalls
Configuring advanced routing on Linux
The following describes how to configure a Linux-based router to redirect selected traffic to One Identity Safeguard for Privileged Sessions (SPS) instead of its original destination. This procedure should work on most modern Linux-based routers, including
Prerequisites
The router must have the iptables and ip tools installed.
To configure a Linux-based router to redirect selected traffic to SPS instead of its original destination
-
Create the packet filter rules that will mark the connections to be sent to SPS using the CONNMARK feature of iptables. Mark only those connections that must be redirected to SPS.
# iptables -t mangle -I PREROUTING -i <interface-facing-the-clients> -p tcp -d <network-of-the-servers> --dport <port-to-access> -j CONNMARK --set-mark 1
Example: Setting up a connection mark for Linux policy routing
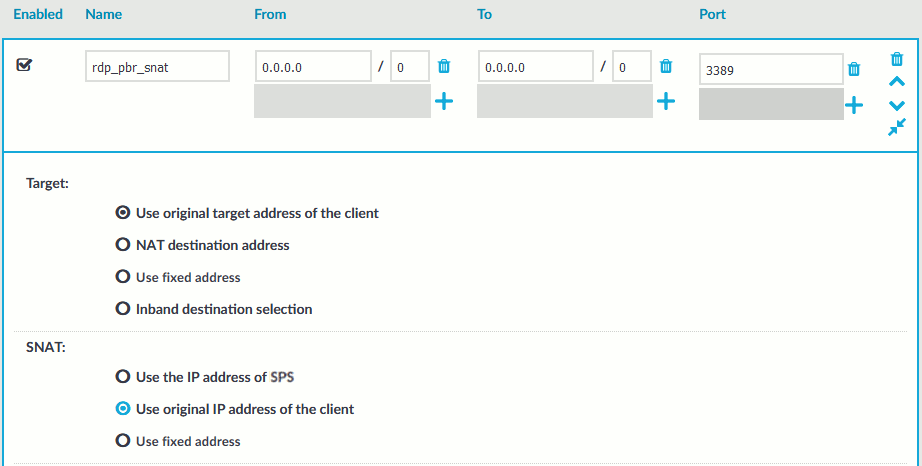
For example, if the network interface of the router that faces the clients is called eth0, the servers are located in the 10.0.0.0/24 subnet, and the clients access the servers using port 3389 (the default port of the RDP protocol), then this command looks like:
# iptables -t mangle -I PREROUTING -i eth0 -p tcp -d 10.0.0.0/24 --dport 3389 -j CONNMARK --set-mark 1
-
Create a rule that redirects the answers of the servers to SPS. That way both the client-to-server and the server-to-client traffic is routed to SPS.
NOTE: This step is only required if you want to use Source NAT (IP Spoofing) instead of SPS’s address towards the monitored servers.
Figure 373: Control > Connections — Using SNAT
# iptables -t mangle -I PREROUTING -i <interface-facing-the-servers> -p tcp -s <network-of-the-servers> --sport <port-to-access> -j CONNMARK --set-mark 1
-
Convert the CONNMARK marks to MARK:
# iptables -t mangle -A PREROUTING ! -i <interface-facing-the-scb> -m connmark --mark 1 -j MARK --set-mark 1
Caution: This rule must be placed after the CONNMARK rules.
-
Add the table name to the /etc/iproute2/rt_tables of the router. Use the following format (for details on routing tables, see for example the Guide to IP Layer Network Administration with Linux):
103 scb
-
Create a routing table that has a single entry with a default route to SPS:
# /sbin/ip route add default via <ip-address-of-SPS> table scb
-
Create a routing rule that selects the routing table called scb, if the connection is marked.
# /sbin/ip rule add from all fwmark 1 table scb
-
If SPS is configured to spoof the IP address of the clients on the server side (that is, the SNAT > Use original IP address of the client option of the connection policies is selected), enable spoofing on the router for the interface connected to SPS.
# echo 0 > /proc/sys/net/ipv4/conf/<interface-facing-SPS>/rp_filter
# echo 0 > /proc/sys/net/ipv4/conf/all/rp_filter
Expected result
The traffic from the clients targeting the specified port of the servers is redirected to SPS. Therefore, SPS can be configured to control and audit this traffic.