Preparing a remote connection server for accessing Exchange Online
To configure synchronization with a target system, One Identity Manager must load the data from the target system. One Identity Manager communicates directly with the target system to do this. Sometimes direct access from the workstation, on which the Synchronization Editor is installed, is not possible. For example, because of the firewall configuration or the workstation does not fulfill the necessary hardware and software requirements. If direct access is not possible from the workstation, you can set up a remote connection.
The remote connection server and the workstation must be in the same Active Directory domain.
Remote connection server configuration:
-
One Identity Manager Service is started
-
RemoteConnectPlugin is installed
-
Windows PowerShell version 5.1 or above is installed
-
Exchange Online PowerShell V2 module is installed.
-
Exchange Online connector is installed
The remote connection server must be declared as a Job server in One Identity Manager. The Job server name is required.
TIP: The remote connection server requires the same configuration as the synchronization server (with regard to the installed software and entitlements). Use the synchronization as remote connection server at the same time, by simply installing the RemoteConnectPlugin as well.
For more detailed information about setting up a remote connection, see the One Identity Manager Target System Synchronization Reference Guide.
Related topics
Creating a synchronization project for initial synchronization of an Exchange Online environment
Use the Synchronization Editor to configure synchronization between the One Identity Manager database and Exchange Online environment. The following describes the steps for initial configuration of a synchronization project.
IMPORTANT: Each Exchange Online environment should have its own synchronization project.
After the initial configuration, you can customize and configure workflows within the synchronization project. Use the workflow wizard in the Synchronization Editor for this. The Synchronization Editor also provides different configuration options for a synchronization project.
IMPORTANT: It must be possible to reach Exchange Online servers by DNS query for successful authentication. If the DNS cannot be resolved, the target system connection is refused.
Prerequisites for setting up a synchronization project
- Synchronization of the Azure Active Directory system is carried out regularly.
- The Azure Active Directory tenant is declared in One Identity Manager.
Have the following information available for setting up a synchronization project.
Table 3: Information required for setting up a synchronization project
|
User account and password for logging in |
User account and password for logging in to Exchange Online.
Example:
<user>@<domain.com>
<user name of the synchronization user>@yourorganization.onmicrosoft.com
Make a user account available with sufficient permissions. For more information, see Users and permissions for synchronizing with Exchange Online. |
|
Synchronization server for Exchange Online |
The One Identity Manager Service with the Exchange Online connector must be installed on the synchronization server.
Table 4: Additional properties for the Job server
| Server function |
Exchange Online connector |
| Machine role |
Server/Jobserver/Azure Active Directory/ExchangeOnline |
For more information, see Setting up the synchronization server. |
| One Identity Manager database connection data |
-
Database server
-
Database
-
SQL Server login and password
-
Specifies whether integrated Windows authentication is used. This type of authentication is not recommended. If you decide to use it anyway, ensure that your environment supports Windows authentication. |
| Remote connection server |
For more information, see Preparing a remote connection server for accessing Exchange Online. |
NOTE: The following sequence describes how to configure a synchronization project if the
Synchronization Editor is both:
If you execute the project wizard in expert mode or directly from the Synchronization Editor, additional configuration settings can be made. Follow the project wizard instructions through these steps.
To set up initial synchronization project for Exchange Online
-
Start the Launchpad and log in to the One Identity Manager database.
NOTE: If synchronization is executed by an application server, connect the database through the application server.
-
Select the Target system type Exchange Online entry and click Start.
This starts the Synchronization Editor's project wizard.
-
On the System access page, specify how One Identity Manager can access the target system.
-
If access is possible from the workstation on which you started the Synchronization Editor, do not change any settings.
-
If access is not possible from the workstation on which you started the Synchronization Editor, you can set up a remote connection.
Enable the Connect using remote connection server option and select the server to be used for the connection under Job server.
- On the Connection parameters page, enter the login data for connecting to Exchange Online.
Table 5: Connection parameters for the Exchange Online
| User name (user@domain) |
Fully qualified name (FQDN) of the user account for log on.
Example:
<user>@<domain.com>
sync.user@yourorganisation.onmicrosoft.com |
| Password |
Password for the user account. |
User Add set to enter more connection parameters. This allows you to add more synchronization users. These are queried cyclically by the Exchange Online connector when queries are sent to Exchange Online. By using multiple synchronization users, it takes longer to reach the throttling limit.
For more detailed information about throttling limits in Exchange Online, see the Exchange Online documentation from Microsoft.
To test the connection parameters separately, click  in the set. Click Check all sets to check all sets at once.
Click Next.
- Then click Finished to return to the project wizard.
- The wizard loads the target system schema. This may take a few minutes depending on the type of target system access and the size of the target system.
- On the Restrict target system access page, specify how system access should work. You have the following options:
Table 6: Specify target system access
|
Read-only access to target system. |
Specifies that a synchronization workflow is only to be set up for the initial loading of the target system into the One Identity Manager database.
The synchronization workflow has the following characteristics:
- Synchronization is in the direction of One Identity Manager.
- Processing methods in the synchronization steps are only defined for synchronization in the direction of One Identity Manager.
|
|
Read/write access to target system. Provisioning available. |
Specifies whether a provisioning workflow is to be set up in addition to the synchronization workflow for the initial loading of the target system.
The provisioning workflow displays the following characteristics:
- Synchronization is in the direction of the Target system.
- Processing methods are only defined in the synchronization steps for synchronization in the direction of the Target system.
- Synchronization steps are only created for such schema classes whose schema types have write access.
|
- On the Synchronization server page, select a synchronization server to execute synchronization.
If the synchronization server is not declared as a Job server in the One Identity Manager database yet, you can add a new Job server.
-
Click  to add a new Job server.
-
Enter a name for the Job server and the full server name conforming to DNS syntax.
- Click OK.
The synchronization server is declared as a Job server for the target system in the One Identity Manager database.
NOTE: After you save the synchronization project, ensure that this server is set up as a synchronization server.
- To close the project wizard, click Finish.
This creates and allocates a default schedule for regular synchronization. Enable the schedule for regular synchronization.
The synchronization project is created, saved, and enabled immediately.
NOTE: If enabled, a consistency check is carried out. If errors occur, a message appears. You can decide whether the synchronization project can remain activated or not.
Check the errors before you use the synchronization project. To do this, in the General view on the Synchronization Editor‘s start page, click Verify project.
NOTE: If you do not want the synchronization project to be activated immediately, disable the Activate and save the new synchronization project automatically option. In this case, save the synchronization project manually before closing the Synchronization Editor.
NOTE: The connection data for the target system is saved in a variable set and can be modified in the Configuration | Variables category in the Synchronization Editor.
To configure the content of the synchronization log
-
Open the synchronization project in the Synchronization Editor.
- To configure the synchronization log for target system connection, select the Configuration | Target system category.
- To configure the synchronization log for the database connection, select the Configuration | One Identity Manager connection category.
- Select the General view and click Configure.
- Select the Synchronization log view and set Create synchronization log.
- Enable the data to be logged.
NOTE: Some content generates a particularly large volume of log data. The synchronization log should only contain data required for troubleshooting and other analyses.
- Click OK.
To synchronize on a regular basis
-
Open the synchronization project in the Synchronization Editor.
- Select the Configuration | Start up configurations category.
- Select a start up configuration in the document view and click Edit schedule.
- Edit the schedule properties.
- To enable the schedule, click Activate.
- Click OK.
To start initial synchronization manually
-
Open the synchronization project in the Synchronization Editor.
-
Select the Configuration | Start up configurations category.
-
Select a start up configuration in the document view and click Execute.
- Confirm the security prompt with Yes.
Related topics
Advanced settings for the Exchange Online connector
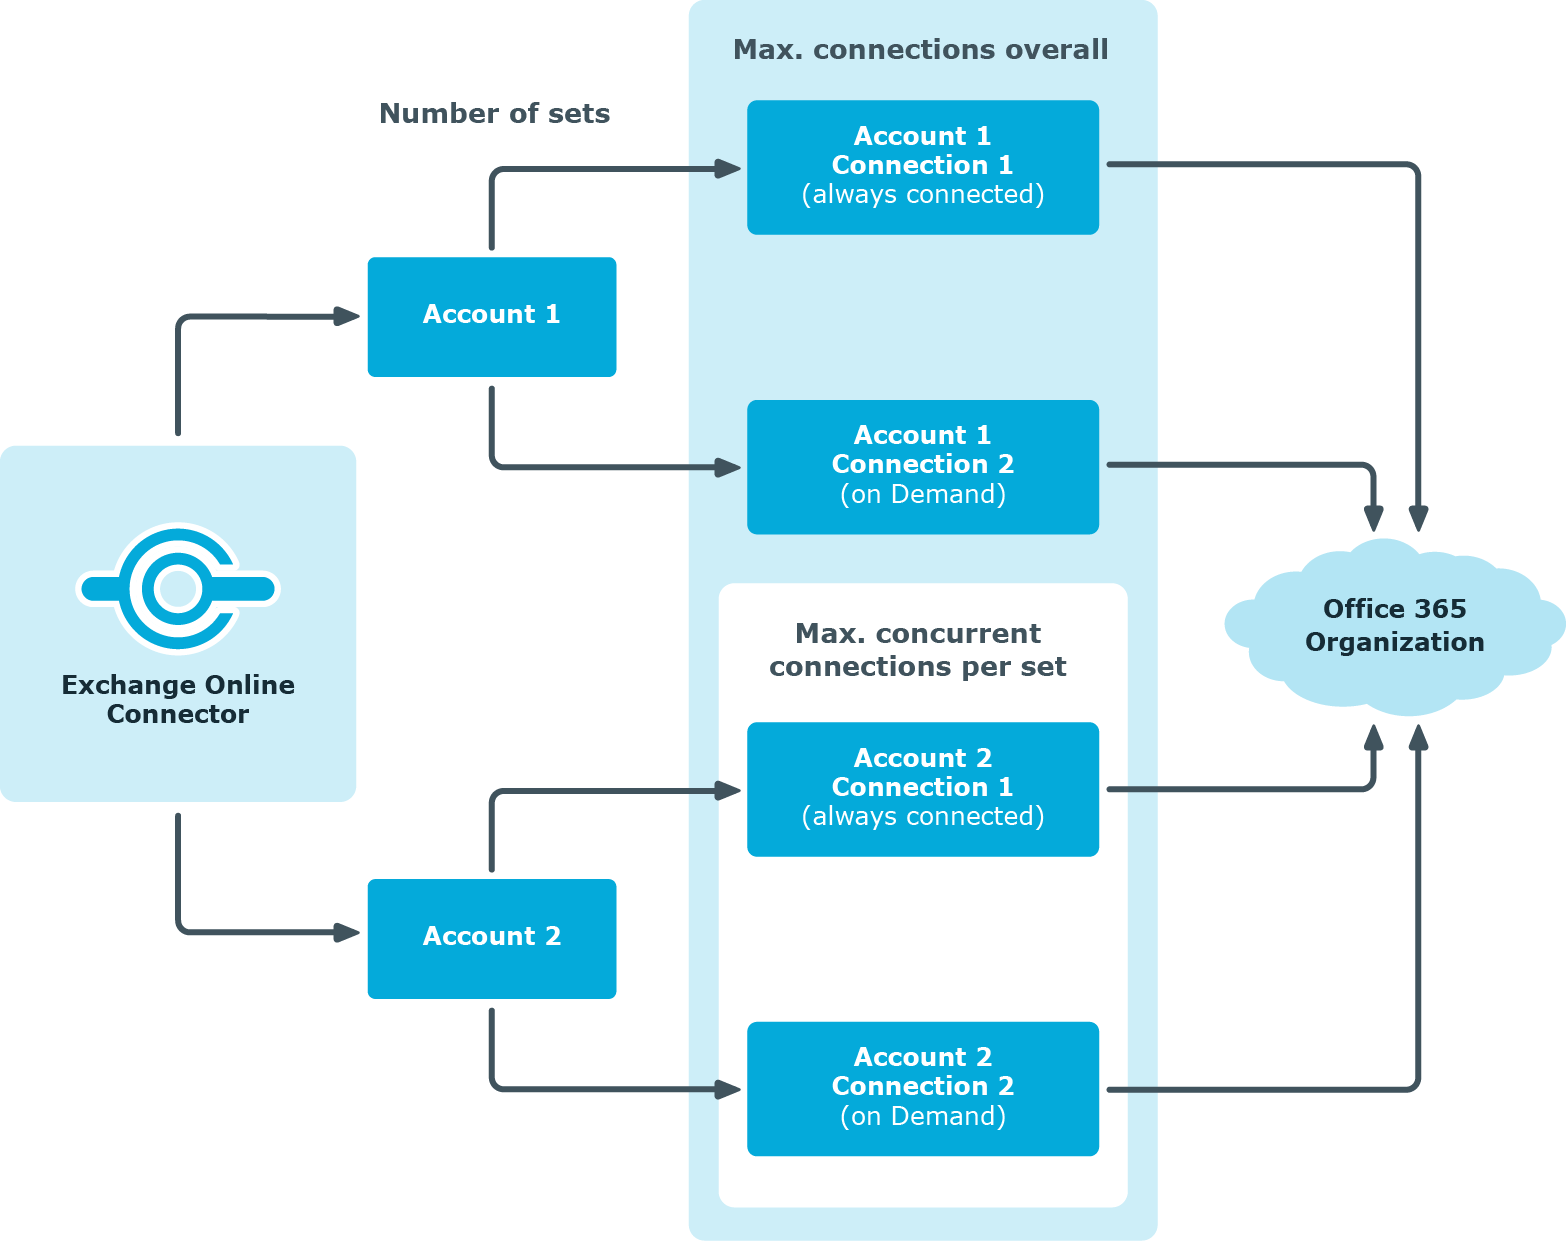
You can specify whether want to set advanced options in the Synchronization Editor project wizard on the Connect Exchange Online page. These settings allow you to change the following options for communicating with Exchange Online:
- The number of concurrent connections per connection parameter set
- The definition of Windows PowerShell commands
Number of concurrent connections per connection parameter set
IMPORTANT: You should only make changes to this option with the help of support desk staff. Changes to this setting will have wide ranging effects on synchronization and must be made carefully.
Use this option to set the number of concurrent connections for each connection parameter set or for each user account for synchronization. The setting specifies how many concurrent connections will be created for each user account. The default value is 2. Exchange Online currently allows three connections per user account on the server side.
When the Exchange Online connector creates the connection, it creates one Windows PowerShell session per connection parameter set regardless of the number of queries that follow. Further connections are created on demand, for example, when loading multiple objects during the synchronization.
The maximum number of sessions established to Exchange Online can be calculated with the following formula:
Maximum number of Windows PowerShell sessions = Number of parameter sets * Value of concurrent connection per connection parameter set
The minimum number of sessions established to Exchange Online is the same as the number of connection parameter sets.
To change the number of concurrent connections
- On the Connect to Exchange Online page in the Synchronization Editor connection wizard, select Show advanced options and click Next.
- Enter a value between 1 and 3 in concurrent connections per connection parameter set.
- On the Connection parameters page, enter the login data for connecting to Exchange Online. For more information, see Creating a synchronization project for initial synchronization of an Exchange Online environment.
- Click Finish to complete.
Customizing the connection definition
You can use this setting to adjust the definition used by the connector in order to convert inputs and outputs between the Exchange Online Cmdlets and the schema of the Synchronization Engine.
IMPORTANT: You should only make changes to the connector definition with the help of support desk staff. Changes to this setting will have wide ranging effects on synchronization and must be made carefully.
NOTE: A customized connection definition is not overwritten by default and must be made with careful consideration.
To customize the connector definition
-
Open the synchronization project in the Synchronization Editor.
-
Select Configuration | Target system.
-
Click Edit connection.
This starts the system connection wizard.
-
Enable Show advanced options on the system connection wizard's start page.
-
Customize the connector definition as required on the Advanced options page.
-
Select Customize connector definition.
-
Edit the definition according to the instructions given by the support desk staff. You take the following action:
-
Choose  to load the definition from a file.
-
Use  to test the definition for errors.
-
Choose  to display the differences to the standard version.
- Save the changes.
Displaying synchronization results
Synchronization results are summarized in the synchronization log. You can specify the extent of the synchronization log for each system connection individually. One Identity Manager provides several reports in which the synchronization results are organized under different criteria.
To display a synchronization log
-
Open the synchronization project in the Synchronization Editor.
-
Select the Logs category.
-
Click  in the navigation view toolbar.
Logs for all completed synchronization runs are displayed in the navigation view.
-
Select a log by double-clicking it.
An analysis of the synchronization is shown as a report. You can save the report.
To display a provisioning log
-
Open the synchronization project in the Synchronization Editor.
-
Select the Logs category.
-
Click  in the navigation view toolbar.
Logs for all completed provisioning processes are displayed in the navigation view.
-
Select a log by double-clicking it.
An analysis of the provisioning is shown as a report. You can save the report.
The log is marked in color in the navigation view. This mark shows you the status of the synchronization/provisioning.
TIP: The logs are also displayed in the Manager under the <target system> | synchronization log category.
Synchronization logs are stored for a fixed length of time.
To modify the retention period for synchronization logs
