Creating an alias IP address (Linux)
The following describes how to assign an alias IP address to a network interface on Linux platforms.
To assign an alias IP address to a network interface on Linux platforms
-
Start a terminal console (for example, gnome-terminal, konsole, xterm, and so on).
-
Issue the following command as root:
ifconfig <ethX>:0 192.168.1.2
where <ethX> is the ID of the network interface of the client, usually eth0 or eth1.
-
Issue the ifconfig command. The <ethX>:0 interface appears in the output, having inet addr:192.168.1.2.
-
Issue the ping -c 3 192.168.1.1 command to verify that One Identity Safeguard for Privileged Sessions (SPS) is accessible. A similar result is displayed:
user@computer:~$ ping -c 3 192.168.1.1
PING 192.168.1.1 (192.168.1.1) 56(84) bytes of data.
64 bytes from 192.168.1.1: icmp-seq=1 ttl=63 time=0.357 ms
64 bytes from 192.168.1.1: icmp-seq=2 ttl=63 time=0.306 ms
64 bytes from 192.168.1.1: icmp-seq=3 ttl=63 time=0.314 ms

--- 192.168.1.1 ping statistics ---
3 packets transmitted, 3 received, 0% packet loss, time 2013ms
rtt min/avg/max/mdev = 0.306/0.325/0.357/0.030 ms
-
Open the page https://192.168.1.1 from your browser and accept the certificate shown. The Welcome Wizard of SPS appears.
Modifying the IP address of One Identity Safeguard for Privileged Sessions (SPS)
The following describes how to configure One Identity Safeguard for Privileged Sessions (SPS) to listen for connections on a custom IP address.
|

|
Caution:
Use this procedure only before the initial configuration of SPS, that is, before completing the Welcome Wizard. For details on changing the IP address or other network settings of a configured SPS system, see Network settings.
If you change the IP address of SPS, make sure that you use this address as the Physical interface 1 — IP address in the Networking settings section of the Welcome Wizard (see Configuring interface 1). |
To configure SPS to listen for connections on a custom IP address
-
Access SPS from the local console, and log in with username root and password default.
-
Select Shells > Core shell in the Console Menu.
-
Change the IP address of SPS:
ifconfig eth0 <IP-address> netmask 255.255.255.0
Replace <IP-address> with an IPv4 address suitable for your environment.
-
Set the default gateway using the following command:
route add default gw <IP-of-default-gateway>
Replace <IP-of-default-gateway> with the IP address of the default gateway.
-
Type exit, then select Logout from the Console Menu.
-
Open the page https://<IP-address-you-set-for-SPS> from your browser and accept the certificate shown. The Welcome Wizard of SPS appears.
Configuring One Identity Safeguard for Privileged Sessions (SPS) with the Welcome Wizard
The Welcome Wizard guides you through the basic configuration steps of One Identity Safeguard for Privileged Sessions (SPS). All parameters can be modified before the last step by using the Back button of the wizard, or later through the web interface of SPS.
To configure SPS with the Welcome Wizard
-
Open the https://<IP-address-of-SPS-interface> page in your browser and accept the displayed certificate. The Welcome Wizard of SPS appears.
TIP: The SPS console displays the IP address the interface is listening on. SPS either receives an IP address automatically via DHCP, or if a DHCP server is not available, listens on the 192.168.1.1 IP address.
-
When configuring SPS for the first time, click Next.
Figure 18: The Welcome Wizard
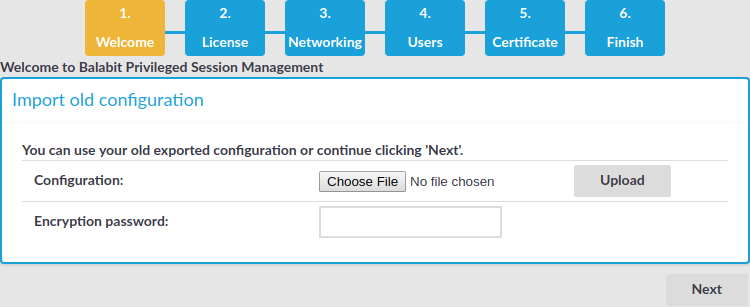
You can import an existing configuration from a backup file. Use this feature to restore a backup configuration after a recovery, or to migrate an existing SPS configuration to a new device.
|
|
Caution:
Do not export or import configuration between a physical SPS deployment and a virtual one. Because of the differences and limitations between physical and virtual appliances, configure the virtual appliance from scratch to ensure proper functionality. When you migrate a virtual SPS to another one, you can export and import the configuration. |
-
Click Browse and select the configuration file to import.
NOTE: It is not possible to directly import a GPG-encrypted configuration into SPS, it has to be decrypted locally first.
-
Enter the passphrase used when the configuration was exported into the Encryption passphrase field.
For details on restoring configuration from a configuration backup, see Restoring One Identity Safeguard for Privileged Sessions (SPS) configuration and data
-
Click Import.
|
|
Caution:
If you use the Import function to copy a configuration from one SPS to another, do not forget to configure the IP addresses of the second SPS. Having two devices with identical IP addresses on the same network leads to errors. |
-
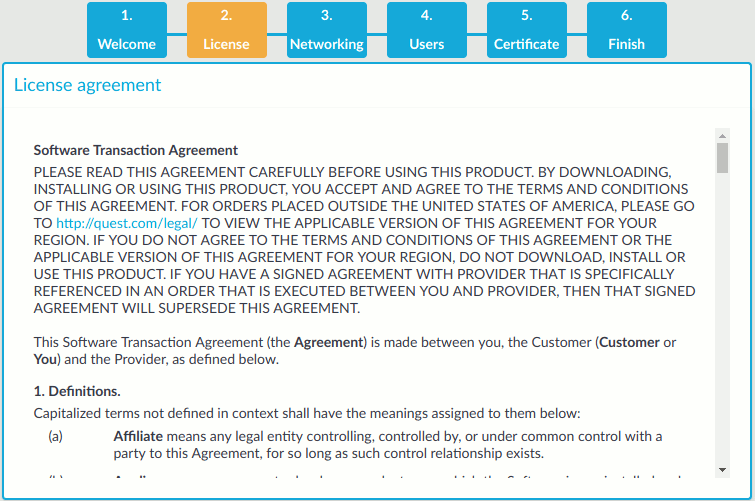
Accept the End User License Agreement and install the SPS license.
Figure 19: The EULA and the license key
-
Read the End User License Agreement and select I have read and agree with the terms and conditions. The License Agreement covers both the traditional license, and subscription-based licensing as well. Clicking I have read and agree with the terms and conditions means that you accept the agreement that corresponds to the license you purchased. After the installation is complete, you can read the End User License Agreement at Basic Settings > System > License.
-
Click Browse, select the SPS license file received with SPS, then click Upload.
NOTE: It is not required to manually decompress the license file. Compressed licenses (for example .zip archives) can also be uploaded.
-
Click Next.
-
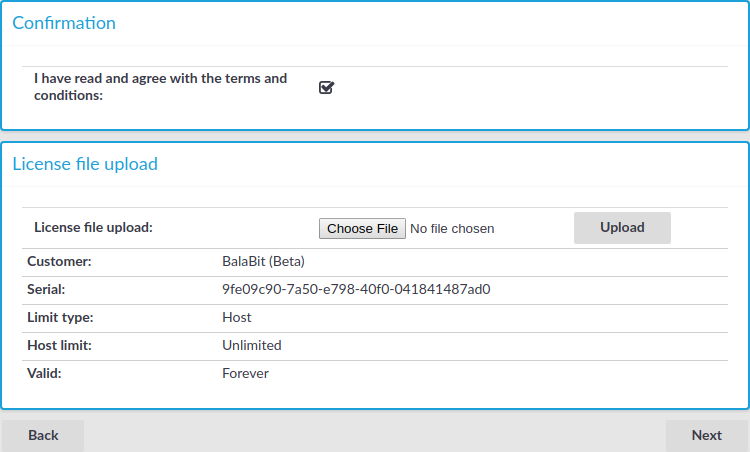
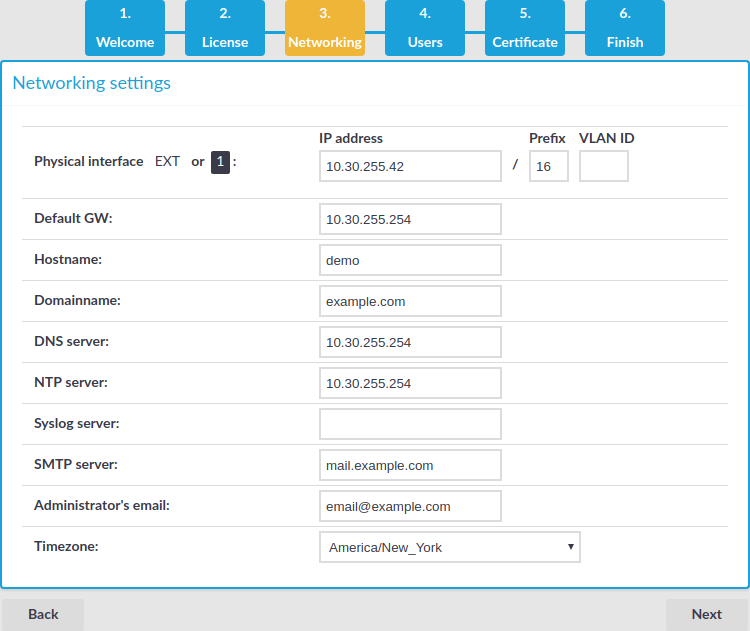
Configure networking. All settings can be modified later using the web interface of SPS.
Figure 20: Initial networking configuration
-
Physical interface EXT or 1 — IP address: The IP address of interface 1 (or EXT, for older hardware) of SPS (for example, 192.168.1.1). The IP address can be chosen from the range of the corresponding physical subnet. Clients will connect to this interface, therefore it must be accessible to them.
Use an IPv4 address.
NOTE: Do not use IP addresses that fall into the following ranges:
-
Physical interface EXT or 1 — Prefix: The IP prefix of the given range. For example, general class C networks have the /24 prefix.
-
Physical interface EXT or 1 — VLAN ID: The VLAN ID of interface 1 (or EXT). Optional.
|
|
Caution:
Do not set the VLAN ID unless your network environment is already configured to use this VLAN. Otherwise, your SPS appliance will be unavailable using this interface. |
-
Default GW: IP address of the default gateway.
Use an IPv4 address.
-
Hostname: Name of the machine running SPS (for example, SPS).
-
Domainname: Name of the domain used on the network.
-
DNS server: The IP address of the name server used for domain name resolution.
Use an IPv4 address.
-
NTP server: The IP address or the hostname of the NTP server.
Use an IPv4 address.
-
Syslog server: The IP address or the hostname of the syslog server.
Use an IPv4 address.
-
SMTP server: The IP address or the hostname of the SMTP server used to deliver e-mails.
Use an IPv4 address.
-
Administrator's email: E-mail address of the SPS administrator.
-
Timezone: The timezone where the SPS is located.
-
HA address: The IP address of the High Availability (HA) interface. Leave this field on auto unless specifically requested by the support team.
-
Click Next.
-
Enter the passwords used to access SPS.
Figure 21: Passwords
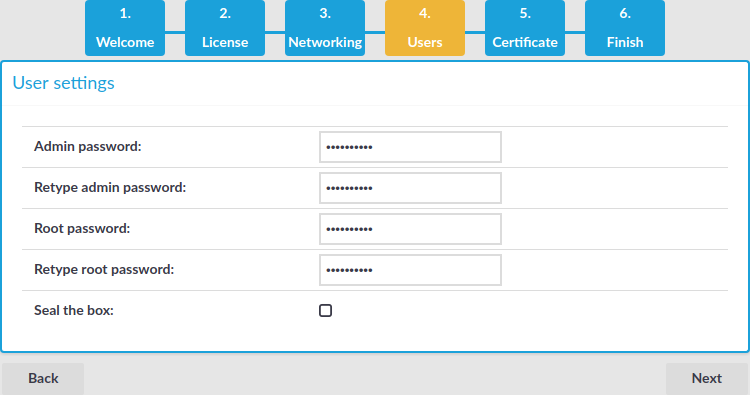
NOTE: One Identity Safeguard for Privileged Sessions (SPS) accepts passwords that are not longer than 150 characters. Letters A-Z, a-z, numbers 0-9, the space character, as well as the following special characters can be used: !"#$%&'()*+,-./:;<>=?@[]\^-`{}_|
-
Admin password: The password of the admin user who can access the web interface of SPS.
-
Root password: The password of the root user, required to access SPS via SSH or from the local console.
NOTE: Accessing SPS using SSH is rarely needed, and One Identity recommends it only for advanced users for troubleshooting situations.
-
If you want to prevent users from accessing SPS remotely via SSH or changing the root password of SPS, select the Seal the box checkbox. Sealed mode can be activated later from the web interface as well. For details, see "Sealed mode" in the Administration Guide.
-
Click Next.
-
Upload or create a certificate for the SPS web interface. This SSL certificate will be displayed by SPS to authenticate HTTPS connections to the web and the REST interface.
Figure 22: Creating a certificate for SPS
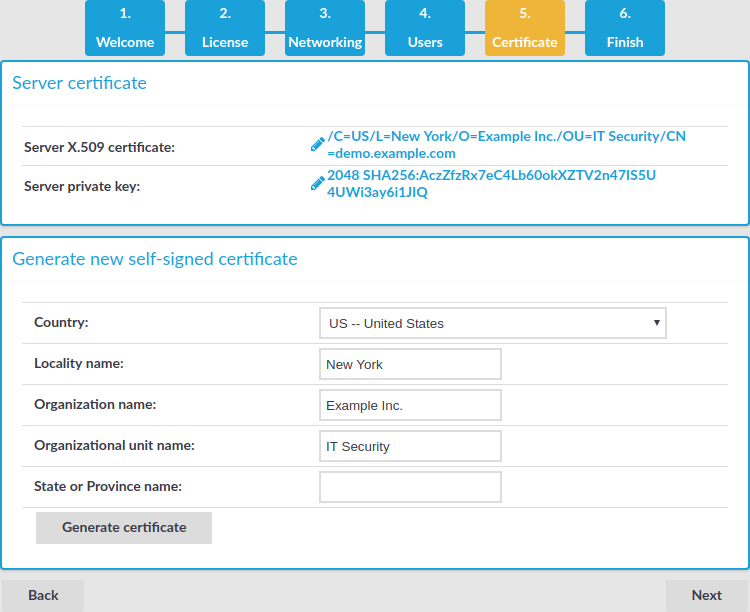
To create a self-signed certificate, fill the fields of the Generate new self-signed certificate section and click Generate certificate. The certificate will be self-signed by the SPS appliance. The hostname of SPS will be used as the issuer and common name.
-
Country: Select the country where SPS is located (for example, HU-Hungary).
-
Locality name: The city where SPS is located (for example, Budapest).
-
Organization name: The company who owns SPS (for example, Example Inc.).
-
Organizational unit name: The division of the company who owns SPS (for example, IT Security Department).
-
State or Province name: The state or province where SPS is located.
-
Click Generate certificate.
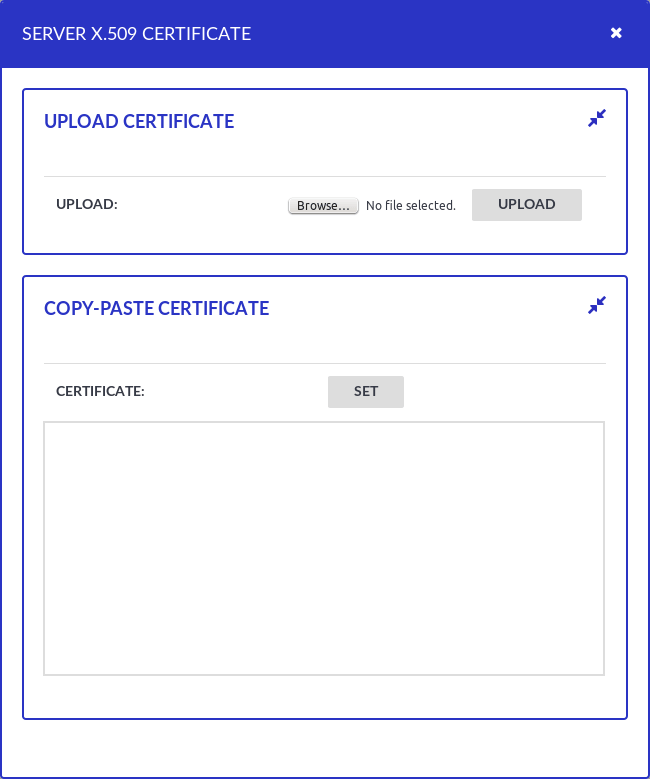
If you want to use a certificate that is signed by an external Certificate Authority, in the Server X.509 certificate field, click  to upload the certificate.
Figure 23: Uploading a certificate for SPS
Then in the Server private key field click , upload the private key, and enter the password protecting the private key.
Figure 24: Uploading a private key
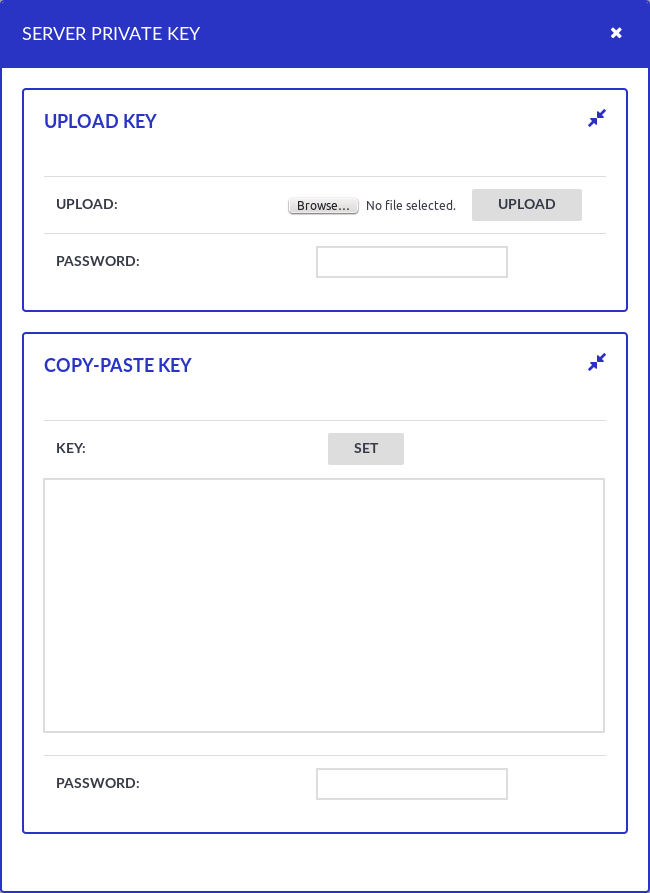
NOTE: SPS accepts private keys in PEM format, using RSA, DSA, and EC private key algorithms. Password-protected private keys are also supported.
One Identity recommends using 2048-bit RSA keys (or stronger).
NOTE: One Identity Safeguard for Privileged Sessions (SPS) accepts passwords that are not longer than 150 characters. Letters A-Z, a-z, numbers 0-9, the space character, as well as the following special characters can be used: !"#$%&'()*+,-./:;<>=?@[]\^-`{}_|
-
Review the data entered in the previous steps. This page also displays the certificate generated in the last step, the SSH RSA and Ed25519 keys of SPS, and information about the license file.
Figure 25: Review configuration data
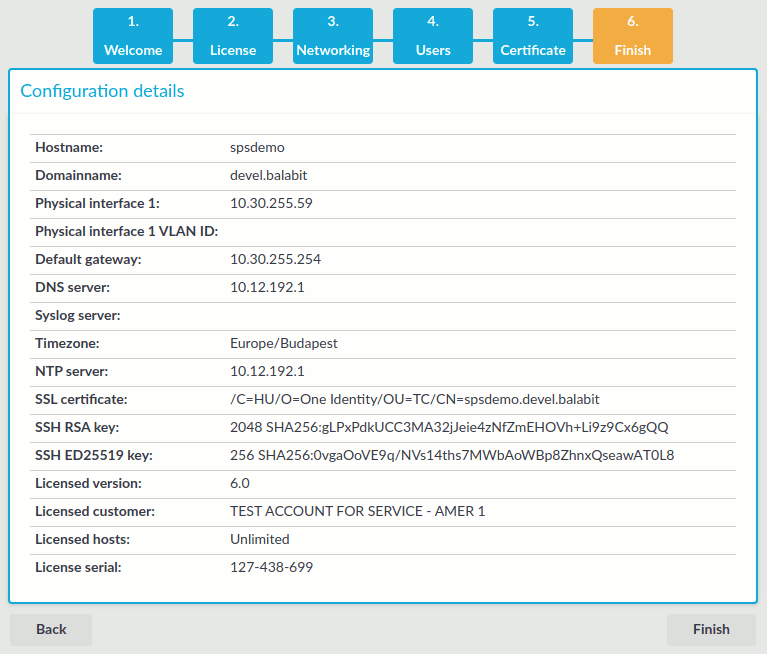
If all information is correct, click Finish.
|
|
Caution:
The configuration takes effect immediately after clicking Finish. Incorrect network configuration data can render SPS unaccessible. |
SPS is now accessible from the regular web interface via the IP address of interface 1 (or EXT).
-
Your browser is automatically redirected to the IP address set for interface 1 (or EXT) of SPS, where you can login to the web interface of SPS using the admin username and the password you set for this user in the Welcome Wizard.
Logging in to One Identity Safeguard for Privileged Sessions (SPS) and configuring the first connection
After finishing the initial configuration of One Identity Safeguard for Privileged Sessions (SPS) using the Welcome Wizard, connections must be configured between the clients and the servers. SPS inspects only the connections that are configured from the web interface, all other connections are forwarded without any inspection.
To enable a simple SSH terminal or a Remote Desktop session over a transparent and a non-transparent connection
-
Login to SPS's web interface.
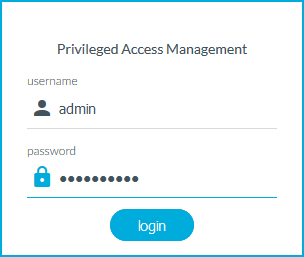
Figure 26: The first login
-
Open the https://IP-address-of-interface-1/ page from your browser to access the web interface of SPS. Replace the IP-address-of-the-interface-1 string with the IP set for interface 1 in the Networking settings section of the Welcome Wizard (see Configuring interface 1) (for example, 192.168.1.1).
-
The certificate created in the Certificate section of the Welcome Wizard (see Creating the web interface certificate) is displayed. Accept it.
-
Log in to the SPS web interface using the displayed login screen.
-
Enter admin into the Login field.
-
Enter the password set in the Users section of the Welcome Wizard (see Setting the administrator password) for the admin user into the Password field.
-
Click Login. The main page of the SPS administration interface is displayed.
-
Configure a new transparent connection.
-
-
To configure an SSH connection, select SSH Control > Connections from the Main Menu. Only terminal sessions will be permitted.
-
To configure an RDP connection, click on the RDP Control > Connections from the Main Menu. Only basic Remote Desktop sessions will be permitted (no file-sharing).
-
Click the  icon on the right to create a new connection.
-
Enter a name into the Name field that will identify the connection (for example, admin-server-transparent).
TIP: One Identity recommends that you use descriptive names that give information about the connection (that is, they refer to the name of the accessible server, the allowed users, and so on).
-
Enter the IP addresses defining the connection:
Figure 27: <Protocol name> Control > Connections — Configuring an SSH connection in transparent mode
-
Enter the IP address of the client that will be permitted to access the server into the From field.
You can use an IPv4 or an IPv6 address. To limit the IP range to the specified address, set the prefix to 32 (IPv4) or 128 (IPv6).
-
Enter the IP address of the server into the To field.
You can use an IPv4 or an IPv6 address. To limit the IP range to the specified address, set the prefix to 32 (IPv4) or 128 (IPv6).
-
Enter the port number where the server is accepting connections into the Port field.
-
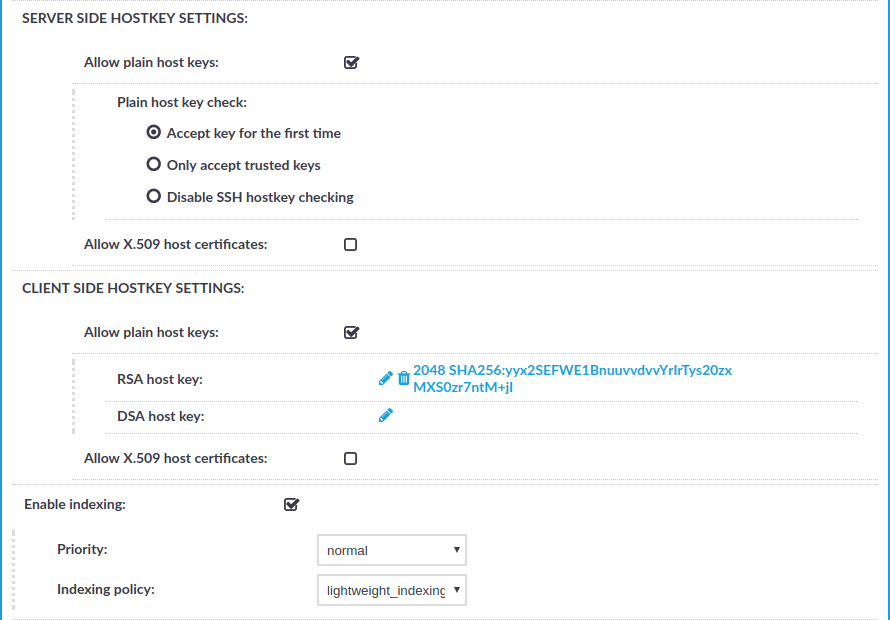
Select Enable indexing.
-
Click  .
.
This connection allows any user from the client machine to connect to the specified server, but permits only terminal sessions — other SSH channels like TCP forwarding are disabled.
-
Configure a new non-transparent connection.
-
-
To configure an SSH connection, select SSH Control > Connections from the Main Menu. Only terminal sessions will be permitted.
-
To configure an RDP connection, click on the RDP Control > Connections from the Main Menu. Only basic Remote Desktop sessions will be permitted (that is, no clipboard or file-sharing).
-
Click the icon on the right to create a new connection.
-
Enter a name into the Name field that will identify the connection (for example, admin-server-nontransparent).
TIP: One Identity recommends that you use descriptive names that give information about the connection (that is, they refer to the name of the accessible server, the allowed users, and so on).
-
Enter the IP addresses defining the connection:
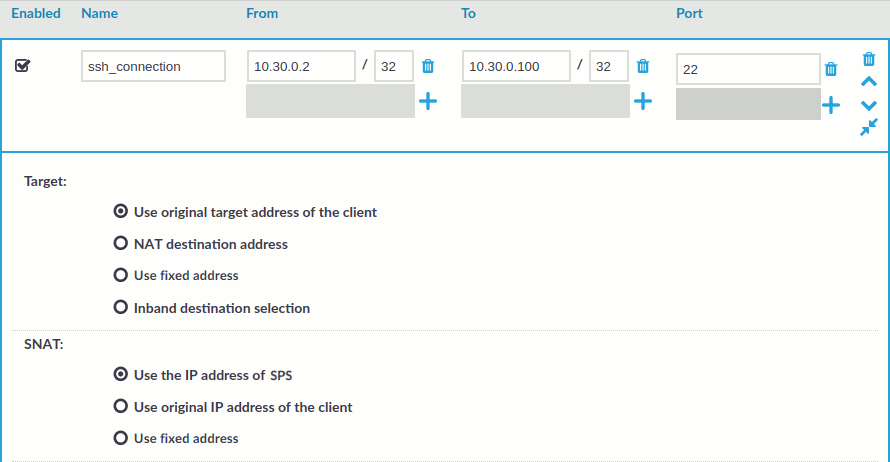
Figure 28: <Protocol name> Control > Connections — Configuring an SSH connection in non-transparent mode
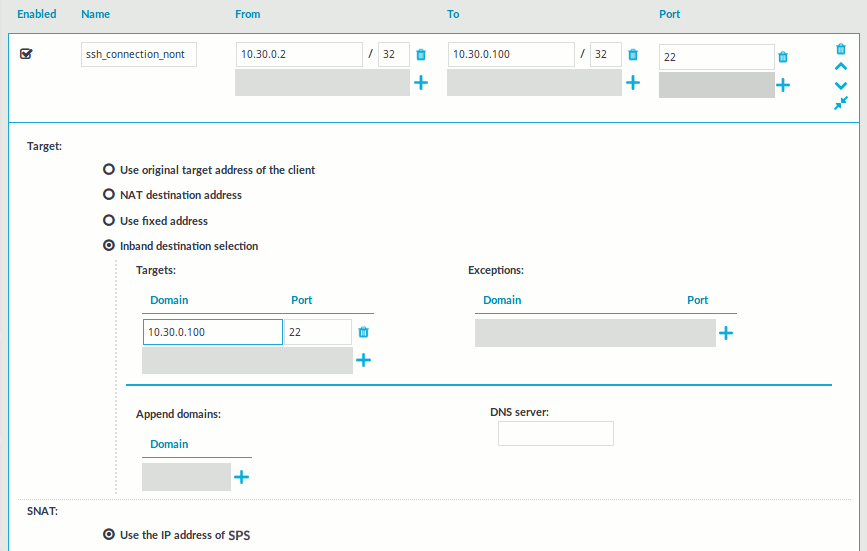
-
Enter the IP address of the client that will be permitted to access the server into the From field.
You can use an IPv4 or an IPv6 address. To limit the IP range to the specified address, set the prefix to 32 (IPv4) or 128 (IPv6).
-
Enter the IP address of SPS's physical interface 1 into the To field.
You can use an IPv4 or an IPv6 address. To limit the IP range to the specified address, set the prefix to 32 (IPv4) or 128 (IPv6).
-
Enter a port number into the Port field.
-
Enter the IP address of the server into the Use fixed address field of the Target section.
You can use an IPv4 or an IPv6 address.
-
Enter the port number where the server is accepting connections into the Port field of the Target section.
-
Select Enable indexing.
-
Click .
This connection allows any user from the client machine to connect to the specified server, but permits only terminal sessions — other SSH channels like TCP forwarding are disabled.
-
Test the new configuration: try to initiate an SSH or and RDP connection from the client to the server.
-
After successfully connecting to the server, do something in the connection, for example, execute a simple command in SSH (for example, ls /tmp), or launch an application in RDP (for example, the Windows Explorer), then disconnect from the server.
-
To access the Search interface, navigate to Search.
Figure 29: The Search interface
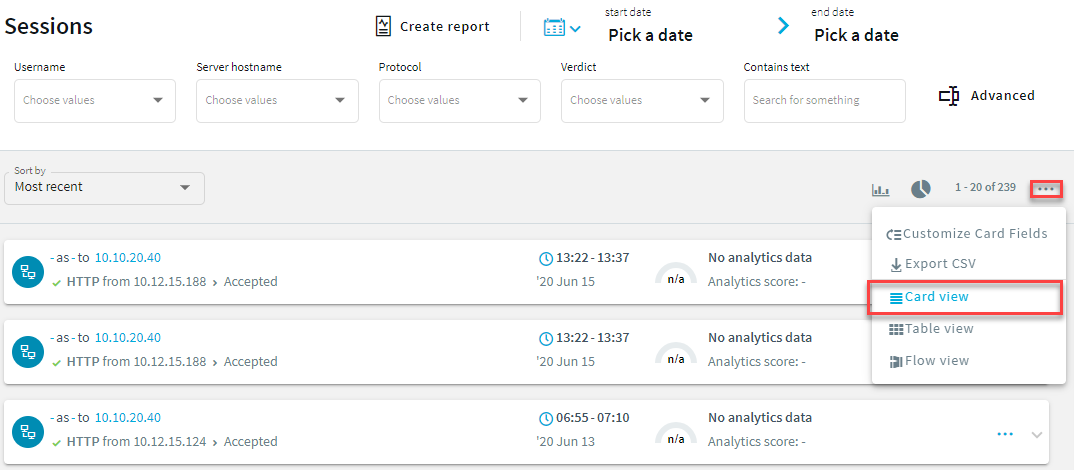
-
Find the session you want to replay on the Search page.
For more information about search criteria and other search-related options, see Using the Search interface.
Figure 30: Search — Accessing session details
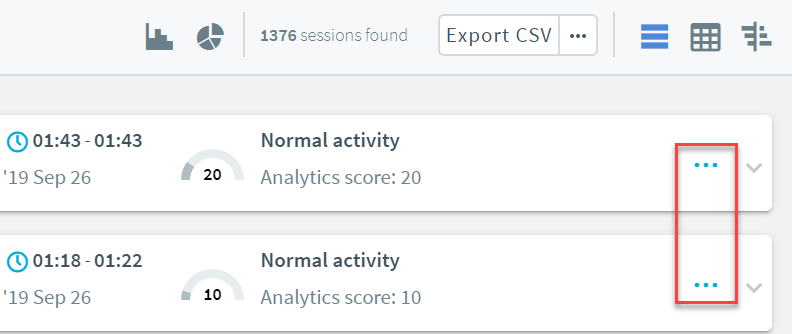
For more information about the session info window and its contents, see Viewing session details.
-
Click  to display the details of the connection.
-
Click  to generate a video file from the audit trail you want to replay. Depending on the load of the indexer and the length and type of the audit trail, this can take several minutes.
When the video is available, changes to  and
and  . You can use the button if you want to remove the generated video. After you remove the video file, the button is available and you can use it to recreate the video file.
-
- (Optional) If you have encrypted audit trails but the necessary certificates and private keys are not uploaded into your private keystore, you have to upload the keys first. After uploading them, click
 . The feature decrypts the encrypted upstream traffic elements. As a result, they will be displayed distributed in the generated video.
-
To replay the video, click .
The Player window opens.
-
Play the audit trail, and review your actions.
For more information about audit trails, see sections Encrypting audit trails, Replaying audit trails in your browserand Replaying encrypted audit trails in your browser.
