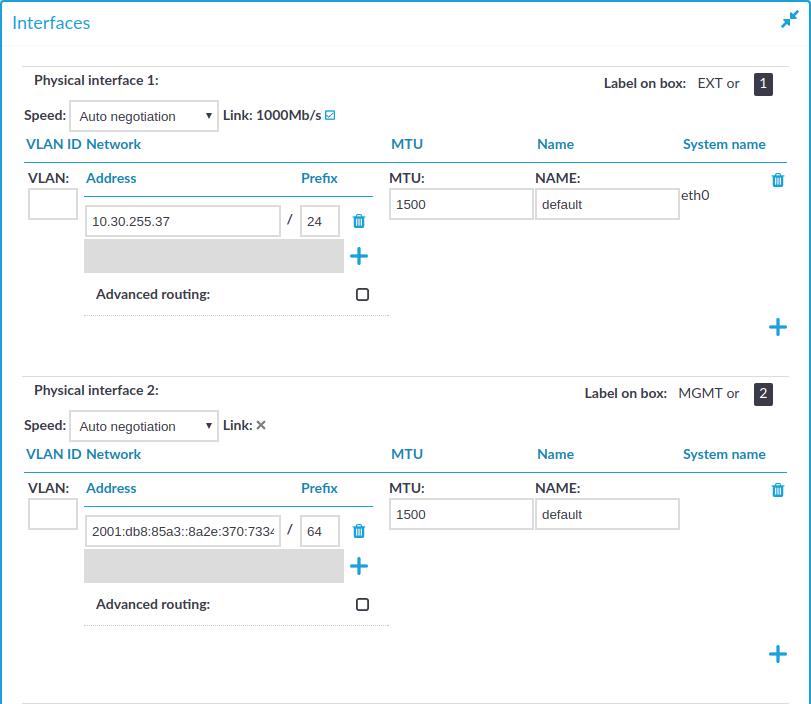
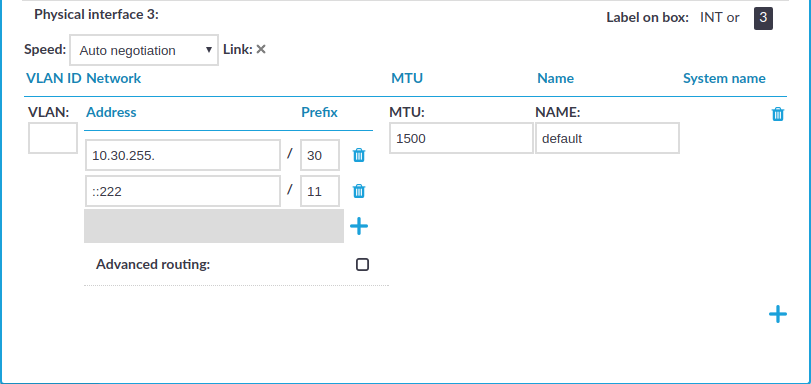
Managing logical interfaces
You can assign logical interfaces to a physical interface. Each logical interface must have its own VLAN ID, and can have its own set of (alias) IP addresses and prefixes. The configured name for each logical interface is visible on One Identity Safeguard for Privileged Sessions (SPS)'s user interface only.
You can configure IPv4 and IPv6 addresses as well. IPv6 is intended for configuring monitored connections. Local services (including the web login) require IPv4 addresses. An interface can have multiple IP addresses, including a mix of IPv4 and IPv6 addresses.
NOTE: SPS does not support scenarios with two hosts using the same IP address on different VLAN groups.
To manage logical interfaces
-
Navigate to Basic Settings > Network > Interfaces.
Figure 48: Basic Settings > Network > Interfaces — Managing the logical interfaces
-
If necessary, use the label on the SPS hardware to identify the physical interface to which you want to assign a logical interface.
-
Choose  to add a new logical interface. Provide the following:
-
VLAN: The VLAN ID of the logical interface. Optional.
|

|
Caution:
Do not set the VLAN ID unless your network environment is already configured to use this VLAN. Otherwise, your SPS appliance will be unavailable using this interface. |
-
Address: The IP address of the logical interface.
Alternatively, you can also enter a hostname instead. One Identity Safeguard for Privileged Sessions (SPS) automatically resolves the hostname to an IP address.
NOTE: Note the following limitations:
-
SPS uses the Domain Name Servers set in the Basic Settings > Network > Naming > Primary DNS server and Secondary DNS server fields to resolve the hostnames.
-
If the Domain Name Server returns multiple IP addresses, SPS selects randomly from the list.
NOTE: Do not use IP addresses that fall into the following ranges:
-
Prefix: The IP range of the logical interface.
-
Optional: To add additional (alias) IP addresses and prefixes to a logical interface, click . To remove an alias IP address, click the corresponding  .
.
-
MTU: Maximum Transmission Unit (MTU) to set per network interface (VLAN or network interface card). The default value is 1500.
-
Name: The name of the logical interface. This name is visible on SPS's user interface only.
To remove a logical interface, choose the on the right side.
-
Click  .
.
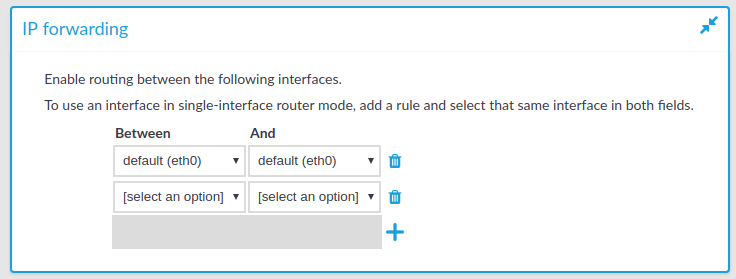
Routing uncontrolled traffic between logical interfaces
You can enable routing between logical interfaces, which allows you to direct uncontrolled traffic through SPS.
To enable routing between logical interfaces
-
Navigate to Basic Settings > Network > IP forwarding.
Figure 49: Basic Settings > Network > IP forwarding — IP forwarding between interfaces
-
To add a new forwarding rule, choose and select the two logical interfaces to connect. You can select the same interface in both fields to use that logical interface in single-interface router mode.
To delete an existing rule, choose .
-
Click .
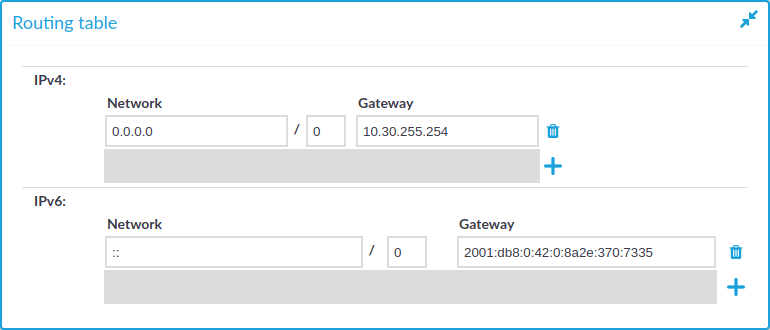
Configuring the routing table
The routing table contains the network destinations SPS can reach. You have to make sure that both the monitored connections, and the local services of SPS (including connections made to the backup and archive servers, the syslog server, and the SMTP server) are routed properly.
You can add multiple IPv4 and IPv6 addresses and address ranges along with their respective gateways.
To configure the routing table
-
To add a new routing entry, navigate to Basic Settings > Network.
You can add interface-specific network routes using the Advanced routing option of each interface. Otherwise, use the Routing table option to manage networking routes.
Figure 50: Basic Settings > Network > Routing table — Routing
-
Click  , then enter the IP address and the network prefix into the Network field.
-
Enter the IP address of the gateway used on that subnetwork into the Gateway field.
-
Click .
Configuring date and time
To configure the date and time-related settings of SPS, navigate to Basic Settings > Date & Time.
Figure 51: Basic Settings > Date & Time — Date and time management

|
|
Caution:
It is essential to set the date and time correctly on SPS, otherwise the date information of the logs and audit trails will be inaccurate.
SPS displays a warning on this page and sends an alert if the time becomes out of sync. |
To explicitly set the date and time on SPS, enter the current date into respective fields of the Date & Time settings group and click Set Date & Time.
When two SPS units are operating in High Availability mode, the secondary node automatically synchronizes its time and date to the primary node. To manually synchronize the time between the nodes, click Sync Master (available only in High Availability mode).
To retrieve the date automatically from a time server, complete the following steps:
-
Select your timezone in the Timezone field.
-
Enter the IP address of an NTP time server into the Address field.
Use an IPv4 address.
-
Click .
-
Click the and icons to add new servers or delete existing ones.
-
Optional: If the time setting of SPS is very inaccurate (that is, the difference between the system time and the actual time is great), it might take a long time to retrieve the date from the NTP server. In this case, click Sync Now or Sync Master to sync the time immediately using SNTP.
