Generating TSA certificate with Windows Certificate Authority on Windows Server 2008
To generate a TSA certificate with Windows Certificate Authority (CA) that works with One Identity Safeguard for Privileged Sessions (SPS), generate a CSR (certificate signing request) on a computer running OpenSSL and sign it with Windows CA, then import this certificate into SPS for timestamping.
Prerequisites
A valid configuration file for OpenSSL with the following extensions:
[ tsa_cert ]
extendedKeyUsage = critical,timeStamping
TIP: You can copy /etc/xcb/openssl-ca.cnf from SPS to the computer that will be used for signing. Rename the file to openssl-temp.cnf.
The TSA certificate is considered valid, in terms of compatibility with SPS, if the following conditions are met:
-
Must be a valid CA certificate (CA is true).
-
Key Usage: Time Stamping is required. No other key usage is permitted.
-
Extended Key Usage: Must be set to critical.
-
Optional Key Usage: If Key Usage is present, it must be digitalSignature and/or nonRepudiation. Other values are not permitted. Make sure that in Encryption, Allow key exchange without key encryption (key agreement) is selected.
|

|
Caution:
In Encryption, do NOT select Allow key exchange only with key encryption (key encipherment), because it will result in errors. |
The following X509v3 extensions are supported:
-
Hard requirement:
X509v3 Extended Key Usage must be critical, and must only contain Time Stamping.
-
Optional:
X509v3 Key Usage, if present, must be digitalSignature and/or nonRepudiation.
To generate TSA certificate with Windows Certificate Authority on Windows Server 2008
-
Create CSR using the new configuration file: openssl req -set_serial 0 -config openssl-temp.cnf -reqexts tsa_cert -new -newkey rsa:2048 -keyout timestamp.key -out timestamp.csr -nodes
-
Complete the required fields according to your environment:
Generating a 2048 bit RSA private key
........................+++
......................................+++
writing new private key to 'timestamp.key'
-----
You are about to be asked to enter information that will be incorporated
into your certificate request.
What you are about to enter is what is called a Distinguished Name or a DN.
There are quite a few fields but you can leave some blank
For some fields there will be a default value,
If you enter '.', the field will be left blank.
-----
Country Name (2 letter code) [AU]:US
State or Province Name (full name) []:New York
Locality Name (eg, city) []:New York
Organization Name (eg, company) [Internet Widgits Pty Ltd]:Examplecompany IT Security
Organizational Unit Name (eg, section) []:Service Delivery
Common Name (eg, YOUR name) []:scb35-1-i1.tohuvabohu.examplecompany
Email Address []:vlad@examplecompany.com
-
Sign the generated CSR with your Windows CA. Make sure that the CSR file is accessible from your Windows CA server.
-
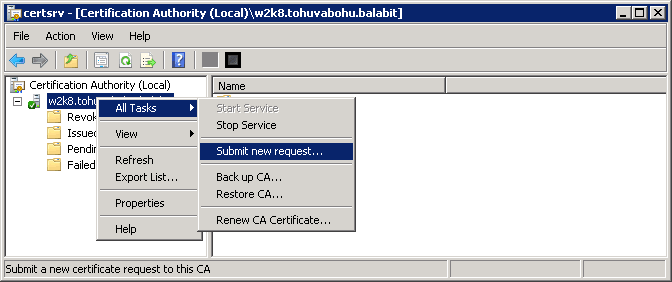
To issue and sign the new certificate request, open the Microsoft Certification Authority Management Console: Start > Run and run certsrv.msc.
-
Right-click on the server name and navigate to All Tasks > Submit new request....
Figure 142: Submitting a new request
-
Select the CSR created in the second step.
-
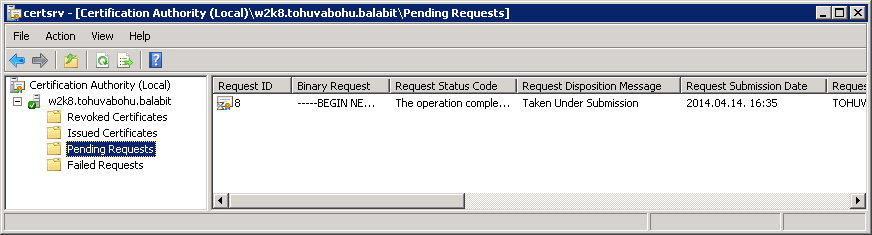
On the left pane, click Pending Requests. The new certificate request is displayed in the right pane.
Figure 143: Issuing a new certificate
-
To issue the new SSL certificate, right-click on the pending certificate request, select “All Tasks” and click on “Issue”.
-
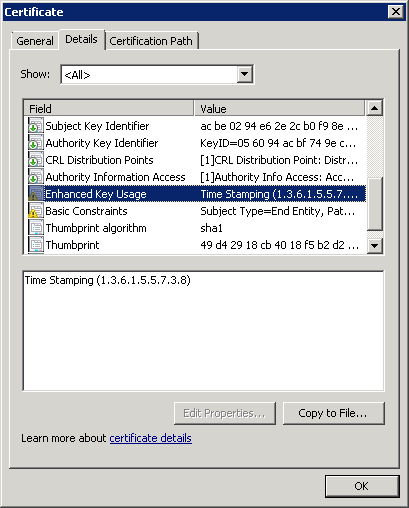
Select "Issued Certificates" and double-click on the certificate issued in the previous step.
-
The CA Certificate window opens. Navigate to the Details tab. Ensure that the required Enhanced Key Usage field is visible and contains the Time Stamping value.
Figure 144: Verifying certificate details
-
Click Copy to File. The Certificate Export Wizard launches. Click Next.
-
Select the format of the certificate: Base-64 encoded X.509 (.CER). Click Next.
Figure 145: Selecting certificate file format

-
Select location to save the certificate, and save it.
-
The Completing the Certificate Export Wizard screen is displayed. Click Finish.
-
In SPS, navigate to Basic Settings > Management > SSL certificates.
-
Click  next to TSA X.509 certificate, browse for the previously generated certificate, and click Upload.
-
Click next to TSA private key, browse for the previously generated key, and click Upload.
NOTE: If the root CA (the CA X.509 certificate field under Basic Settings > Management > SSL certificates) that is used for other certificates on SPS is different from the CA that was used to sign the TSA certificate, a warning is displayed. In this scenario, ignore this warning.
Generating TSA certificate with Windows Certificate Authority on Windows Server 2012
To generate a TSA certificate with Windows Certificate Authority (CA) that works with One Identity Safeguard for Privileged Sessions (SPS), generate a CSR (certificate signing request) on a computer running OpenSSL and sign it with Windows CA, then import this certificate into SPS for timestamping.
Prerequisites
A valid configuration file for OpenSSL with the following extensions:
[ tsa_cert ]
extendedKeyUsage = critical,timeStamping
TIP: You can copy /etc/xcb/openssl-ca.cnf from SPS to the computer that will be used for signing. Rename the file to openssl-temp.cnf.
The TSA certificate is considered valid, in terms of compatibility with SPS, if the following conditions are met:
-
Must be a valid CA certificate (CA is true).
-
Key Usage: Time Stamping is required. No other key usage is permitted.
-
Extended Key Usage: Must be set to critical.
-
Optional Key Usage: If Key Usage is present, it must be digitalSignature and/or nonRepudiation. Other values are not permitted. Make sure that in Encryption, Allow key exchange without key encryption (key agreement) is selected.
|
|
Caution:
In Encryption, do NOT select Allow key exchange only with key encryption (key encipherment), because it will result in errors. |
The following X509v3 extensions are supported:
-
Hard requirement:
X509v3 Extended Key Usage must be critical, and must only contain Time Stamping.
-
Optional:
X509v3 Key Usage, if present, must be digitalSignature and/or nonRepudiation.
To generate TSA certificate with Windows Certificate Authority on Windows Server 2012
-
Create CSR using the new configuration file: openssl req -set_serial 0 -config openssl-temp.cnf -reqexts tsa_cert -new -newkey rsa:2048 -keyout timestamp.key -out timestamp.csr -nodes
-
Complete the required fields according to your environment:
Generating a 2048 bit RSA private key
........................+++
......................................+++
writing new private key to 'timestamp.key'
-----
You are about to be asked to enter information that will be incorporated
into your certificate request.
What you are about to enter is what is called a Distinguished Name or a DN.
There are quite a few fields but you can leave some blank
For some fields there will be a default value,
If you enter '.', the field will be left blank.
-----
Country Name (2 letter code) [AU]:US
State or Province Name (full name) []:New York
Locality Name (eg, city) []:New York
Organization Name (eg, company) [Internet Widgits Pty Ltd]:Examplecompany IT Security
Organizational Unit Name (eg, section) []:Service Delivery
Common Name (eg, YOUR name) []:scb35-1-i1.tohuvabohu.examplecompany
Email Address []:vlad@examplecompany.com
-
Create and configure a time stamping web server template in the Certificate Authority, and use that to generate the TSA certificate.
-
Start the Certification Authority Microsoft Management Console, and select the CA server.
-
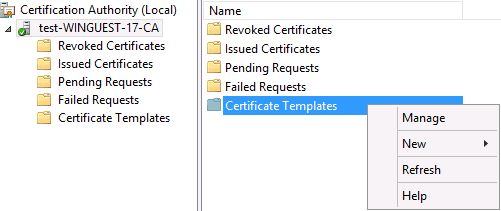
Right-click on Certificate Templates, and choose Manage.
Figure 146: Managing certificate templates
The Certificate Templates Console opens.
-
Right-click the Web Server template, and choose Duplicate Template.
Figure 147: Duplicating a Template

The Properties of New Template window is displayed.
-
Make the following changes to the new template:
-
On the General tab, change the Template display name to TSA.
Figure 148: Creating the new template

-
On the Request Handling tab, enable the Allow private key to be exported option.
-
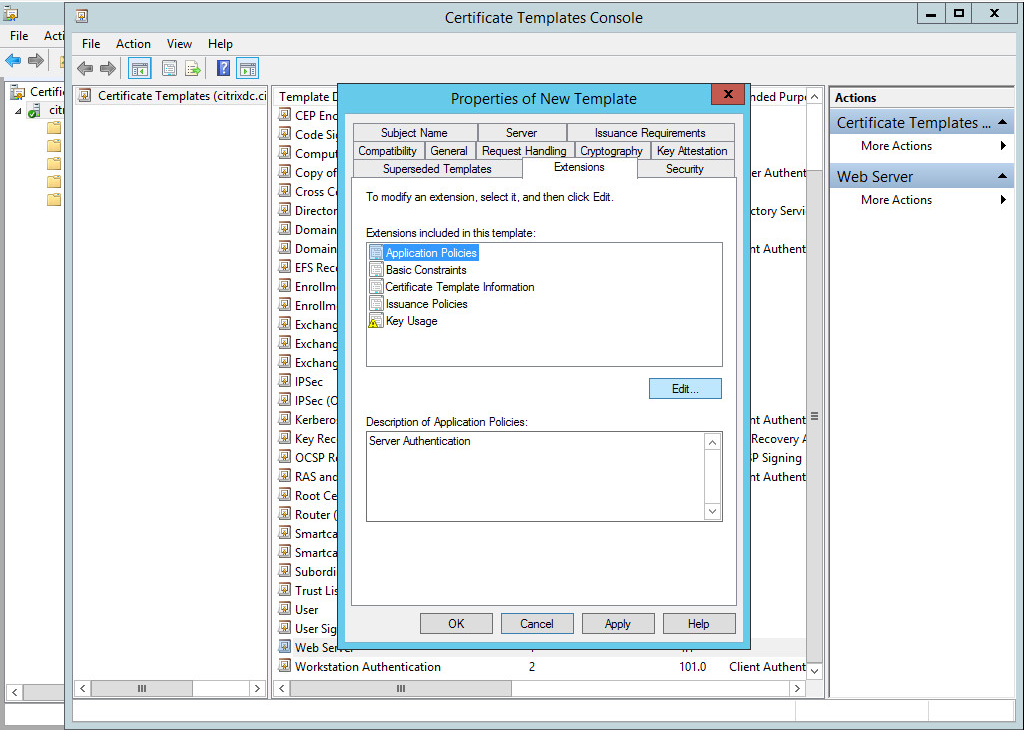
On the Extensions tab, make the following changes:
Edit Application Policies
Select Application Policies and click Edit below the list of extensions.
Figure 149: Editing Application Policies
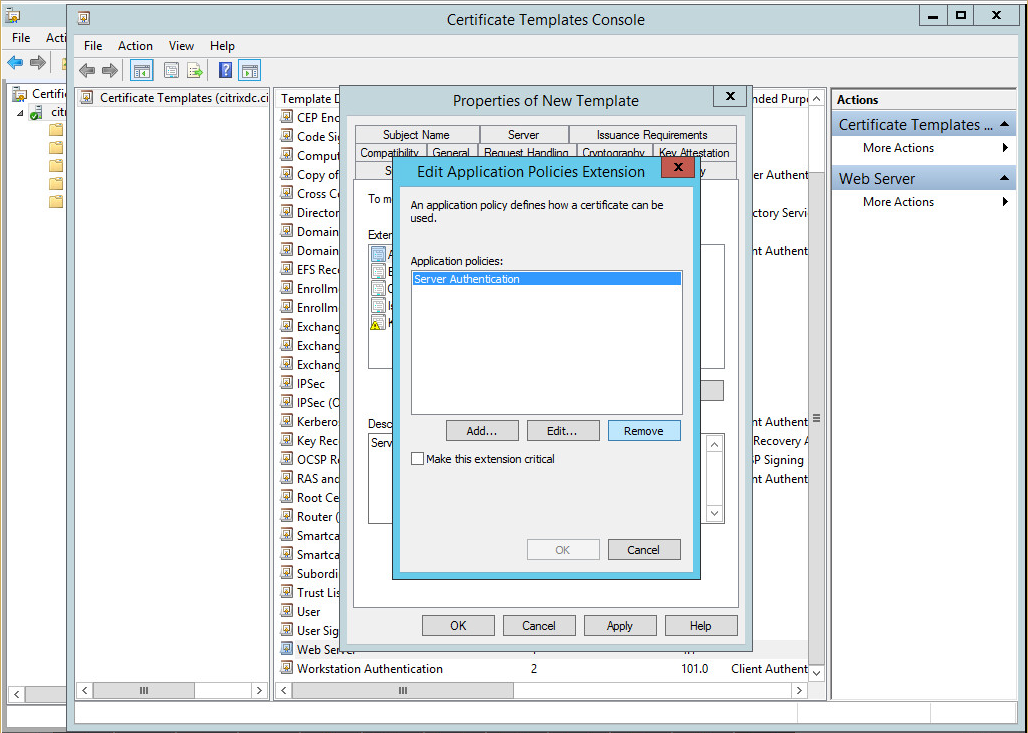
Remove Server Authentication
Select Server Authentication and click Remove.
Figure 150: Removing Server Authentication
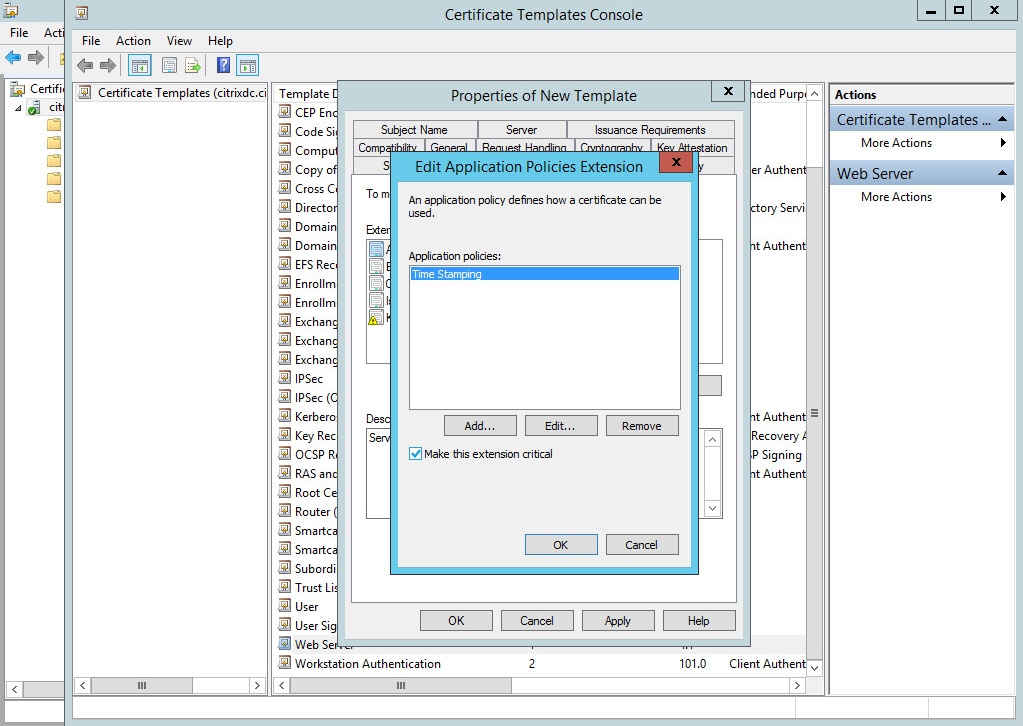
Add Time Stamping
Click Add, select Time Stamping and click OK.
Figure 151: Adding Time Stamping
Make Time Stamping critical
Select Time Stamping and enable the Make this extension critical option, then click OK.
Figure 152: Making Time Stamping critical
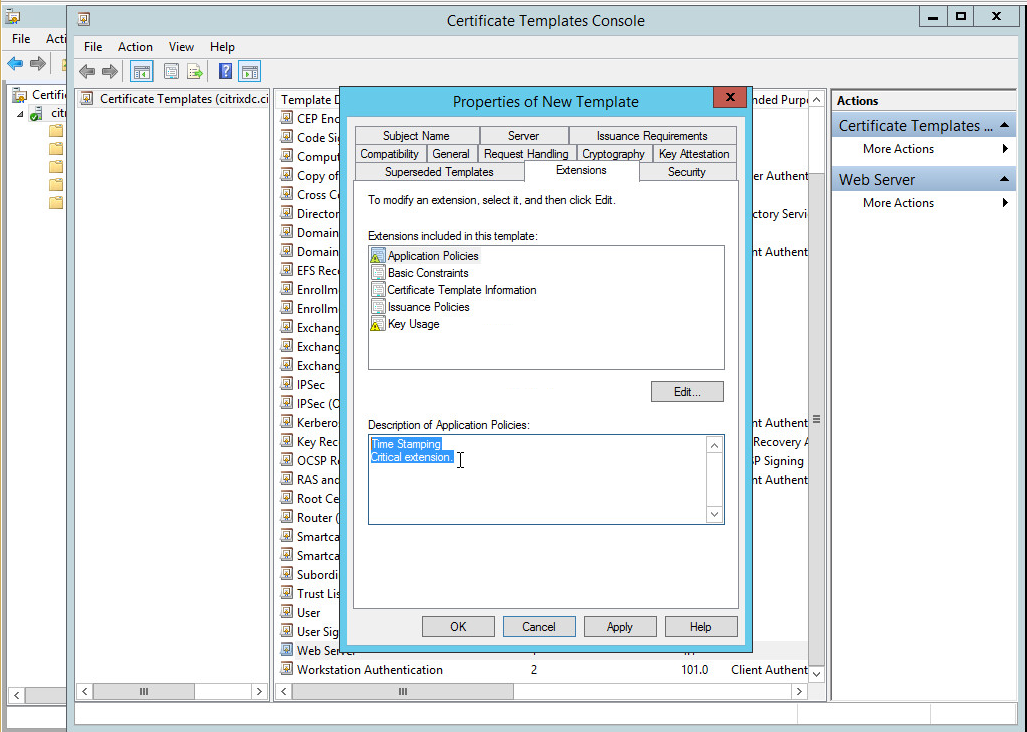
Time Stamping and Critical extension are listed in the Description of Application Policies.
Figure 153: Description of Application Policies
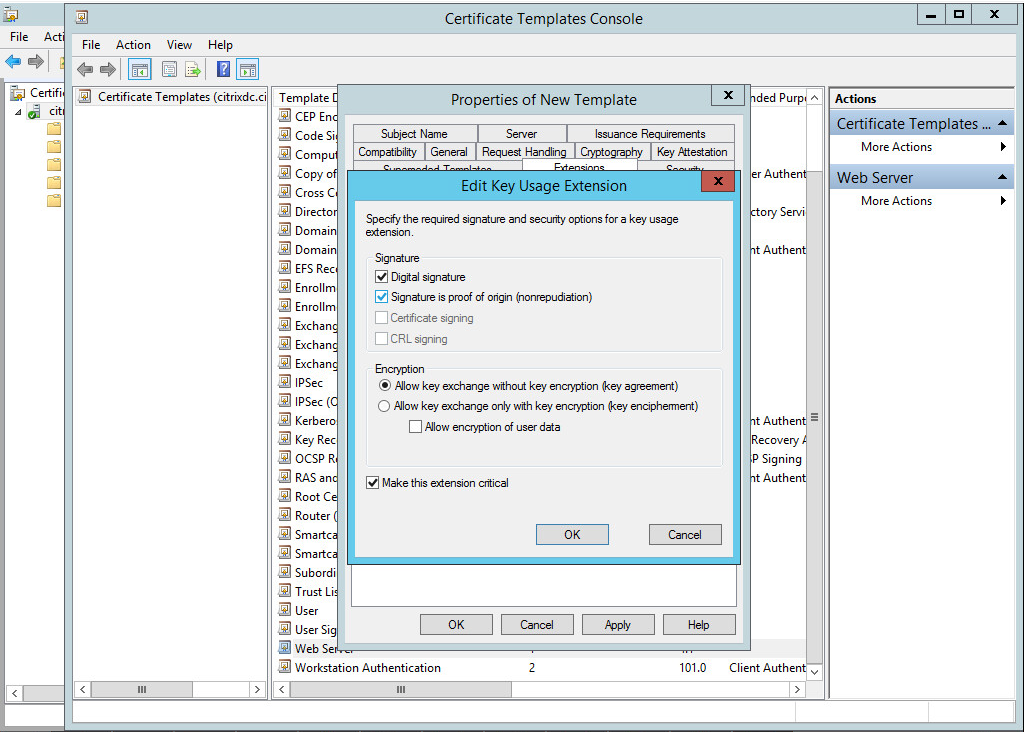
Edit Key Usage
Select Key usage, click Edit. Enable the Signature is proof of origin (nonrepudiation) option.
Select Allow key exchange without key encryption (key agreement).
Click OK.
Figure 154: Editing Key Usage
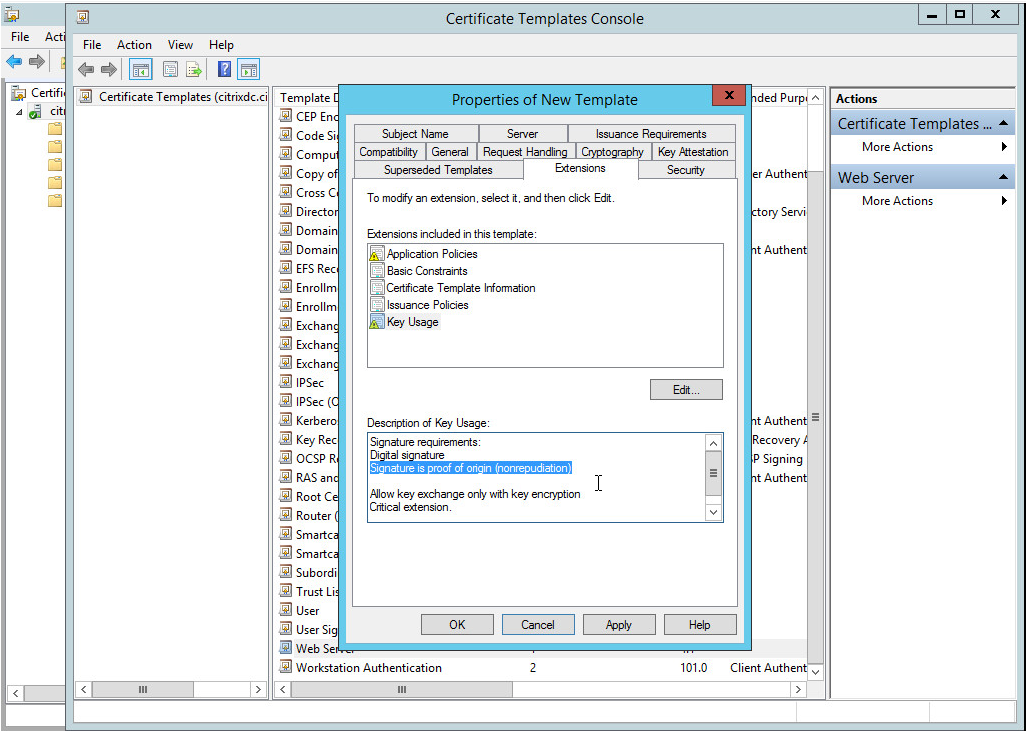
The following are listed in the Description of Key Usage.
Figure 155: Description of Key Usage
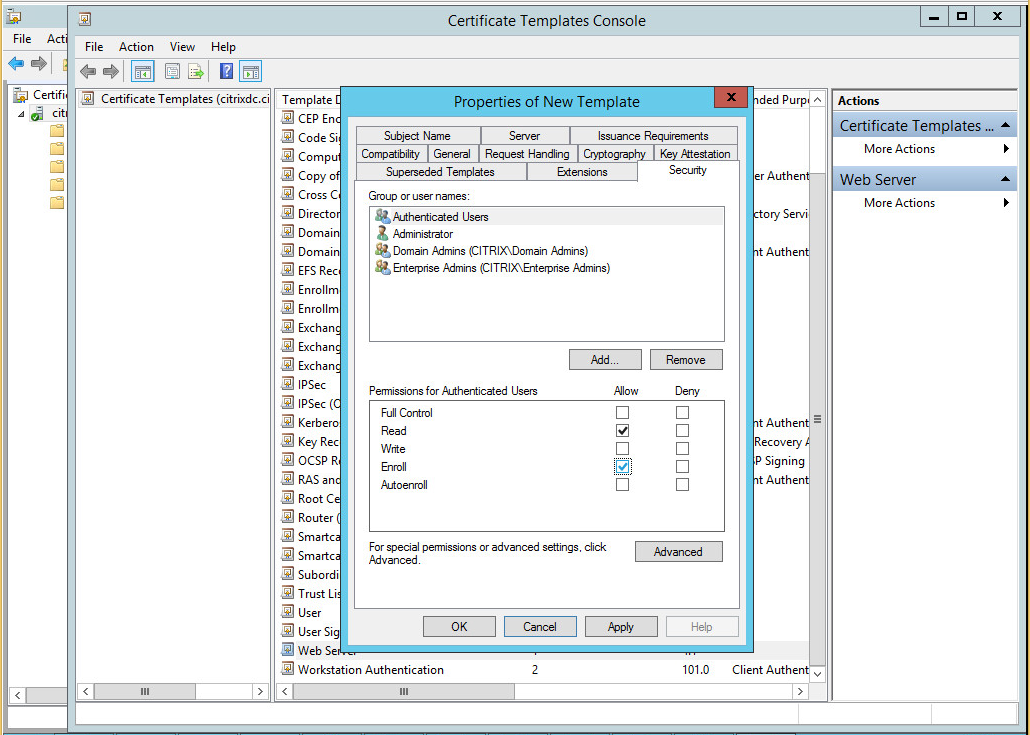
-
On the Security tab, select Authenticated Users, and set Enroll to Allow.
Figure 156: Configuring permissions for the template
-
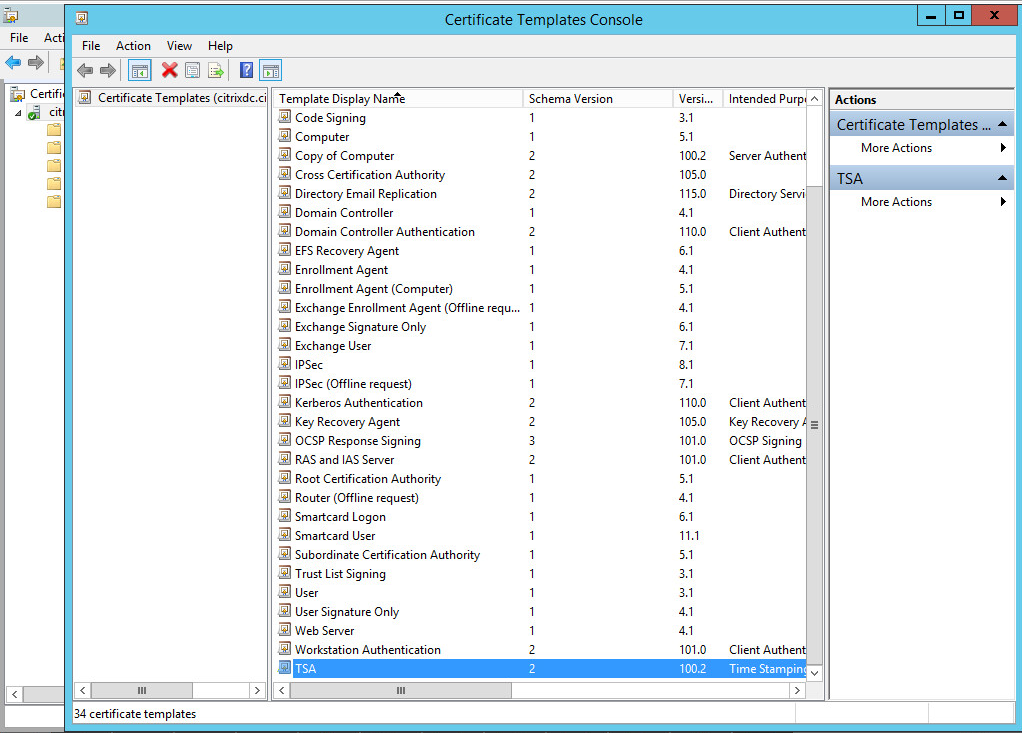
Click Apply. Click OK. The new TSA template is now displayed in the list of templates.
Figure 157: The new TSA template is now displayed in the list of templates
-
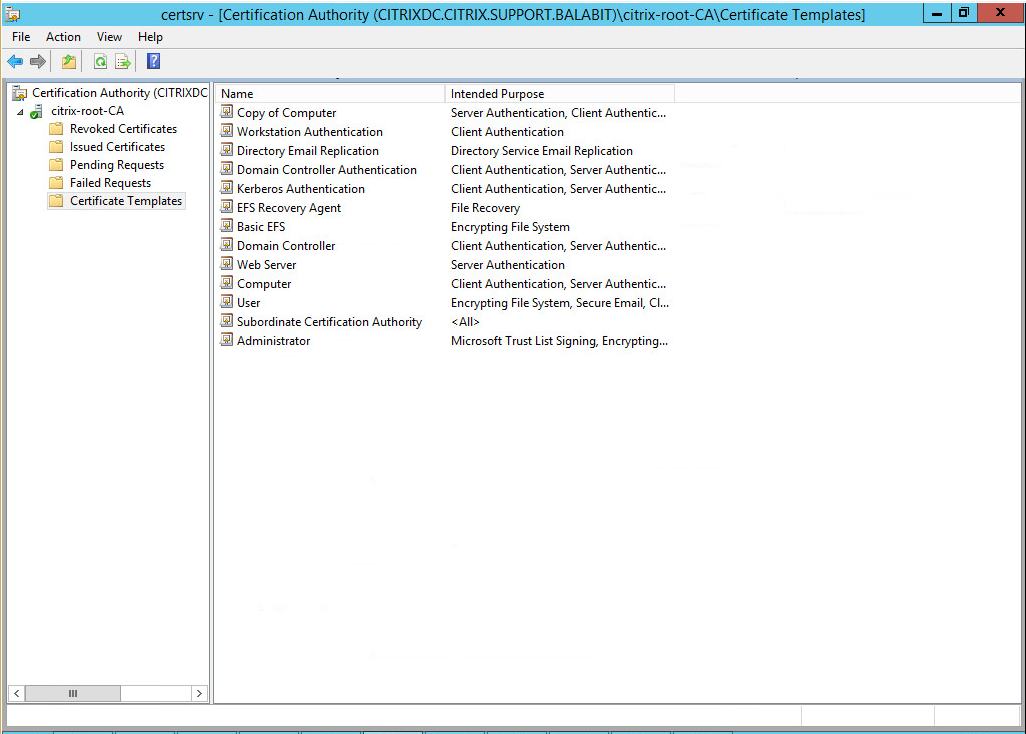
Close this window and return to the Certification Authority main screen, and select the Certificate Templates folder.
Figure 158: Certificate Templates
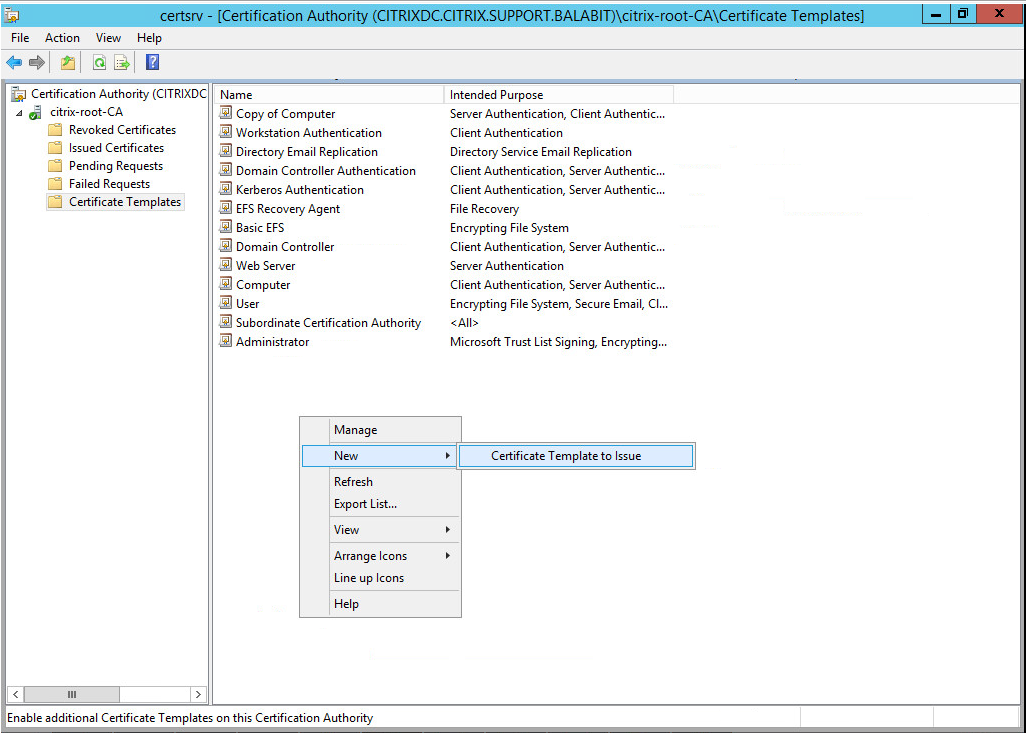
Right-click under the list, and choose New > Certificate Template to Issue.
Figure 159: Certificate Template to Issue
The Enable Certificate Templates window is displayed.
Figure 160: Enable the new template
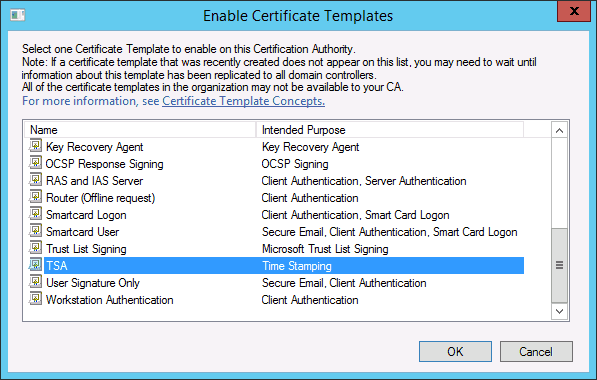
-
Select the TSA certificate template, and choose OK. Close this window.
-
Open the command line, and issue the following command:
certreq -submit -attrib "CertificateTemplate:TSA" <CSR>
Replace <CSR> with the full path of the CSR created earlier (in the second step).
-
The Certification Authority List is displayed. Select the CA.
-
The Save Certificate window is displayed. Choose an output folder.
The certificate is generated to the specified folder.
-
In SPS, navigate to Basic Settings > Management > SSL certificates.
-
Click next to TSA X.509 certificate, browse for the previously generated certificate, and click Upload.
-
Click next to TSA private key, browse for the previously generated key, and click Upload.
NOTE: If the root CA (the CA X.509 certificate field under Basic Settings > Management > SSL certificates) that is used for other certificates on SPS is different from the CA that was used to sign the TSA certificate, a warning is displayed. In this scenario, ignore this warning.
General connection settings
General connection settings
Connections determine if a server can be accessed from a particular client.
-
The policies used in the connection definition can restrict the availability of the connection based on the user name, time, authentication method, and so on. Channel policies (see Creating and editing channel policies) determine if a particular channel can be used within an already established connection.
-
The policies used in the channel policy can restrict the availability of the channel based on the server and the client IP address, user name, and so on. The types of policies available in a connection depend on the protocol (SSH, RDP, and so on) enabled in the connection.
One Identity Safeguard for Privileged Sessions (SPS) compares the connection policies to the parameters of the connection request one-by-one, starting with the first policy in the policy list. The first connection policy completely matching the connection request is applied to the connection.
This section describes how to configure connections, and details the general configuration options and policies that apply to every type of connection that SPS can control: HTTP, ICA, RDP, SSH, Telnet, and VNC. For a detailed list of supported protocol versions, see Supported protocols and client applications.
Protocol-specific configuration options are described in their respective sections: HTTP-specific settings, ICA-specific settings, RDP-specific settings, SSH-specific settings, Telnet-specific settings, and VNC-specific settings.
Configuring connections
The following describes how to configure connections.
NOTE:
When configuring HTTP or SSH connections, avoid using the IP address configured for administrator or user login on One Identity Safeguard for Privileged Sessions (SPS) .
To configure connections
-
Select the type of connection from the main menu.
-
To configure a HTTP connection, select HTTP Control > Connections.
-
To configure an ICA connection, select ICA Control > Connections.
-
To configure a Remote Desktop connection, select RDP Control > Connections.
-
To configure a Secure Shell connection, select SSH Control > Connections.
-
To configure a Telnet connection, select Telnet Control > Connections.
-
To configure a VNC connection, select VNC Control > Connections.
-
Click  to define a new connection and enter a name that will identify the connection (for example admin_mainserver).
TIP: It is recommended to use descriptive names that give information about the connection, for example refer to the name of the accessible server, the allowed clients, and so on.
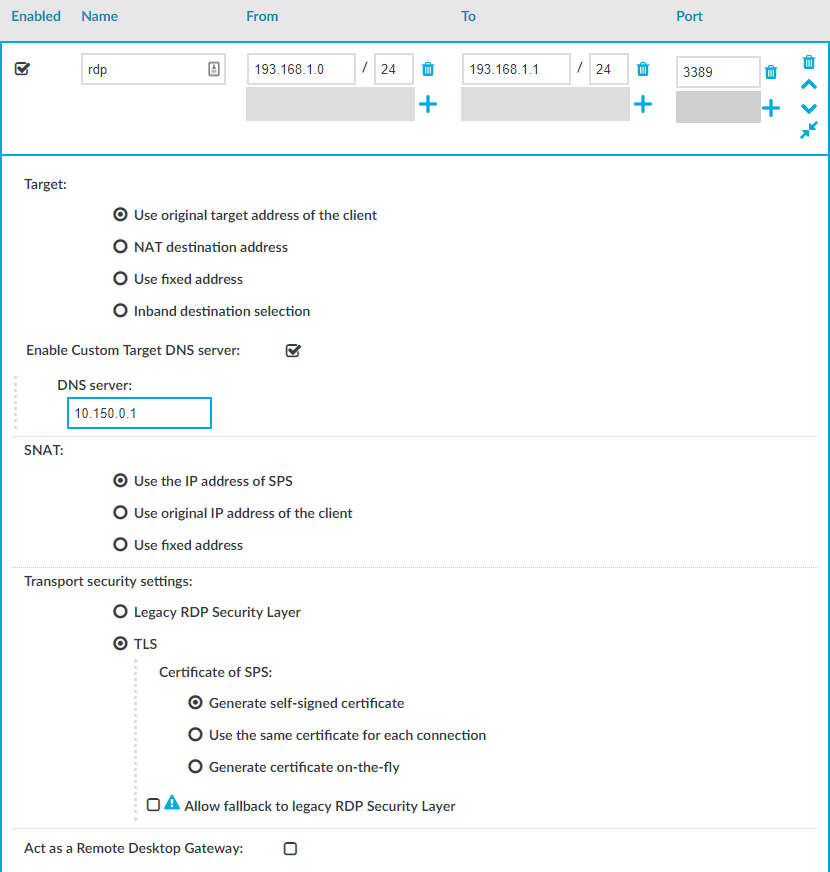
Figure 161: <Protocol name> Control > Connections — Configuring connections
-
Enter the IP address of the client that will be permitted to access the server into the From field. Click  to list additional clients.
You can use an IPv4 or an IPv6 address. To limit the IP range to the specified address, set the prefix to 32 (IPv4) or 128 (IPv6).
Alternatively, you can also enter a hostname instead. One Identity Safeguard for Privileged Sessions (SPS) automatically resolves the hostname to an IP address.
NOTE: Note the following limitations:
-
SPS uses the Domain Name Servers set in the Basic Settings > Network > Naming > Primary DNS server and Secondary DNS server fields to resolve the hostnames.
-
If the Domain Name Server returns multiple IP addresses, SPS selects randomly from the list.
-
Enter the IP address that the clients will request into the To field.
You can use an IPv4 or an IPv6 address. To limit the IP range to the specified address, set the prefix to 32 (IPv4) or 128 (IPv6).
Alternatively, you can also enter a hostname instead. One Identity Safeguard for Privileged Sessions (SPS) automatically resolves the hostname to an IP address.
NOTE: Note the following limitations:
-
SPS uses the Domain Name Servers set in the Basic Settings > Network > Naming > Primary DNS server and Secondary DNS server fields to resolve the hostnames.
-
If the Domain Name Server returns multiple IP addresses, SPS selects randomly from the list.
-
In non-transparent mode, enter the IP address of a SPS logical interface.
For more information on setting up logical network interfaces on SPS, see Managing logical interfaces.
-
In transparent mode, enter the IP address of the protected server.
Click to add additional IP addresses.
-
If the clients use a custom port to address the server instead of the default port used by the protocol, enter the port number that the clients will request into the Port field. Click to list additional port numbers.
NOTE: SPS can handle a maximum of 15 unique ports per connection policy. If you wish to specify more than 15 custom ports, create additional connection policies.
-
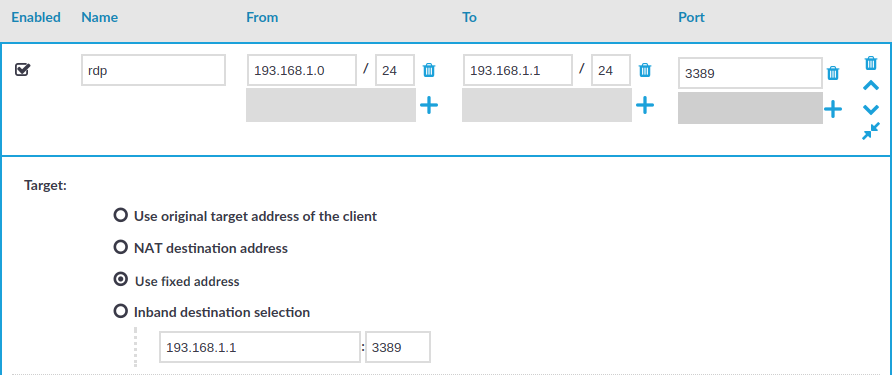
Non-transparent mode: Enter the IP address and port number of the target server into the Target field. SPS will connect all incoming client-side connections to this server. For details on organizing connections in non-transparent mode, see Organizing connections in non-transparent mode.
Figure 162: <Protocol name> Control > Connections — Configuring non-transparent connections
-
Configure advanced settings if needed, like network address translation, channel policy, gateway authentication, various policies, or other settings.
-
Click  to save the connection.
TIP: To temporarily disable a connection, deselect the checkbox before the name of the connection.
-
If needed, reorder the list of the connection policies. You can move connection policies by clicking the  and
and  buttons.
One Identity Safeguard for Privileged Sessions (SPS) compares the connection policies to the parameters of the connection request one-by-one, starting with the first policy in the policy list. The first connection policy completely matching the connection request is applied to the connection.
-
Depending on your needs and environment, you may want to set further settings for your connections.
-
To modify the destination or source addresses of the connections, see Modifying the destination address and Modifying the source address.
-
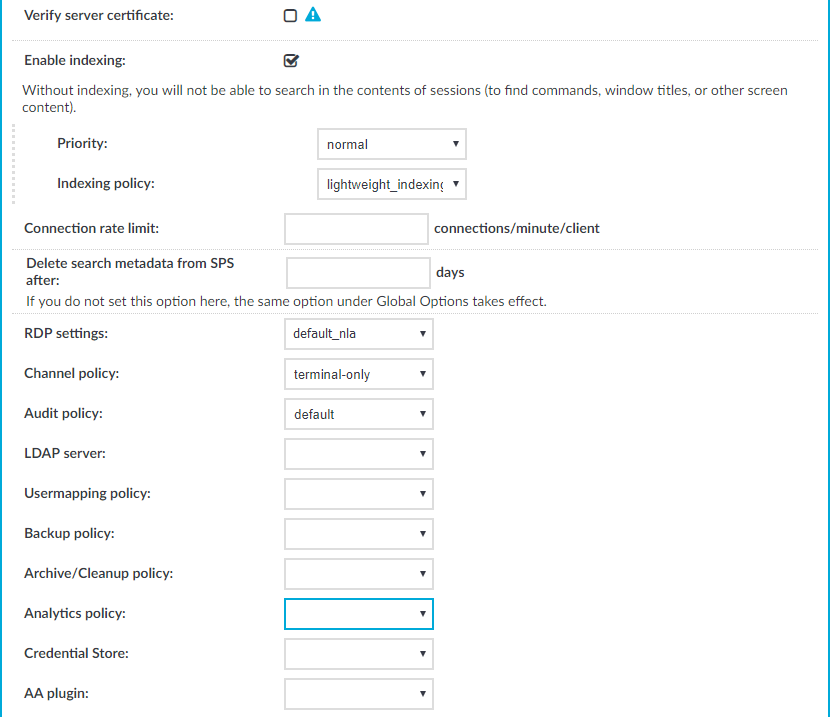
Select a Backup Policy and an Archiving Policy for the audit trails and indexes of the connection.
You can find more information on creating backup and archive policies in Data and configuration backups and Archiving and cleanup.
If you have indexed trails, the index itself is also archived:
When using the Indexer service: Every 30 days, unless the Backup & Archive/Cleanup > Archive/Cleanup policies > Delete data from SPS after is configured to occur less frequently (more than 30 days). For example, if the Delete data from SPS after is 60 days, the index will be archived every 60 days. The content of the archived index will be the content that was available X days before the archival date, where X is the number in the Delete data from SPS after field.
|
|
Caution:
Hazard of data loss Make sure you also backup your data besides archiving (for details, see Data and configuration backups). If a system crash occurs, you can lose up to 30 days of index, since the index is only archived in every 30 days. |
NOTE: The backup and archive policies set for the connection operate only on the audit trails and indexes of the connection. General data about the connections that is displayed on the Search page is archived and backed up as part of the system-backup process of SPS.
-
If you want to timestamp, encrypt, or sign the audit trails, configure an Audit Policy to suit your needs. For details, see Audit policies.
|
|
Caution:
In RDP connections, if the client uses the Windows login screen to authenticate on the server, the password of the client is visible in the audit trail. To avoid displaying the password when replaying the audit trail, you are recommended to encrypt the upstream traffic in the audit trail using a separate certificate from the downstream traffic. For details, see "Encrypting audit trails" in the Administration Guide. |
-
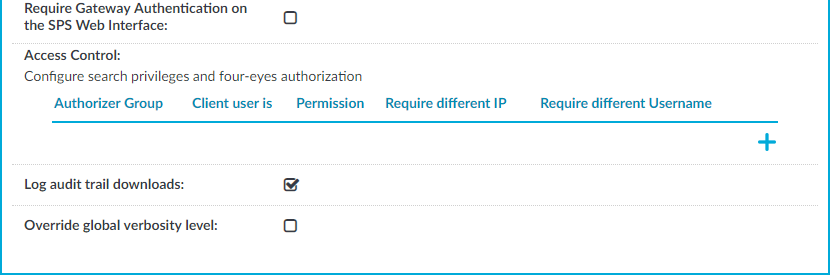
To require the users to authenticate themselves not only on the target server, but on SPS as well, see Configuring gateway authentication.
-
To require four-eyes authorization on the connections, with the possibility of an auditor monitoring the connection in real-time, see Configuring four-eyes authorization.
-
In the case of certain connections and scenarios (for example SSH authentication, gateway authentication, Network Level Authentication (NLA) connections), SPS can authenticate the user to an LDAP database, or retrieve the group memberships of the user. To use these features, select an LDAP Server. For details, see Authenticating users to an LDAP server.
NOTE:
To display the usergroups that can access a specific Connection Policy, open the Connection Policy, then select Show connection permissions > Show on the Connections page.
-
To limit the number of new connection requests accepted from a single client IP address per minute, enter the maximal number of accepted connections into the Connection rate limit field.
-
If your clients and servers support it, configure the connection to use strong encryption.
-
For graphical connections, adjust the settings of your servers for optimal performance:
-
|
|
Caution:
For optimal performance and text recognition in graphical protocols, disable antialiasing on your servers. Antialiased text in the audit trails of RDP, VNC, and X11 connections is not recognized by the OCR engine of the Audit Player. The indexer service recognizes antialiased text, but its accuracy depends on the exact antialiasing settings. Disable antialiasing in order to properly index the trails of these connections.
Note that antialiasing is enabled by default on Windows Vista and newer. Antialiasing is also called font smoothing. ClearType is an antialiasing technology used on Microsoft Windows, and should be disabled for optimal performance. |
-
When processing RDP connections, SPS attempts to extract the username from the connection. To ensure that your users can access the target servers only when their username is recorded, see Usernames in RDP connections.
