You can monitor the traffic of certain connections in real time, and execute various actions if a certain pattern (for example, a particular command or text) appears in the command line or on the screen, or if a window with a particular title appears in a graphical protocol. Since content-monitoring is performed real-time, One Identity Safeguard for Privileged Sessions (SPS) can prevent harmful commands from being executed on your servers. SPS can also detect numbers that might be credit card numbers. The patterns to find can be defined as regular expressions. In case of ICA, RDP, and VNC connections, SPS can detect window title content.
The following actions can be performed:
-
Log the event in the system logs.
-
Immediately terminate the connection.
-
Send an e-mail or SNMP alerts about the event.
-
Store the event in the connection database of SPS.
SPS currently supports content monitoring in SSH session-shell connections, Telnet connections, RDP and Citrix ICA Drawing channels, and in VNC connections.
NOTE: Command, credit card and window detection algorithms use heuristics. In certain (rare) situations, they might not match the configured content. In such cases, contact our Support Team to help analyze the problem.
Real-time content monitoring in graphical protocols is not supported for Arabic and CJK languages.
The following describes how to create a new content policy that performs an action if a predefined content appears in a connection.
NOTE: Using content policies significantly slows down connections (approximately 5 times slower), and can also cause performance problems when using the indexer service.
Figure 167: Policies > Content Policies — Content policies
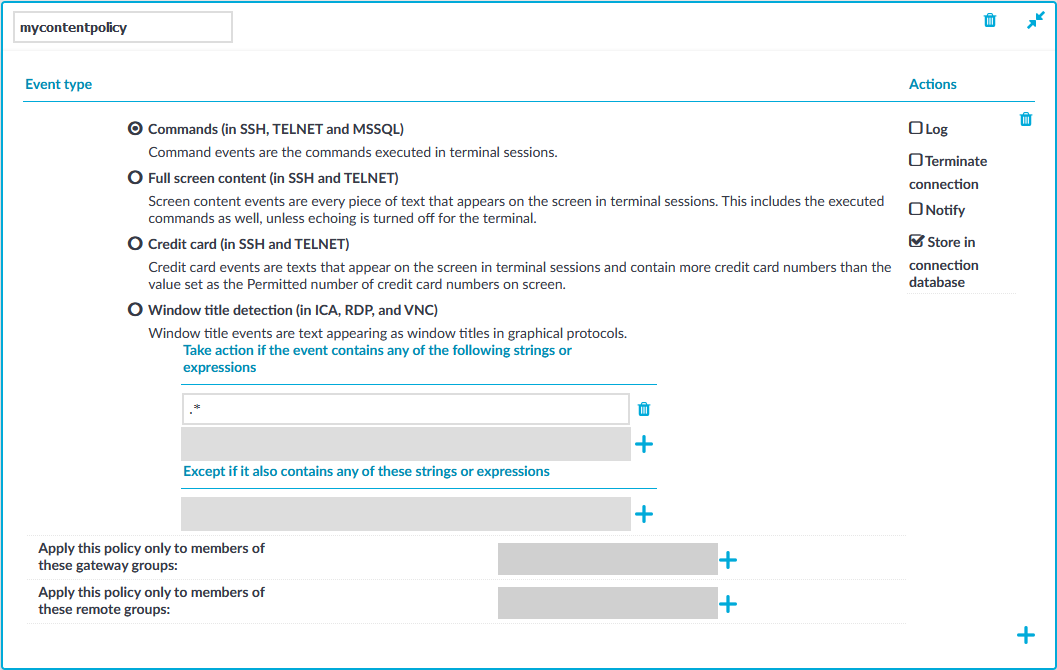
To create a new content policy that performs an action if a predefined content appears in a connection
-
Navigate to Policies > Content Policies, click  and enter a name for the policy.
-
Select the type of event that you want to monitor:
-
Commands: The commands executed in the session-shell channel of SSH connections, or in Telnet connections.
|

|
Caution:
During indexing, if a separate certificate is used to encrypt the upstream traffic, command detection works only if the upstream key is accessible on the machine running the indexer. |
NOTE: Command detection is case-insensitive.
-
Screen content: Every text that appears on the screen. For example, every text that is displayed in the terminal of SSH or Telnet connections. This includes the executed commands as well, unless echoing is turned off for the terminal.
-
Credit card: Process every text that appears on the screen and attempt to detect credit card numbers in SSH or Telnet connections. One Identity Safeguard for Privileged Sessions (SPS) performs an action if the number of detected credit card numbers exceeds the value set as Permitted number of credit card numbers.
Credit card number detection is based on the Luhn algorithm and lists of known credit card number prefixes.
-
Window title detection: Text appearing as window titles that can be detected on the screen in RDP, Citrix ICA, and VNC connections. Window title detection involves Optical Character Recognition (OCR) on parts of the screen, and can be slightly resource-intensive. SPS versions up till 6.2 only detected only the active window in the screen. From SPS version 6.3, multiple windows can be detected.
Limitations
-
Default Windows themes are supported.
-
Windows that do not have an X (close window) button in the top-right corner (or it is not visible) are not detected.
-
Use window title detection for sessions that use a single monitor. The feature works in multi-monitor environments as well, but becomes very slow, therefore it is not recommended.
-
Window title detection is case-insensitive.
-
Select Take action if the event contains any of the following strings or expressions, click and enter a string or regular expression. SPS will perform an action if this expression is found in the connection, unless it is listed in the Except if it also contains any of these strings or expressions list. For example, SPS can terminate the connection if the user issues the rm -rf * in an SSH connection. Repeat this step to add further expressions if needed.
-
Use Perl Compatible Regular Expressions (PCRE).
-
The following characters must be escaped using a backslash character: '(single-quote). For example, instead of .*' use .*\'
-
SPS uses substring search to find the expression in the content. That is, SPS finds the expression even if there is more content before or after the matching part. For example, the conf pattern will match the following texts: conf, configure, reconfigure, arcconf, and so on.
-
Using complicated regular expressions or using many regular expressions will affect the performance of SPS.
-
If the multiple expressions are set, SPS processes them one after the other, and stops processing the content if the first match is found, even if other expressions would also match the content. Therefore, when using multiple expressions, start with the most specific one, and add general expressions afterward.
Example: Sample regular expressions for content policies
The following simple regular expressions are samples to demonstrate what kinds of events that can be detected using content policies.
-
The enable command on Cisco devices: the user enters privileges mode.
-
The conf term command on Cisco devices: the user configures the networking parameters of the device.
-
The sudo and su - commands: the user enters privileged mode Linux and other UNIX platforms.
-
To add an exception to the Take action if the event contains any of the following strings or expressions rule, select Except if it also contains any of these strings or expressions, click and enter a string or regular expression. SPS will not perform any action if this expression is found in the connection. For example, to permit the users to delete only the /tmp directory in an SSH connection, enter rm -rf /tmp. Repeat this step to add further expressions if needed.
Example: Sample content policies using Ignore rules
The following expressions can be used to perform an action if any SQL command is used in MySQL, except for the select and help commands:
-
Into the Take action if the event contains any of the following strings or expressions expression, enter mysql>.*
-
Add two Except if it also contains any of these strings or Except if it also contains any of these strings or Except if it also contains any of these strings or expressions expressions: mysql> select.* and mysql> help.*
-
Select the action to perform.
-
Log: Send a log message into the system logs. The log message includes the expression that matched the content. On log level 6, the message includes the matching content as well.
-
Terminate connection: Immediately terminate the connection. When using the Terminate connection action for the Command event type, and a command matches an expression, the connection is terminated before the command is executed. When using the Terminate connection action, note the following points.
-
Select the Log or Notify action as well so that it is easy to find out why a connection was terminated.
-
If the connection is terminated by a content policy, the Verdict of the connection becomes ACCEPT-TERMINATED.
-
Notify: Send an e-mail or SNMP alert about the event. To configure the alerts, navigate to Basic Settings > Alerting & Monitoring and set the required alerts for the Real time audit event detected (scbAuditRealTime) event.
-
Store in connection database: Add the event to the SPS connection database. These events are displayed in the Alerts column of the Search page. If the column is not visible, click Customize columns....
-
To apply the content policy only for users belonging to specific groups, select Apply this policy only to members of these gateway groups or Apply this policy only to members of these remote groups, and specify the usergroups as needed. If Apply this policy only to members of these gateway groups or Apply this policy only to members of these remote groups is set, the content policy is applied only to connections of these usergroups.
-
To add a new rule to the policy, click and repeat Steps 2-6.
Note that if you have more than one rules in a policy, SPS evaluates them as follows.
-
SPS evaluates the first (top) rule.
-
If the rule contains Apply this policy only to members of these gateway groups or Apply this policy only to members of these remote groups restrictions, SPS checks if the current user belongs to any of the specified groups. If the groups do not match, SPS skips the rule.
-
If the content matches any entry of the Except if it also contains any of these strings or expressions list, SPS skips the rule.
-
If the content matches any entry of the Take action if the event contains any of the following strings or expressions list, SPS performs the action configured for the rule. Otherwise, SPS skips the rule.
-
If the current rule did not match the content, SPS evaluates the next rule of the policy (if any).
-
Click  . A new content policy is created.
-
To use the content policy created in the previous steps, select the policy in the channel policy that is used to control the connections.
NOTE: It is not required to enable auditing to use content policies.
The time policy determines the timeframe when the users are permitted to access a particular channel. By default, there is no time-based restriction, all channels are available 7x24.
Figure 168: Policies > Time Policies — Configuring time policies
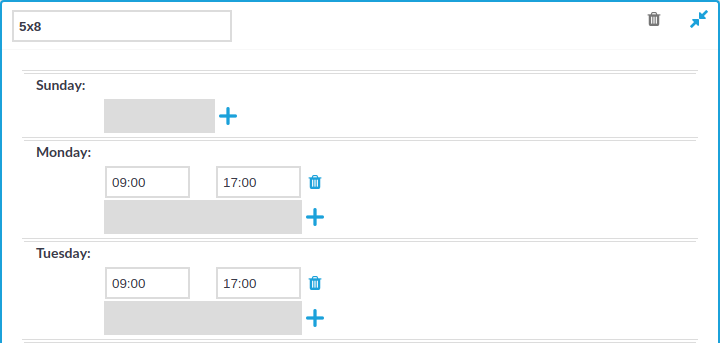
To create a time policy or edit an existing one
-
Navigate to the Time Policies tab of the Policies menu item and click to create a new time policy. Enter a name for the policy (for example workhoursonly).
-
Click  to display the days of the week and the allowed intervals.
-
Enter the intervals for each day when the users are allowed to access the connection. Use the hh:mm format (for example from 08:00 to 16:00).
-
To add multiple intervals for a day, click .
-
Click .
-
To actually restrict access to a connection or a channel based on the policy created in the previous steps:
User lists are white- or blacklists of usernames that allow fine-control over who can access a connection or a channel.
|
|
Caution:
User Lists are white- or blacklists of usernames that determine who can access the server remotely. However, this cannot prevent a user from accessing the server from a local terminal. |
Figure 169: Policies > User Lists — Configuring user lists
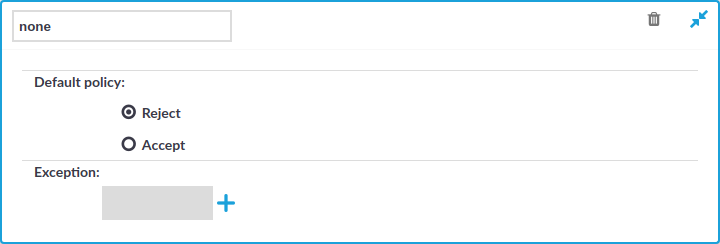
To create a new user list or edit an existing one
-
Navigate to the User Lists tab of the Policies menu and click to create a new user list. Enter a name for the list User List field (for example serveradmins).
|
|
Caution:
Usernames, the names of user lists, and the names of usergroups are case sensitive. |
-
Click to display the list of users.
-
Select the default policy of the user list. Select Reject for a whitelist, that is, to allow access only to the members of the list. Select Accept for a blacklist, that is, to allow access to everyone except the members of the list.
-
Click  and enter a username into the displayed field. Repeat this step until all required usernames are listed.
|
|
Caution:
Usernames, the names of user lists, and the names of usergroups are case sensitive. |
-
Click to save the list.
-
To actually restrict access to a channel based on the user list created in the previous steps:
-
Navigate to the Channel Policies tab of the type of connection you want to control and click to display the details of the policy.
-
Click in the Group section to add a new group to the policy and enter the name of the group. Repeat this step to add other groups.
|
|
Caution:
Usernames, the names of user lists, and the names of usergroups are case sensitive. |
NOTE: When listing more groups, users of any of the listed groups can access the channel. For details, see Creating and editing channel policies.
When listing both a whitelist and blacklist in the Group section and a username appears on both lists, the user will be able to access the channel.
-
Click .
