You can link your One Identity Safeguard for Privileged Sessions (SPS) deployment to your One Identity Safeguard for Privileged Passwords (SPP) deployment. That way you can jointly use the features of the two deployments.
Both appliances provide different functionality. You can use them together or independently from each other.
SPP provides:
-
Machine and account discovery
-
Password rotation and management
-
Advanced access request and approval workflows
-
A user portal and desktop application to initiate connections
SPS provides:
-
Transparent or non-transparent interception of remote admin protocols (SSH, RDP, Telnet, Citrix ICA, and VNC)
-
Audit recording and video-like playback of sessions
-
Inband authentication of the monitored users independently from the target servers
-
Basic access control policy enforcement
-
Advanced search and reporting capabilities in the audit records
-
Built-in user behavior analytics for the recorded sessions (One Identity Safeguard for Privileged Analytics)
Prerequisites
Before you start, ensure that Network Level Authentication (NLA) is enabled in the RDP setting policies. Also ensure that the CVE-2018-0886 update of the Credential Security Support Provider protocol (CredSSP) from Microsoft has been installed. For more information, see Creating and editing protocol-level RDP settings.
|

|
CAUTION: When linking your Safeguard for Privileged Sessions (SPS) deployment to your Safeguard for Privileged Passwords (SPP) deployment, ensure that the SPS and SPP versions match exactly, and you keep the versions synchronized during an upgrade. For example, you can only link SPS version 6.6 to SPP version 6.6, and if you upgrade SPS to version 6.7, you must also upgrade SPP to 6.7.
Make sure that you do not mix Long Term Supported (LTS) and feature releases. For example, do not link an SPS version 6.0 to an SPP version 6.1. |
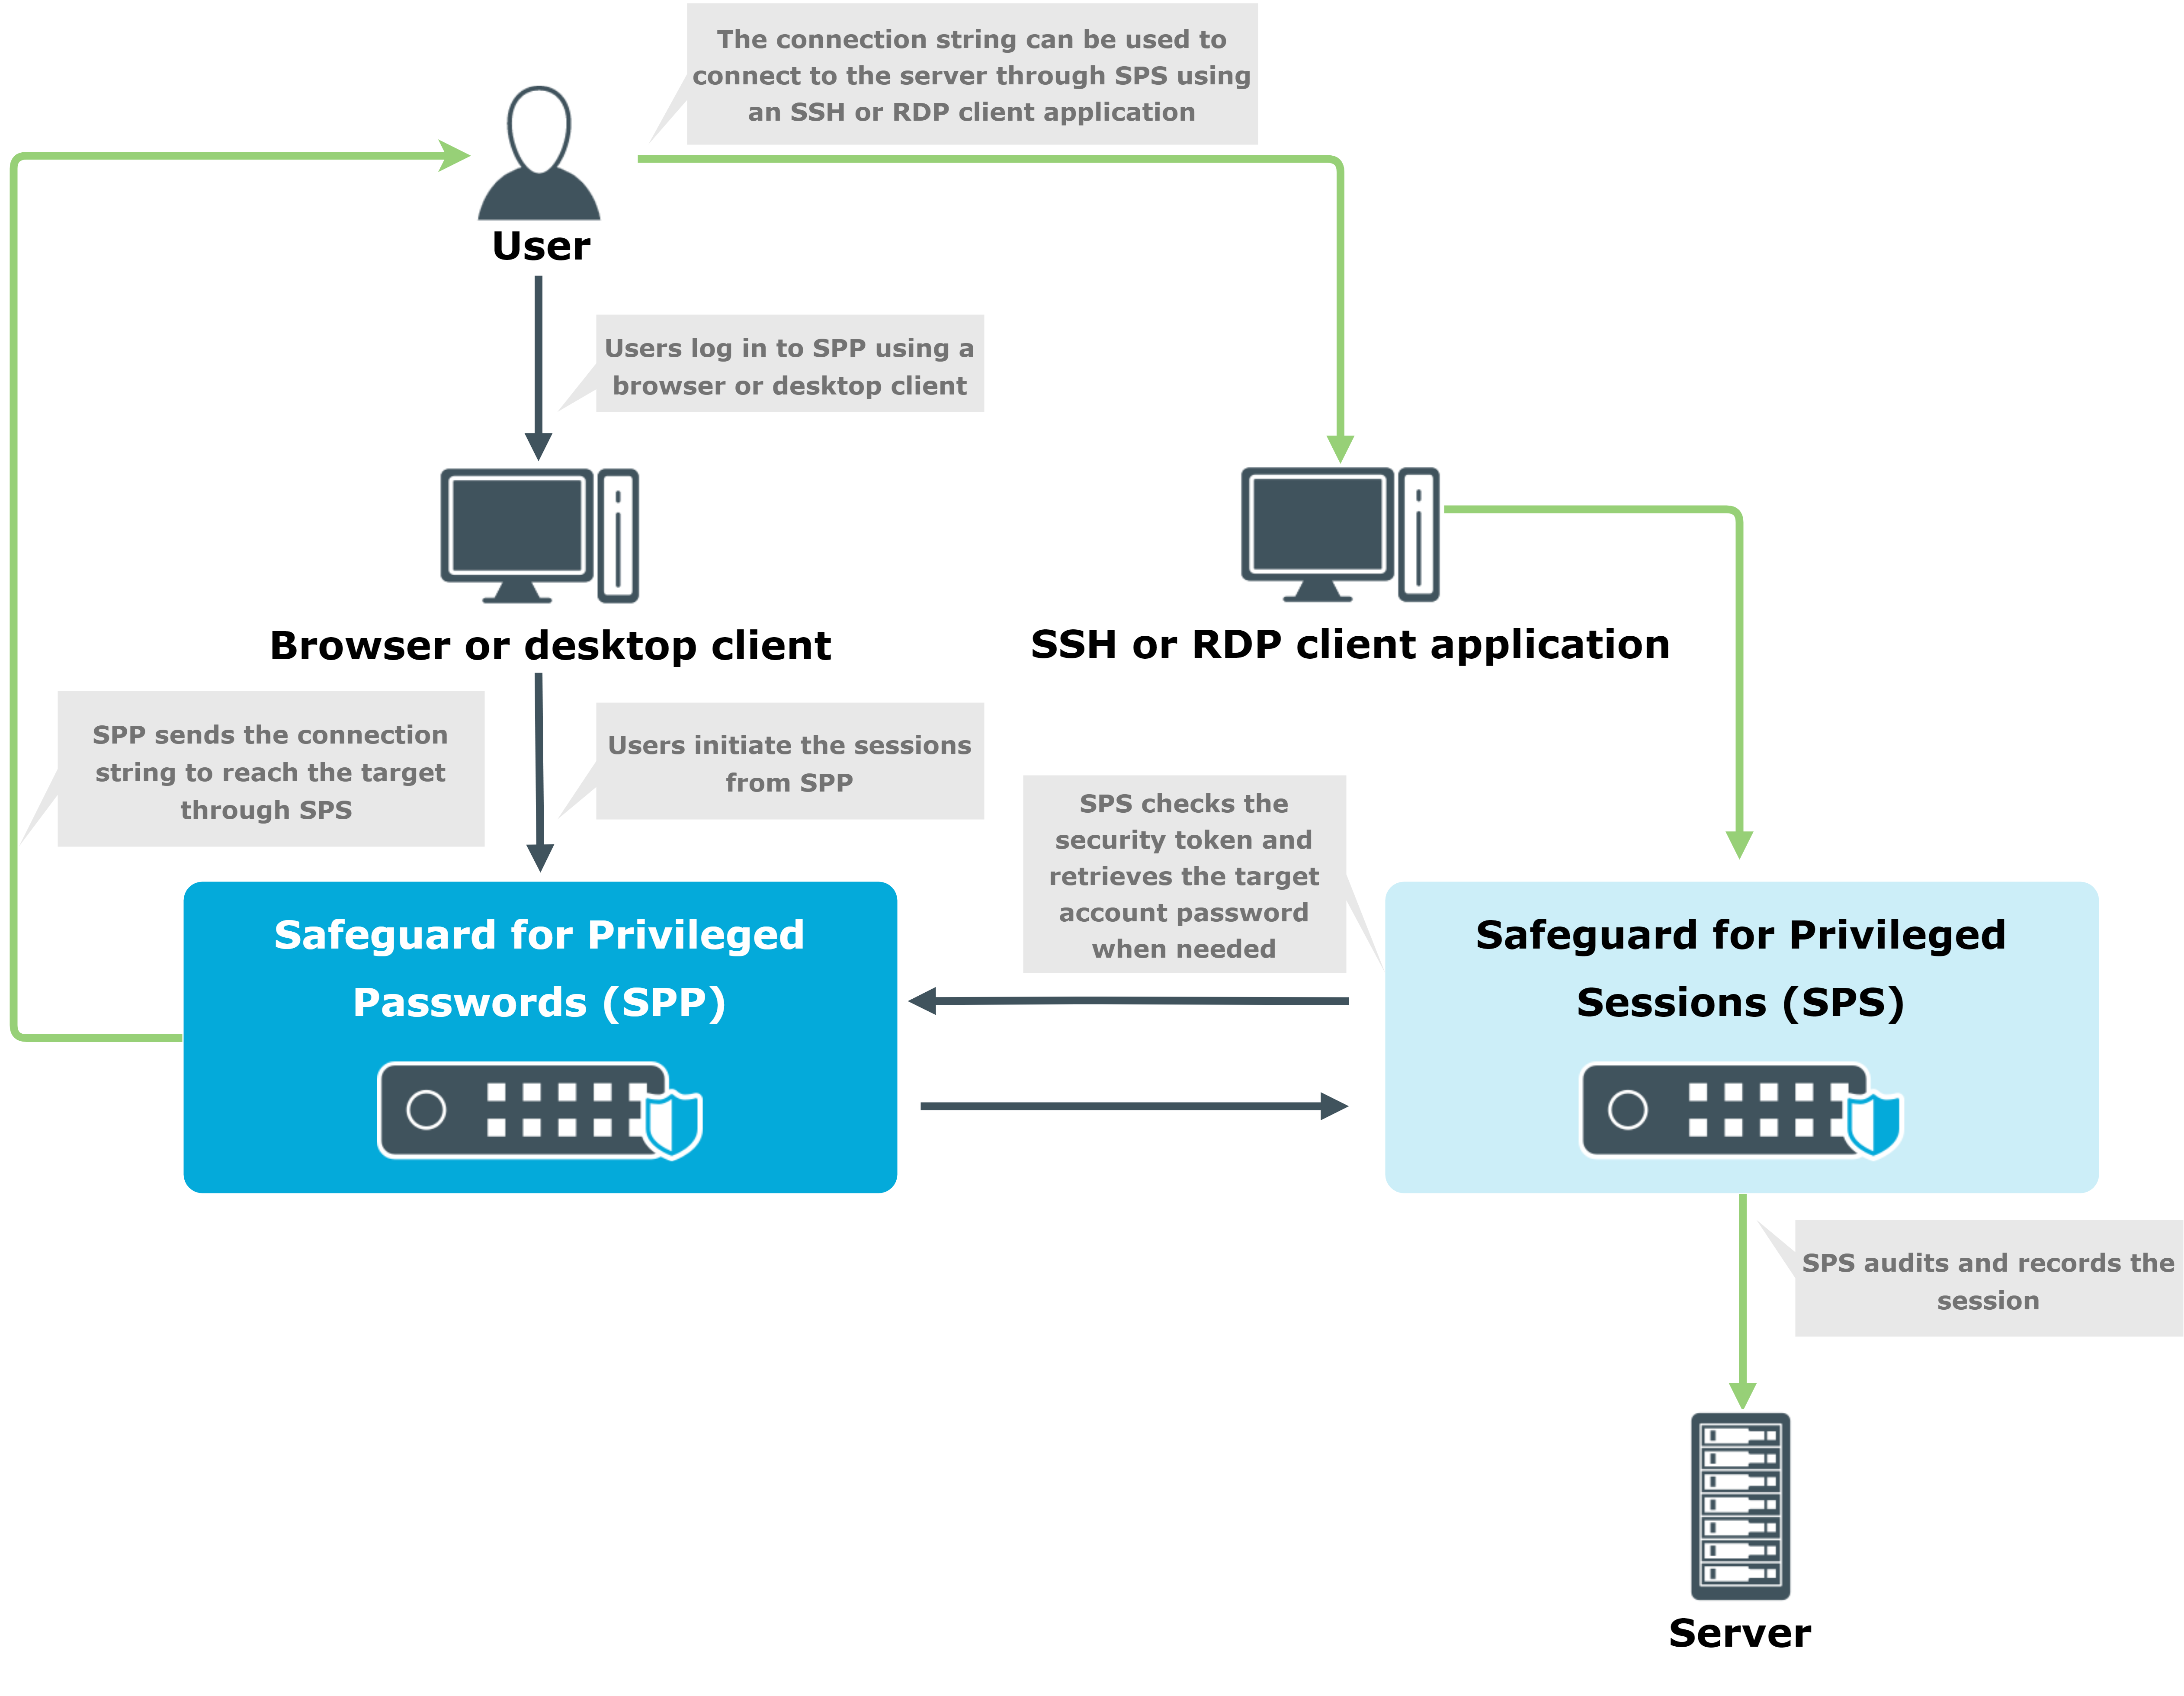
Passwords-initiated (SPP-initiated) workflow
In the Passwords-initiated workflow, the users initiate sessions from SPP. In this workflow SPP uses SPS as a session-recording device.
You can use your browser or the One Identity Safeguard desktop client to request access from SPP and initiate the connection to the target server via SPS. SPP creates an access string for the user’s SSH or RDP client that allows these clients to connect to the target server via SPS, so SPS can audit and record the session. In this sense this workflow is nontransparent, the user must use a browser or the One Identity Safeguard desktop client.
This is what all SPS users who bought the Sessions Module use before SPP version 2.7.
Figure 367: Passwords-initiated (SPP-initiated) workflow
For details on configuring this workflow, see Configuring SPP for Passwords-initiated workflow.
Sessions-initiated (SPS-initiated) workflow
In the Sessions-initiated workflow, the users initiate sessions from SPS. In this workflow SPS uses SPP as a credential store.
This workflow is transparent in the sense that you can connect to the target server or to SPS directly using your SSH or RDP client application. SPS authenticates these clients and communicates with SPP to get the password for the target server. It then uses that password to open the connection. Authentication happens on SPS, while authorization happens on SPP based on the user's entitlements.
This is what old and new users of standalone SPS are likely to prefer.
The usual SPP Access Requests workflows that SPP provides are supported:
Figure 368: Sessions-initiated (SPS-initiated) workflow

Passwords-initiated (SPP-initiated) workflow
In the Passwords-initiated workflow, the users initiate sessions from SPP. In this workflow SPP uses SPS as a session-recording device.
You can use your browser or the One Identity Safeguard desktop client to request access from SPP and initiate the connection to the target server via SPS. SPP creates an access string for the user’s SSH or RDP client that allows these clients to connect to the target server via SPS, so SPS can audit and record the session. In this sense this workflow is nontransparent, the user must use a browser or the One Identity Safeguard desktop client.
This is what all SPS users who bought the Sessions Module use before SPP version 2.7.
Figure 369: Passwords-initiated (SPP-initiated) workflow
For details on configuring this workflow, see Configuring SPP for Passwords-initiated workflow.
Prerequisites
To configure the Passwords-initiated (SPP-initiated) workflow
-
On SPS, link SPP and SPS as described in Linking SPS to SPP.
-
Configure SPP to use the linked SPS as described in Configuring SPP for Passwords-initiated workflow.
-
Optionally, customize monitoring settings as follows:
-
To make use of the more advanced features of SPS, you can change the safeguard_default Connection Policy or create a new Connection Policy and select that in SPP.
-
The critical setting is the AA plugin – make sure you use the same one as what the auto-generated one uses.
To configure SPP to use the linked SPS in Passwords-initiated (SPP-initiated) workflows, complete the following steps. For details on the workflow, see Using SPS with SPP.
Prerequisites
To configure SPP for Passwords-initiated workflow
-
On SPP, assign the managed networks for sessions management.
-
Navigate to Administrative Tools > Settings > Cluster > Managed Networks.
-
Add the network you want to monitor with SPS and choose the SPS appliance for the Sessions Managed By field.
-
Select the SPS for the access request policy.
-
Navigate to Administrative Tools > Entitlements > Access Request Policies > (create or edit a policy).
-
On the Session Settings tab of the selected policy, select the SPS Connection Policy. The IP address of the cluster master is displayed first followed by the SPS Connection Policy name (safeguard_default by default).
Sessions-initiated (SPS-initiated) workflow
In the Sessions-initiated workflow, the users initiate sessions from SPS. In this workflow SPS uses SPP as a credential store.
This workflow is transparent in the sense that you can connect to the target server or to SPS directly using your SSH or RDP client application. SPS authenticates these clients and communicates with SPP to get the password for the target server. It then uses that password to open the connection. Authentication happens on SPS, while authorization happens on SPP based on the user's entitlements.
This is what old and new users of standalone SPS are likely to prefer.
The usual SPP Access Requests workflows that SPP provides are supported:
Figure 370: Sessions-initiated (SPS-initiated) workflow
Prerequisites
|
|
CAUTION: When linking your Safeguard for Privileged Sessions (SPS) deployment to your Safeguard for Privileged Passwords (SPP) deployment, ensure that the SPS and SPP versions match exactly, and you keep the versions synchronized during an upgrade. For example, you can only link SPS version 6.6 to SPP version 6.6, and if you upgrade SPS to version 6.7, you must also upgrade SPP to 6.7.
Make sure that you do not mix Long Term Supported (LTS) and feature releases. For example, do not link an SPS version 6.0 to an SPP version 6.1. |
Limitations
-
Only SSH and RDP sessions are supported.
-
Users must perform gateway authentication on SPS with the same username they have Entitlements for in SPP.
-
For SSH sessions, the gateway authentication can use a Local User Database, an LDAP server, or an Active Directory server as authentication backend.
Note that SPP does not support every type of LDAP and Active Directory settings that SPS does. Verify that you can configure both appliances to access and retrieve data from the LDAP or Active Directory server.
-
For RDP sessions, SPS must be configured to act as a Remote Desktop Gateway. For details, see Using One Identity Safeguard for Privileged Sessions (SPS) as a Remote Desktop Gateway.
The gateway authentication can use a Local User Database or an Active Directory server as authentication backend. When using an Active Directory server, note the following points.
-
Both SPS and SPP must use the same server, and be the member of the same domain as the Active Directory server.
-
SPP does not support every type of Active Directory settings that SPS does. Verify that you can configure both appliances to access and retrieve data from the Active Directory server.
-
SPS does not receive the domain of the authenticated user from the Domain Controller. SPS assumes that the user belongs to the same domain that SPS is joined into. (Configuring trust between the Domain Controller of SPS and the Domain Controller of the user does not solve this problem.)
-
You must use a uniform address for the target server. Use either its IPv4 address or its hostname everywhere: when configuring the Assets in SPP, the Connection Policies and Channel Policies in SPS, and also when the user sets the target address in the SSH/RDP application. Otherwise, the authentication will fail.
To configure the Sessions-initiated (SPS-initiated) workflow
-
On SPS, link SPP and SPS as described in Linking SPS to SPP.
-
Configure SPP to allow SPS to request passwords from SPP as described in Configuring SPP for Sessions-initiated workflow.
-
Configure SPS to use the linked SPP as a Credential Store as described in Configuring SPS for Sessions-initiated workflow.
-
Optionally, customize monitoring settings as follows:
