
Configuring a front-end authentication method
Microsoft® Active Directory® authentication
Configuring smart card authentication
LDAP authentication
Microsoft® Active Directory® LDS
389 Directory Service
Novell® eDirectory™
Windows Azure™ Active Directory® authentication
SAML federated
WS-Federated
Social authenticators
Integration with password management applications
Primary credentials
Configuring user front-end authentication method selection
Adding a web application
Integrated Windows Authentication
Form fill authentication
Proxy-less form fill authentication
SAML federation
Configuring advanced SAML token settings
Configuring advanced WS-Federation token settings
OpenID Connect/OAuth 2.0
Manual user provisioning
HTTP basic authentication
HTTP header value
No back-end SSO
Exporting an application configuration template
Forwarding claims to federated applications
Adding HTTP headers to proxy applications
Configuring step-up authentication
Configuring front-end authenticators
Configuring each application
Configuring for external users
Configuring Defender as a Service with Cloud Access Manager
Using Dell's Security Analytics Engine
Enabling Dell's Security Analytics Engine
Configuring Cloud Access Manager to use Dell's Security Analytics Engine for access control
Managing your SSL certificate
Obtaining a signed certificate
Replacing an expiring certificate
Installing a fully signed certificate from a certificate archive file
Installing a certificate authority certificate
Changing the Cloud Access Manager service account password
Cloud Access Manager IIS Application Pool
Dell Redistributable Secure Token Server
Front-end authenticators
Reporting
Customizing Dell™ One Identity Cloud Access Manager
Primary credentials
Configuring user front-end authentication method selection
|
1 |
Log in to the Administration Console, navigate to the Settings page and click Home Realm Discovery Options. |
|
2 |
Select Home realm discovery mode. There are two options with this mode: |
|
• |
User selects home realm from a list — the user can either select the home realm from a list. |
|
• |
User enters text to identify home realm — the user can enter text to match against. Typically, this will be an email address, where the domain of the email address is used to determine the front-end authenticator. |
If you select User selects home realm from a list then no further configuration is required; if you select User enters text to identify home realm, you will see the following.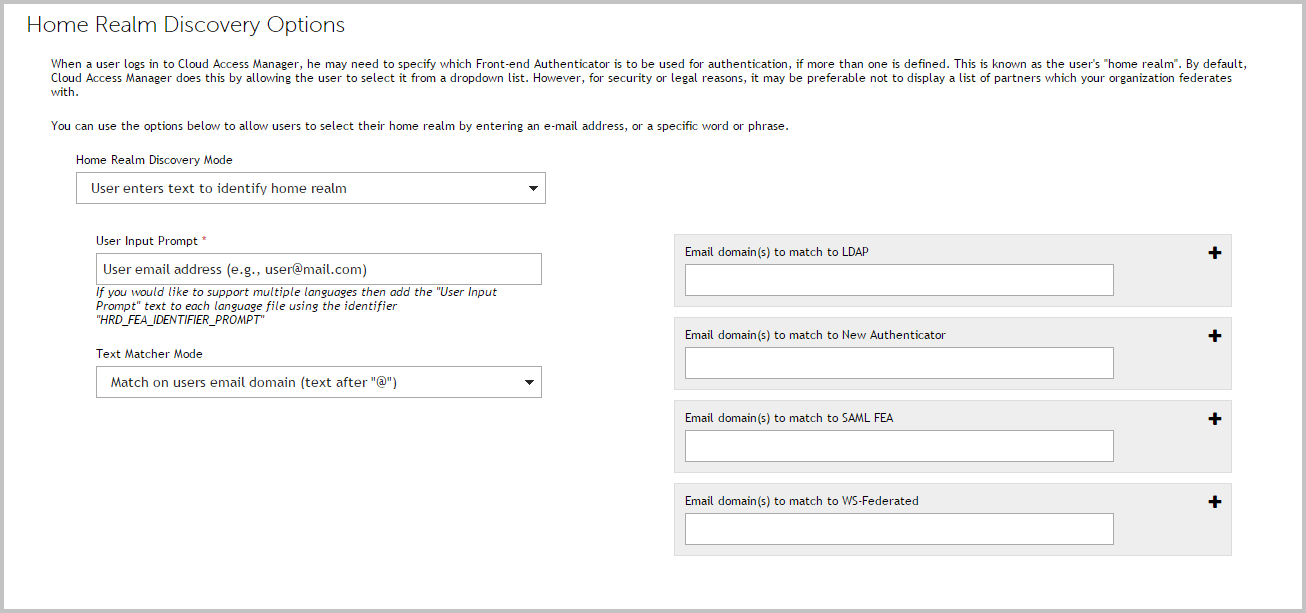
|
3 |
In the User Input Prompt field, enter the prompt that will be displayed to your users the first time they authenticate through Cloud Access Manager. |
|
4 |
Select an option from the Text Matcher Mode list to determine how the text entered by the user will be matched. |
|
5 |
|
NOTE: If you need to configure the matching text for a front-end authenticator after the initial configuration, you can either navigate back to the Home Realm Discovery Options page in Settings, or go to the Front-end Authentication page and edit the required front-end authenticator. You will then see an extra Home Realm Discovery tab that allows you to edit the matching text for that front-end authenticator. In addition, if you have previously configured home realm discovery to use text matching, you will see the Home Realm Discovery tab as part of the wizard when you add a new front-end authenticator. |
By default, the user will only be shown the Home Realm Discovery choice the first time they authenticate through Cloud Access Manager.
To show the Home Realm Discovery page each time the user authenticates
|
1 |
Navigate to the Settings page. |
|
2 |
Click Turn Features On/Off. |
|
3 |
If Home Realm Discovery is configured to display a list of front-end authenticators, the user will see a screen similar to that displayed below. The user must select the correct front-end authenticator from the list and click Log in. Authentication will then be directed to the selected front-end authenticator.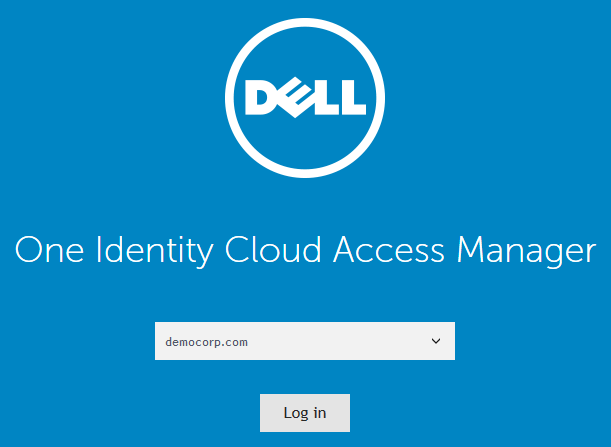
|
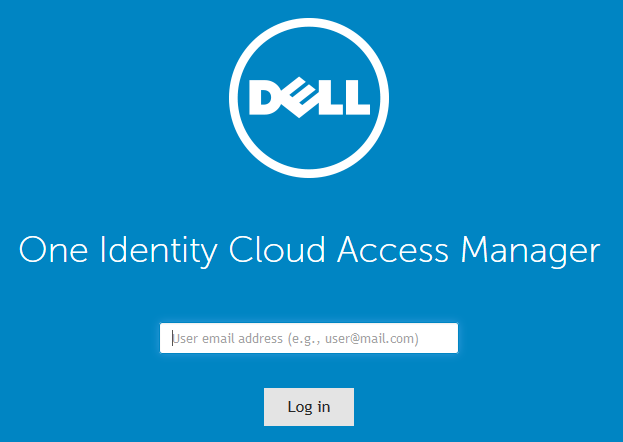
NOTE: The prompt in the text box is configured in the Home Realm Discovery settings page. The user must enter the text as prompted and click Log in. Authentication will then be directed to the selected front-end authenticator. |
Adding a web application
Integrated Windows Authentication
|
1 |
Log in to the Administration Console using the desktop shortcut Cloud Access Manager Application Portal and select Add New from the Applications section on the home page. |
|
2 |
Click Configure Manually. |
|
3 |
|
NOTE: The protocol and FQDN can be obtained from the URL used to access the application. For example, if the application is normally accessed through https://ars.prod.local/ARServerAdmin the FQDN would be ars.prod.local and the protocol would be Secure HTTP (HTTPS). |
The new FQDN should be within the wildcard DNS subdomain created during the Cloud Access Manager installation, which will resolve to the Public IP address used by the proxy. For example, if you created the wildcard DNS subdomain *.webapps.democorp.com during the installation you could use the FQDN owa.webapps.democorp.com to proxy Outlook® Web App. If you did not create a wildcard DNS subdomain for Cloud Access Manager during the installation you need to add this new FQDN into your public DNS manually. The new FQDN should be covered by the wildcard SSL certificate you are using.
|
6 |
You will now see the Permissions page, which enables you to control which users can access the application. By default, all Cloud Access Manager users have access to the application. You can restrict access to the application to users who belong to a specific role, but for this example, simply click Next to allow all users to access the application. |
|
8 |
Select Use primary credentials to log into this application and click Next. This will ensure that ARS uses the user's Active Directory® domain credentials rather than a different username or password unique to the application, for example the same credentials that the user used to authenticate to Cloud Access Manager. For applications that require different credentials, make sure this option is deselected. |
|
9 |
You can now configure how the application is displayed on the Cloud Access Manager Portal. Enter the Title and Description you want to display on the Cloud Access Manager Portal. Many applications will require you to configure a particular entry point, for example for Active Roles Server you would need to add ARServerAdmin in the URL field of the Application Portal page. |
|
NOTE: Take care to ensure that the URL entered is unaltered, even down to subtle changes such as character case, in the example Active Roles Server the URL must be ARServerAdmin. In addition the Add application to application portal home and Allow user to remove application from application portal home options allow you to specify whether the application should automatically appear on each user’s portal page and how the user can manage the application from the application portal. The options are shown in Table 1. |
|
|
|
|
|
|
|
|
|
|
|
To access the application catalog from the application portal, the user simply needs to click their username, then select Application Catalog. Depending on the settings in the Add application to application portal home and Allow user to remove application from application portal home options, the user can add or remove applications to/from the application portal.
|
1 |
Close Internet Explorer® to end your Cloud Access Manager session. |
|
2 |
Use the desktop shortcut Cloud Access Manager Application Portal to open the Cloud Access Manager Portal. |
|
3 |
Log in to the Cloud Access Manager application portal and click the Active Roles Server application. |