
Configuring a front-end authentication method
Microsoft® Active Directory® authentication
Configuring smart card authentication
LDAP authentication
Microsoft® Active Directory® LDS
389 Directory Service
Novell® eDirectory™
Windows Azure™ Active Directory® authentication
SAML federated
WS-Federated
Social authenticators
Integration with password management applications
Primary credentials
Configuring user front-end authentication method selection
Adding a web application
Integrated Windows Authentication
Form fill authentication
Proxy-less form fill authentication
SAML federation
Configuring advanced SAML token settings
Configuring advanced WS-Federation token settings
OpenID Connect/OAuth 2.0
Manual user provisioning
HTTP basic authentication
HTTP header value
No back-end SSO
Exporting an application configuration template
Forwarding claims to federated applications
Adding HTTP headers to proxy applications
Configuring step-up authentication
Configuring front-end authenticators
Configuring each application
Configuring for external users
Configuring Defender as a Service with Cloud Access Manager
Using Dell's Security Analytics Engine
Enabling Dell's Security Analytics Engine
Configuring Cloud Access Manager to use Dell's Security Analytics Engine for access control
Managing your SSL certificate
Obtaining a signed certificate
Replacing an expiring certificate
Installing a fully signed certificate from a certificate archive file
Installing a certificate authority certificate
Changing the Cloud Access Manager service account password
Cloud Access Manager IIS Application Pool
Dell Redistributable Secure Token Server
Front-end authenticators
Reporting
Customizing Dell™ One Identity Cloud Access Manager
Configuring a front-end authentication method
Before users and administrators can log in to Dell™ One Identity Cloud Access Manager you will need to configure a Front-end Authentication method. Typically this will involve configuring the Microsoft® Active Directory® authenticator to authenticate users to your domain, but equally you can configure the SAML or WS-Federated authenticator to authenticate users to a different security authority.
Figure 1. Cloud Access Manager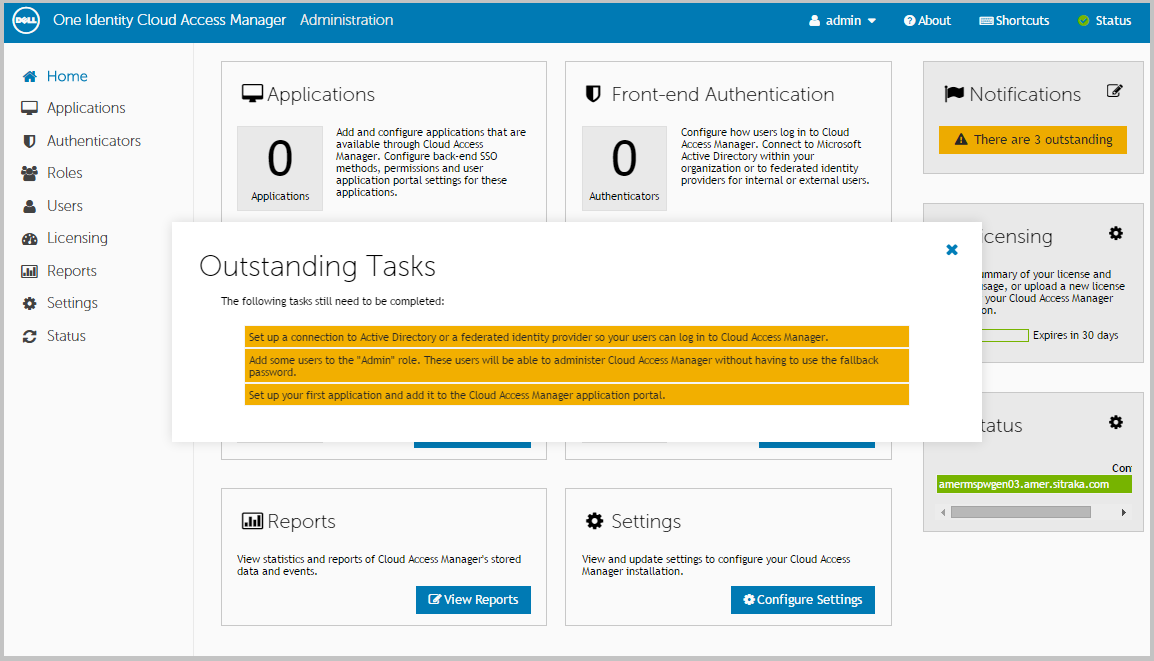
Microsoft® Active Directory® authentication
|
1 |
Log in to the Administration Console and select Add New from the Front-end Authentication section on the home page. |
|
2 |
|
3 |
Enter the full user principal name (UPN), for example johndoe@domain.org, and password of a Windows® domain account that has read access to all user and group objects in the forest (usually a regular user account belonging to the Domain Users group is sufficient). |
|
4 |
Click Test Connection. This will test that Cloud Access Manager can connect to the domain using the credentials provided. When successful, click Next. 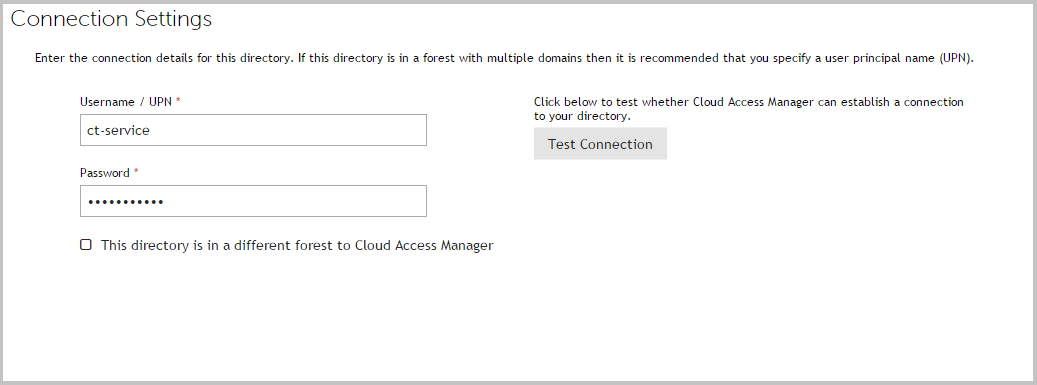 |
|
5 |
The settings on the Primary Authentication screen are split into three sections. When complete, click Next. |
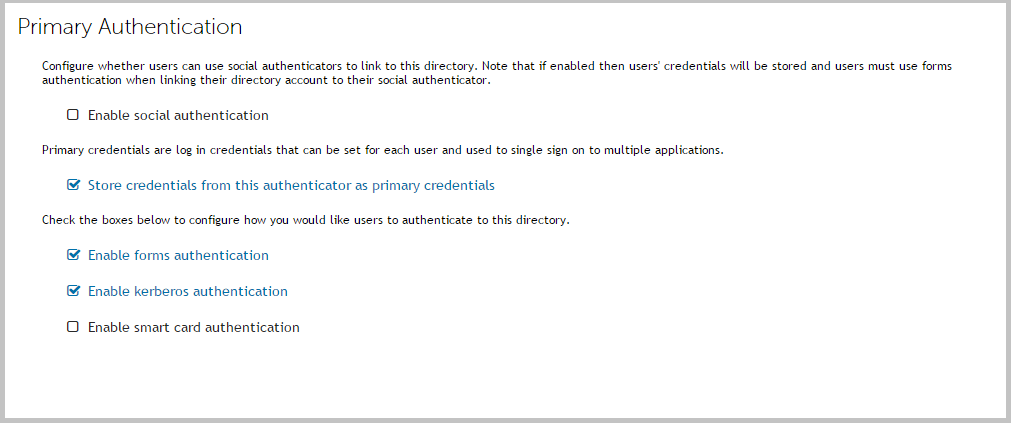
The second section determines whether users’ credentials are stored for accessing other applications. If selected, the credentials used to authenticate to Cloud Access Manager are stored as the Primary Credentials in the user’s Password Wallet. Please refer to Primary credentials for details.
|
a |
Enable kerberos authentication — Cloud Access Manager will check for a Kerberos ticket generated during Windows domain login and supplied by the browser. If the Kerberos ticket is present and valid, then the user will be successfully logged in. Successful Kerberos authentication requires correct configuration of the user's browser. Please refer to Configuring Cloud Access Manager for Integrated Windows Authentication for details. In addition some browsers do not support Kerberos authentication. Please refer to the Dell™ One Identity Cloud Access Manager Installation Guide for browsers that support Integrated Windows Authentication. |
|
b |
Enable smart card authentication — Users are given the opportunity to present an X.509 certificate in order to log in to Cloud Access Manager. The X.509 certificate may be located on a smart card or in the client computer's certificate store. If the certificate is invalid or expired the login attempt will be rejected. Please refer to the section Configuring smart card authentication for details. |
|
c |
Enable forms authentication — Users are prompted for their Active Directory username and password using a login form. |
|
6 |
If you require two factor authentication each time users authenticate to Cloud Access Manager, select Use two factor authentication for all applications from the Two factor authentication mode list. Select the method of authentication from the Type of two factor authentication list. For information on how to configure the various authentication types or how to configure two factor authentication only for specific users or applications, refer to Configuring step-up authentication. When compete, click Next. |
|
7 |
In the Authenticator Name field, enter the name that will be used to identify the authenticator within Cloud Access Manager, then click Finish. |
|
8 |
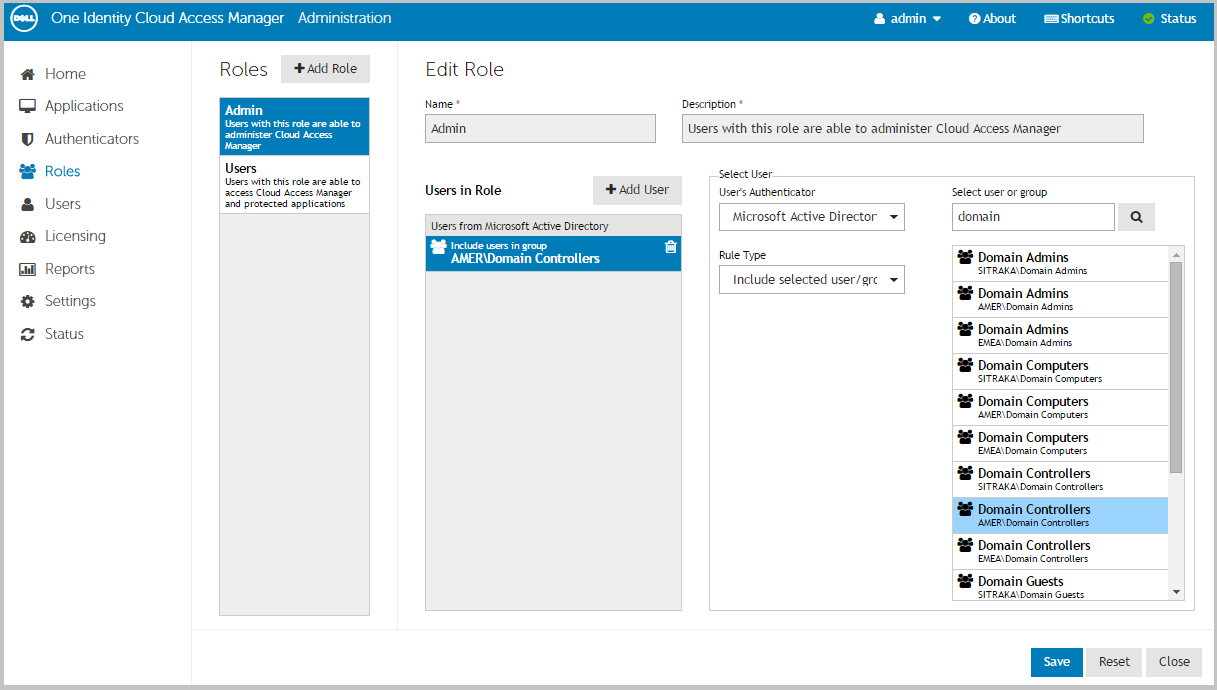
You have now created the front-end authentication method. Click Edit Roles. Before Cloud Access Manager administrators and users can log in to Cloud Access Manager using their Active Directory credentials, you must tell Cloud Access Manager how to identify administrators and users based on their Active Directory group membership. For example, the Domain Admins group for Cloud Access Manager administrators and the Domain Users group for regular Cloud Access Manager users. |
|
9 |
Click Admin. |
|
10 |
|
13 |
Click Save. |
|
15 |
Click +Add User. |
|
18 |
Click Save. |
|
19 |
Click Close to return to the Cloud Access Manager Administration Console. The configuration is now complete. Cloud Access Manager administrators and users can now log in to Cloud Access Manager using their Active Directory credentials. |
|
NOTE: This step is not required when using the Proof Of Concept (POC) installation type. This uses the built-in system account rather than a dedicated service account. |
|
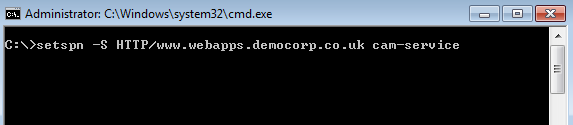
• |
To create an SPN, you need the name of the service account specified during the Cloud Access Manager installation and the hostname assigned to the proxy for the Cloud Access Manager portal. This is the account name and the hostname entered in the section Installing Cloud Access Manager, in the Dell One Identity Cloud Access Manager Installation Guide. |
Where <hostname> is the hostname assigned to the proxy for the Cloud Access Manager portal and <account> is the name of the service account specified during the Cloud Access Manager installation.
|
3 |
Add Cloud Access Manager to Internet Explorer's Local intranet zone. To do this, click Tools |Internet options | Security | Local Intranet | Sites | Advanced. Verify that the website address displayed matches the Cloud Access Manager application portal address noted in Step 2, then click Add. 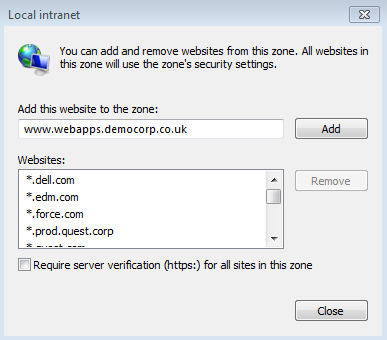 |
|
4 |
Next, click Tools | Internet options | Security | Local Intranet | Custom level to verify that the local Intranet zone has the default logon option of Automatic logon only in Intranet zone selected. 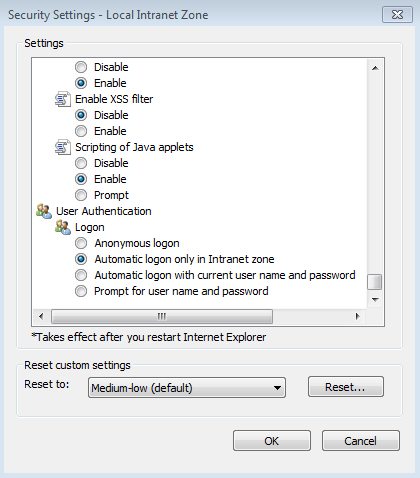 |
|
5 |
Check that Enable Integrated Windows Authentication is selected in the Internet Explorer Advanced panel. 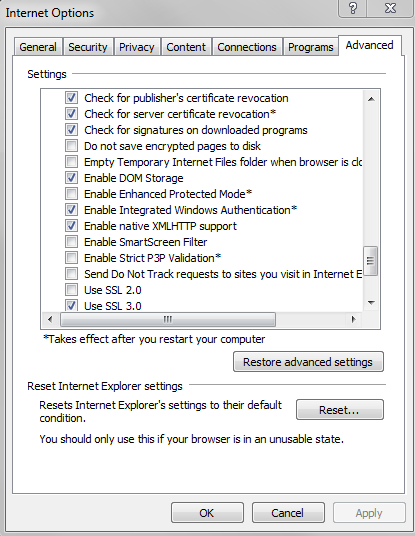 |
|
3 |
Add Cloud Access Manager to the Google Chrome local intranet zone. To do this, click the Chrome menu Customize and control Google Chrome | Settings | Show Advanced Settings... | Network | Change proxy settings... This will open Internet Explorer's Tools |Internet options | Connections. |
|
4 |
Next, click Security | Local Intranet | Sites | Advanced. Verify that the website address displayed matches the Cloud Access Manager application portal address noted in Step 2, then click Add. |
|
5 |
Next, follow from Step 4 in the section Configuring Microsoft® Internet Explorer® to single sign-on to the Cloud Access Manager portal. |
|
3 |
|
4 |
Search for the setting network.negotiate-auth.trusted-uris |
|
5 |
Double click the network.negotiate-auth.trusted-uris setting and edit it by entering the hostname of the Cloud Access Manager application portal noted in Step 2. If the setting already contains a value, separate the existing and new values with a comma. The value entered into this setting should contain only the hostname of the application portal and should not contain the https:// protocol prefix or the portal path.  |
Configuring smart card authentication
Cloud Access Manager can be configured to require your Microsoft® Active Directory® users to present an X.509 Certificate as a means of authentication. The certificate can be stored on a standards-based smart card or in the user’s local certificate store.
|
1 |
On the Primary Authentication page ensure that Enable smart card authentication is selected. In this example we will not allow other authentication methods. |
|
2 |
Select the Enable certificate revocation list checking box to cause Cloud Access Manager to check the Certificate Authority's Certificate Revocation List (CRL) to ensure the user’s certificate has not been revoked. If the user's certificate has been revoked, the login request will be denied. |
|
3 |
Export the certificate from your Certificate Authority in .pem or base-64 encoded format, copy it to the Cloud Access Manager STS host and upload it using the Choose File control on this page. In order to perform X.509 certification authentication, the public signing certificate of the root Certificate Authority must be uploaded into Cloud Access Manager. |
Configuration of smart card authentication for Microsoft Active Directory front-end authentication is now complete.
|
1 |
|
3 |
To determine the User Principal Name, open the user object in Active Directory Users and Computers. |
|
4 |
Click the Account tab and concatenate the User logon name with the domain name that follows it, as shown below. 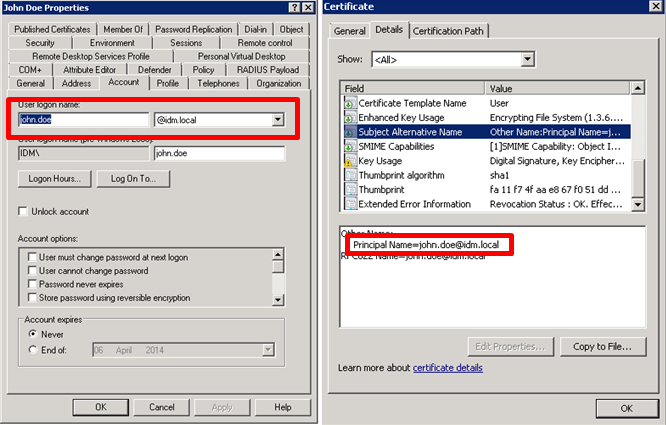 Click Next. Click Next. |
LDAP authentication
|
1 |
Log in to the Administration Console and select Add New from the front-end Authentication section on the home page. |
|
2 |
|
a |
In the Comma separated list with optional ports field, enter either a single host or a comma separated list of hosts, including the port. The default port is 389 (or 636 if the Use secure LDAP? box is selected). If you want to use a different port, it should be explicitly specified on a per host basis. |
|
b |
In the DN of User to Bind With field, enter a user account to use to connect to the directory, for example, cn=administrator,cn=users,dc=company,dc=com The account must have the appropriate privileges to allow it to read user and group information from the directory. |
|
c |
In the Object Class of Users field and Object Class of Groups field, enter appropriate object classes to distinguish users and groups. |
|
d |
In the Attribute Mappings section, complete the attributes as required. The User’s Unique ID Attribute field and Group’s Unique ID Attribute field are usually left empty. They will default to the object’s distinguished name. |
|
NOTE: The User’s Unique ID Attribute is used to link to the Group’s Members Attribute, so it is important that they are in the same format. |
|
e |
When you have entered the required configuration information, click Test Connection to verify the configuration. Click Next. |
|
3 |
The settings on the Primary Authentication screen are split into two sections. When complete, click Next. |
|
a |
Store credentials from this authenticator as primary credentials — Determines whether the user's credentials are stored for accessing other applications. If the box is selected, the credentials used to authenticate to Dell™ One Identity Cloud Access Manager are stored as the Primary Credentials in the user's Password Wallet. Please refer to Primary credentials for details. |
|
b |
Enable social authentication — Determines whether users are allowed to use social authenticators, for example Facebook or Google, and link to the selected authenticator when authenticating to Cloud Access Manager. |
|
4 |
Click Next. |
|
5 |
If you require two factor authentication each time users authenticate to Cloud Access Manager, select Use two factor authentication for all applications from the Two factor authentication mode list. Select the method of authentication from the Type of two factor authentication list. For information on how to configure the various authentication types or how to configure two factor authentication only for specific users or applications, refer to the Configuring step-up authentication section. When compete, click Next. |
|
6 |
In the Authenticator Name field, enter the name that will be used to identify the authenticator within Cloud Access Manager, then click Finish. |
|
7 |
You have now created the front-end authentication method. Click Edit Roles. Before Cloud Access Manager administrators and users can log in to Cloud Access Manager using their directory credentials, you must tell Cloud Access Manager how to identify administrators and users based on their directory group membership. For example the admins group for Cloud Access Manager administrators and the users group for regular Cloud Access Manager users. |
|
8 |
Click Admin. |
|
9 |
|
12 |
Click Save. |
|
14 |
Click Close to return to the Cloud Access Manager Administration Console. The configuration is now complete. Cloud Access Manager administrators and users can now log in to Cloud Access Manager using their directory credentials. |