Links to frequently visited objects are stored in the favorites list in the Manager.
Figure 5: Favorites list in the Manager

To copy an entry to the favorites in the Manager
To delete an entry from the favorites in the Manager
The favorites list has its own toolbar and context menu.
Table 17: Meaning of entries in the special toolbar in the Manager
|

|
Sort your favorites alphabetically. |
|

|
Sort your favorites by object type. |
|

|
Delete all favorites. |
|

|
Delete selected favorites. |
Table 18: Entries in the context menu of the favorites list in the Manager
|
Open on new tab |
The object is opened in a new form in the document view. |
|
Search |
The system looks for objects in the favorites list. |
|
Remove selected favorites |
The selected favorites are removed from the favorites list. |
|
Tasks |
A submenu shows all the tasks that are available for the selected object. Select one of the tasks to open the relevant form. |
|
Properties |
Show other properties of the active object. This menu item is only available in expert mode. |
Related topics
When you select an object in the result list, the first available form is displayed in document view. As a minimum, the following forms are displayed for each editable object:
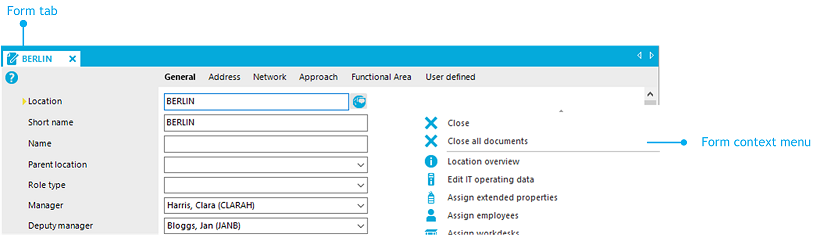
Every form has a form tab bar that displays the selected object according to a set display template. For objects that were marked as pending during a synchronization, the display template is provided with the [Outstanding] ID.
Every form has a context menu with form-specific entries. In expert mode, you can use the Properties entry in the form context menu to view additional object properties and the permissions.
Figure 6: Form in the Manager
To open the forms for an object:
-
When you select an object on the result list, the first form always opens (usually the overview form).
-
From the result list, select single objects one after the other to update the opened form in the document view. Only one form is open at a time.
-
To open other forms, select the task from the task view or from the form's context menu.
To display multiple forms in the document view:
-
Use Alt + Click or the Open on new tab context menu to open the objects.
This means that you can quickly switch between objects without having to reload the object from the list again. The forms stay open when you switch between categories.
To close the forms:
By default, an object‘s overview form is displayed first. You can, however, configure the program to show the edit form for the object first, which allows faster editing.
To enable quick edit mode:
-
In the Manager, use the  icon in the result list.
It is only possible to quick edit the selected object.
-
Select the View > Enable quick edit mode menu item.
Restart the program to enable quick edit mode.
-
From the Database > Settings menu item, select the Enable quick edit mode program setting.
Quick edit mode remains enabled even if you restart the program.
The status bar in the Manager also shows the following information when you open a form:
TIP: Double-click the name in the status bar to copy the object definition and the form name to the clipboard.
The forms use different controls and functions.
Related topics
Form elements are used to present the information on the overview forms.
Figure 7: Example of elements in an overview form
The display text of the menu item, the display text for the objects to be shown and the menu item icon are displayed in the header of a form element. Other data represents the object properties and values. There is a tooltip for each property showing a description for use. Some form element entries are highlighted in color when you click on them with the mouse. Then you can click on the entry to switch to the referenced object.
If the form element is used for mapping lists, the items are displayed with their names. The number of items is shown in the form element header. There is also an icon in the form element header for showing and hiding the items. A tooltip is also shown for the list items.
Table 19: Form element icon
|

|
Show list items. |
|

|
Hide list items. |
NOTE: Objects marked for deletion and outstanding objects are struck through on the overview form.
Input fields are used to edit strings, numbers, and dates. A default context menu is available for input fields. Mandatory input fields are marked with a triangle  . Whether an input field is required or not depends on the minimum column length defined in the model tables. Other required fields are defined in the customizers.
Figure 8: Input field with required field

TIP: You can use the Ctrl + Alt + Enter key combination to enlarge the input fields for entering multiline texts.
