Running consistency checks
You should run a consistency check at regular intervals, as well as after significant changes to the system configuration. Tests are performed at database, table, and object level. There are already predefined tests available. You can run your own custom tests.
To run a consistency check
-
In the Designer or the Manager, start the Consistency Editor with the Database > Check data consistency menu item.
During start up, One Identity Manager schema table definitions are loaded and database objects are made available for testing.
-
Specify the test settings.
-
In the Consistency Editor toolbar, click  .
.
-
Enable the test that is to be run and adjust the test settings further if necessary.
- Click OK.
NOTE: In the Designer, the test settings dialog opens immediately after the Consistency Editor is started.
-
Start the consistency check. The following test procedures are available in the Consistency Editor for this:
-
Checking all test objects
NOTE: To exclude individual test objects from the check, use the Disable item in the context menu to disable these test objects in the list view before the check starts.
Use the  button to start the check.
-
Checking single test objects
In the list view, select the relevant test objects and start this check by selecting Test.
TIP: Use Shift + select or Ctrl + select to select more than one test object to be checked.
NOTE: To stop a check that is in progress, click  in the Consistency Editor toolbar.
-
Verify error output.
-
Repair errors if necessary.
Displaying test objects and test status
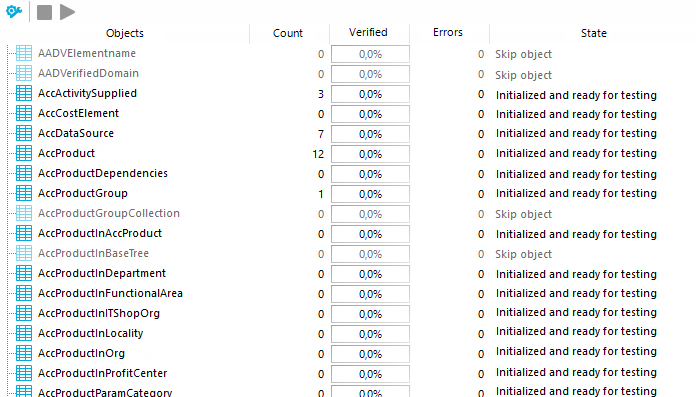
When Consistency Editor is starting up, One Identity Manager schema table definitions are loaded and database objects are made available for testing. The database tables, the number of objects per table and the test status are displayed in the Consistency Editor’s list view.
TIP: To sort by a specific column, click on that column in the table header.
Figure 10: Consistency Editor with Initialized Data

Table 31: List view information
|
Object |
Test object name. |
|
Count |
Total number of objects in the database table. |
|
Verified |
Test progress in percent. |
|
Errors |
The number of error that occurred during a consistency check. |
|
Status |
Current test status. The status is updated during the consistency check. |
Table 32: Meaning of list view icons
|

|
Test object is currently being test. |
|

|
Consistency check was successful for this Test object. |
|

|
Consistency check for this test object is complete but errors occurred. |
Table 33: List view context menu items
|
Enable |
Enables selected test object(s) for the period of the consistency check. |
|
Disable |
Disables selected test object(s) for the period of the consistency check. |
|
Test |
Starts running the consistency check for the selected test object(s). |
|
Skip |
Skip the test object during the consistency check. |
Logging test results
During the consistency check, the number of tested objects and the test status is updated in the editor’s list view. Once the test has completed, any error messages are outputted to the Consistency Editor error log.
Table 34: Meaning of icons in the error log
|

|
Shows all error messages. |
|

|
Only shows errors in the selected objects list view. |
|

|
A full description of the error is shown in a separate window. |
|

|
Fixes the error. |
|

|
Saves the error messages in a log file. |
|

|
Deletes the error messages. |
TIP: For a detailed description of an error, double-click the error message.
Repairing errors in the consistency check
If automatic error correction is possible, the Consistency Editor error log offers a Repair button.
To correct faulty data
-
Select the error entry in the Consistency Editor error log.
TIP: Use Shift + select or Ctrl + select to select several entries for repair.
-
To start error correction, click Repair.
The correction is made directly in the One Identity Manager database. Resulting data changes are made using the One Identity Manager Service.
NOTE: When repairing templates, dependent objects can also be changed. In certain cases, a large number of dependent objects are changed and saved. Additional processes may be generated.
.
button to start the check.
in the Consistency Editor toolbar.


