Enabling SSH access to the One Identity Safeguard for Privileged Sessions (SPS) host
Exclusively for troubleshooting purposes, you can access the One Identity Safeguard for Privileged Sessions (SPS) host using SSH.
Completing the Welcome Wizard automatically disables SSH access to SPS. Re-enabling it allows you to connect remotely to the SPS host and login using the root user. The password of the root user is the one you provided in the Welcome Wizard. For details on how to change the root password from the web interface, see Changing the root password of One Identity Safeguard for Privileged Sessions (SPS).
|
|
Caution:
Accessing the One Identity Safeguard for Privileged Sessions (SPS) host directly using SSH is not recommended or supported, except for troubleshooting purposes. In such case, the One Identity Support Team will give you exact instructions on what to do to solve the problem. For security reasons, disable SSH access to SPS when it is not needed. For details, see "Enabling SSH access to the One Identity Safeguard for Privileged Sessions (SPS) host" in the Administration Guide. |

The following encryption algorithms are configured on the local SSH service of SPS:
-
Key exchange (KEX) algorithms:
diffie-hellman-group-exchange-sha256
-
Ciphers:
aes256-ctr,aes128-ctr
-
Message authentication codes:
hmac-sha2-512,hmac-sha2-256
SSH access is, by default, protected against brute-force attacks: after 20 unsuccessful login attempts, the offending IP is blocked from accessing the SSH service for ten minutes.
You can turn off brute force protection by unselecting the Protect against brute-force attacks option for the SSH server.
To enable SSH access to the SPS host
-
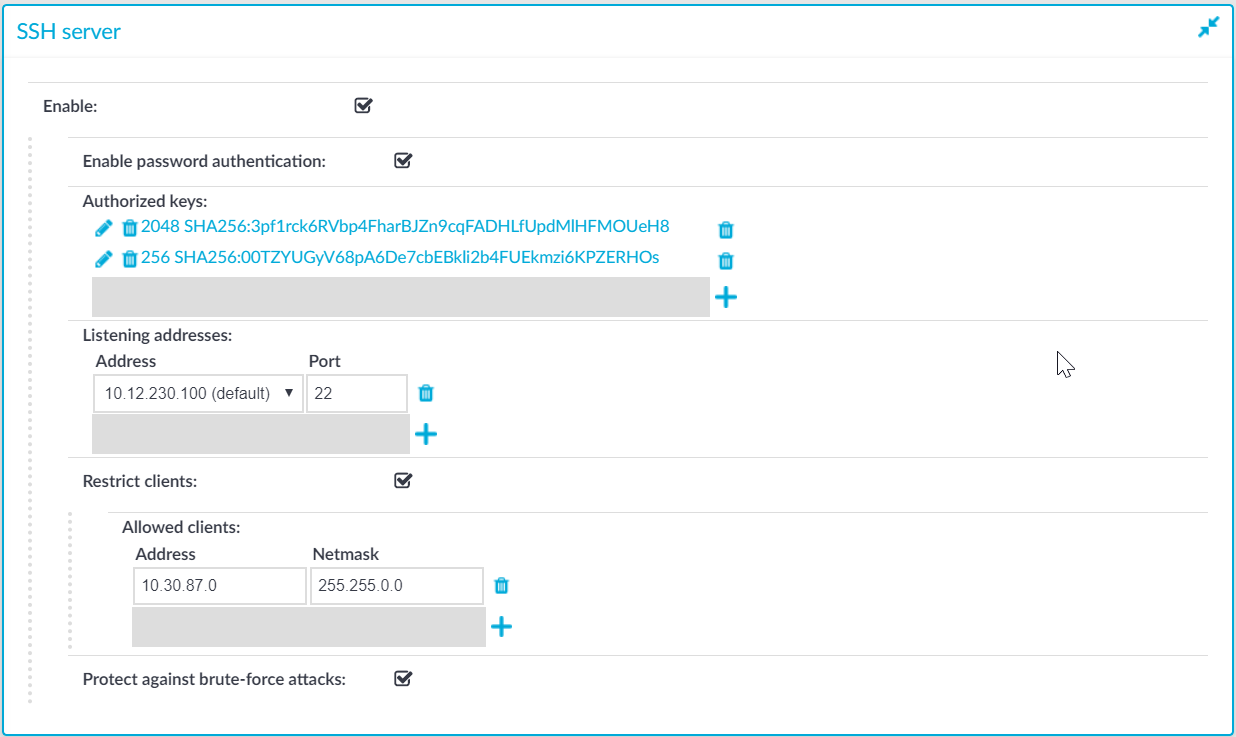
Navigate to Basic Settings > Local Services > SSH server.
Figure 131: Basic Settings > Local Services > SSH server — Enabling remote SSH access to SPS
-
Select the Enable option.
NOTE: Remote SSH access is automatically disabled if Sealed mode is enabled. For details, see Sealed mode.
-
Choose the authentication method for the remote SSH connections.
-
To enable password-based authentication, select the Enable password authentication option.
-
To enable public-key authentication, click
in the Authorized keys field, click
and upload the public keys of the users who can access and manage SPS remotely via SSH.
SPS allows you to use the following SSH host keys:
-
RSA (ssh-rsa), which is the most widely used public-key algorithm for the SSH key. In SPS, uploading RSA SSH host keys are supported in PKCS #1 PEM, PKCS #8 PEM, OpenSSH (openssh-key-v1), and PuTTY private key formats.
NOTE:
One Identity recommends using 2048-bit RSA keys (or stronger).
-
Ed25519 (ssh-ed25519), which offers a better security and faster performance compared to RSA.
In SPS, uploading Ed25519 SSH host keys are supported in PKCS #8 PEM, OpenSSH (openssh-key-v1), and PuTTY private key formats.
-
ECDSA NIST P-256 (ecdsa-sha2-nistp256), which is a variant of the Digital Signature Algorithm (DSA). In SPS, uploading ECDSA SSH host keys are supported in SEC1 PEM, PKCS #8 PEM, OpenSSH (openssh-key-v1), and PuTTY private key formats.
You can have multiple SSH server host keys on SPS for the same server, however, you cannot set more than one key for each type. For example, you can keep your old RSA SSH key and generate a new Ed25519 key but you cannot set two RSA keys.
-
-
-
Choose an address and a port for the SSH server in the Listening addresses section.
The available addresses correspond to the interface addresses configured in Basic Settings > Network > Interfaces. Only IPv4 addresses can be selected.
To add multiple addresses, click
-
(Optional) To permit SSH acces only from selected subnets or IP addresses, select Restrict clients, click
Use an IPv4 address.
To add multiple addresses, click
-
Click
.