Deploying Defender EAP Agent
To benefit from using two-factor authentication over the EAP protocol, you need to install the Defender EAP Agent on the Network Policy Server and on the VPN client computer. Then, you need to configure the Network Policy Server and the VPN client computer for working with the Defender EAP Agent.
To deploy the Defender EAP Agent, complete the following steps:
Step 1: Install Defender EAP Agent
You must install the Defender EAP Agent on the Network Policy Server, and on the VPN client computer.
To install Defender EAP Agent
- Run the DefenderEAPAgent.exe file supplied with the Defender distribution package.
- Complete the wizard that starts.
IMPORTANT:
- When installing Defender EAP Agent on the Network Policy Server, on the Installation Complete step of the wizard, clear the Create a VPN connection with Defender now check box, and then click Finish.
- When installing Defender EAP Agent on the VPN client computer, on the Installation Complete step of the wizard, select the Create a VPN connection with Defender now check box, click Finish, and follow the wizard that starts to create a new VPN connection.
- After completing the wizard, restart the computer on which you have just installed Defender EAP Agent.
Step 2: Configure Network Policy Server
To configure the Network Policy Server
- On the Network Policy Server, start the Network Policy Server tool (nps.msc).
- In the left pane, expand the Policies node to select Network Policies.
- In the right pane, right-click the network policy you want to use for Defender, and then on the shortcut menu click Properties.
- In the dialog box that opens, click the Constraints tab.
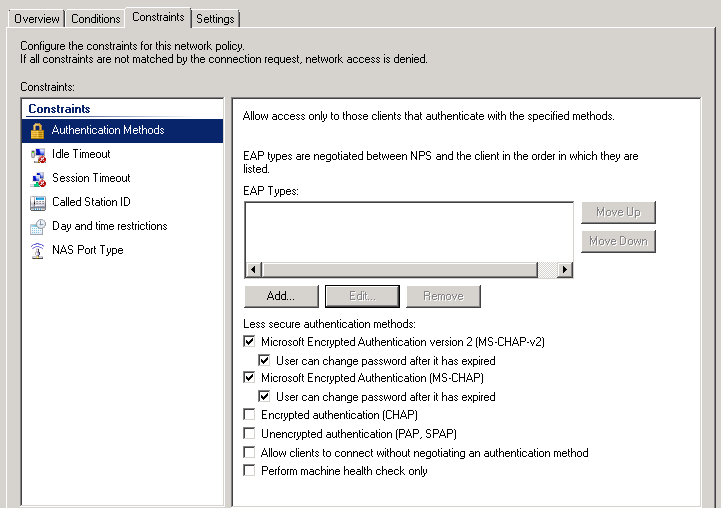
- Below the EAP types list, click the Add button.
- In the dialog box that opens, select Defender 5 from the list, and then click OK.
- In the EAP types list, select the Defender 5 entry you have just added, and then click the Edit button below the list. The following dialog box opens:
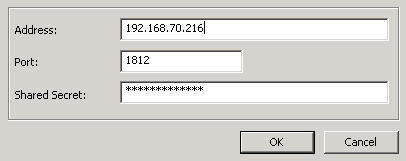
- Use the following elements:
- Address Type the IP address of the Defender Security Server you want to use for user authentication
- Port Type the port used by the Access Node to which the specified Defender Security Server belongs.
- Shared Secret Type the shared secret that corresponds to the Access Node.
- Click OK.
Step 3: Configure VPN connection on the client computer
In this step, you need to configure the authentication settings of the VPN connection you created on the VPN client computer.
To configure VPN connection
- Open the properties of the VPN connection you created on the VPN client computer in Step 1: Install Defender EAP Agent.
- In the Properties dialog box, click the Security tab.
- Make sure that in the Authentication area you select the Use Extensible Authentication Protocol (EAP) option, and then select Defender 5 (encryption enabled) from the list below the option:
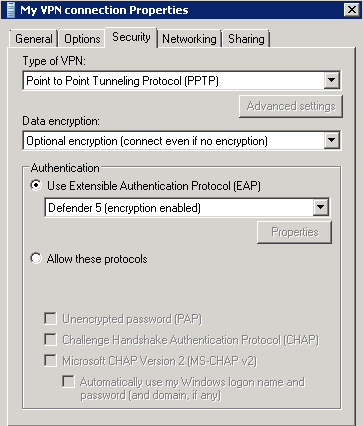
- Click OK to close the dialog box.
Now when you connect through the configured VPN connection on the client computer, a Defender dialog box opens prompting you to type the response provided by your token.
